
As an SEO expert and a WordPress developer myself, I know the importance of using HTTPS on our website and also understand the critical significance of forcing HTTPS on WordPress websites. If we fail to do so after implementing a new SSL on our website, it will increase the chance of accessing our website on a non-secure (HTTP) version by typing the URL directly or by following old links on SERP.
We all understand that this situation is unfavorable, both in terms of user experience and Google’s perception, when its bots index our websites. That is why it is crucial to properly install SSL certificates and redirect all users from the non-secure HTTP version to the secure HTTPS version.
If you are experiencing similar issues with your blog, this guide will provide you with multiple approaches to enforce HTTPS on your WordPress website.
So, read this article till the end for proper guidance.
Author’s Note:
If you want to force HTTPS on your WordPress website without using a plugin, then you need to edit the ‘.htaccess’ file, a core file of WordPress. And be careful when modifying this file, as any errors can lead to your website becoming inaccessible.
And it’s highly recommended to create a full backup of your WordPress site before making any changes to the file. To do so, use the free version of the UpdraftPlus plugin.
Once you’ve configured UpdraftPlus, you can effortlessly back up your website with just one click.
Ways to Force HTTPS on WordPress

You can force HTTPS on WordPress in different ways, including:
- Force HTTPS on WordPress using a free plugin
- Force HTTPS on WordPress by editing the ‘.htaccess’ file
- Force HTTPS on WordPress using CloudFlare.
Below I have explained all three ways to force HTTPS on WordPress with the step by step instructions. You can follow these instructions to accomplish your task of forcing HTTPS on WordPress.
How to Force HTTPS on WordPress Using a Free Plugin?
If you’re a beginner with no coding experience or are someone who finds server-side interfaces difficult to use, then using a plugin to force HTTPS on WordPress is best for you.
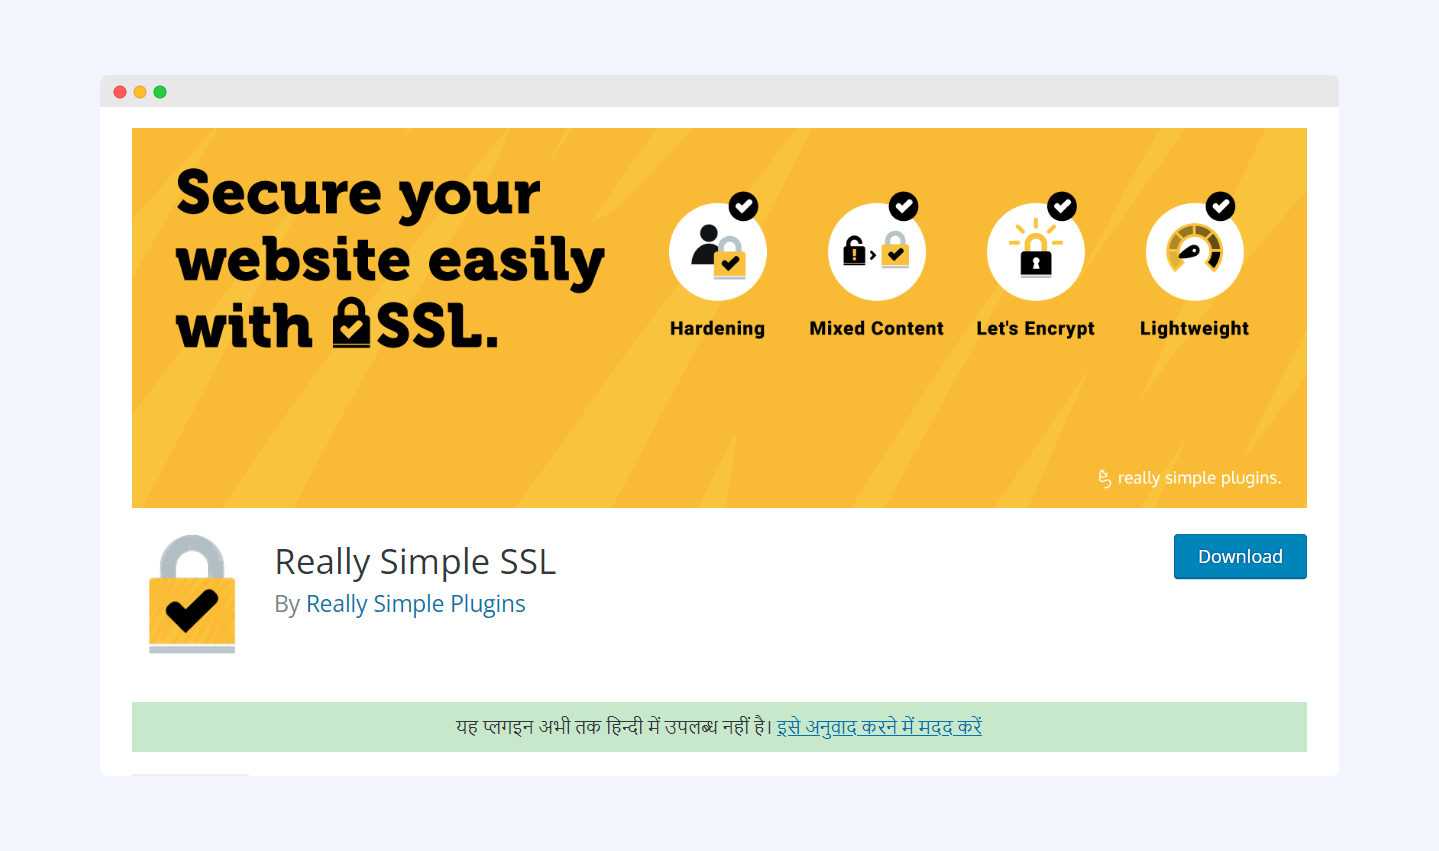
You can find many free and paid plugins in the WordPress repository for doing so, and one of them is “Really Simple SSL” which I usually use on every blog I own. The setup of this plugin is too easy, and I never encountered any issues while using this plugin on my website.
First of all, you need to log in to your WordPress dashboard.
After that, you need to click on “Plugins > Add New,” and then search for the “Really Simple SSL” plugin.
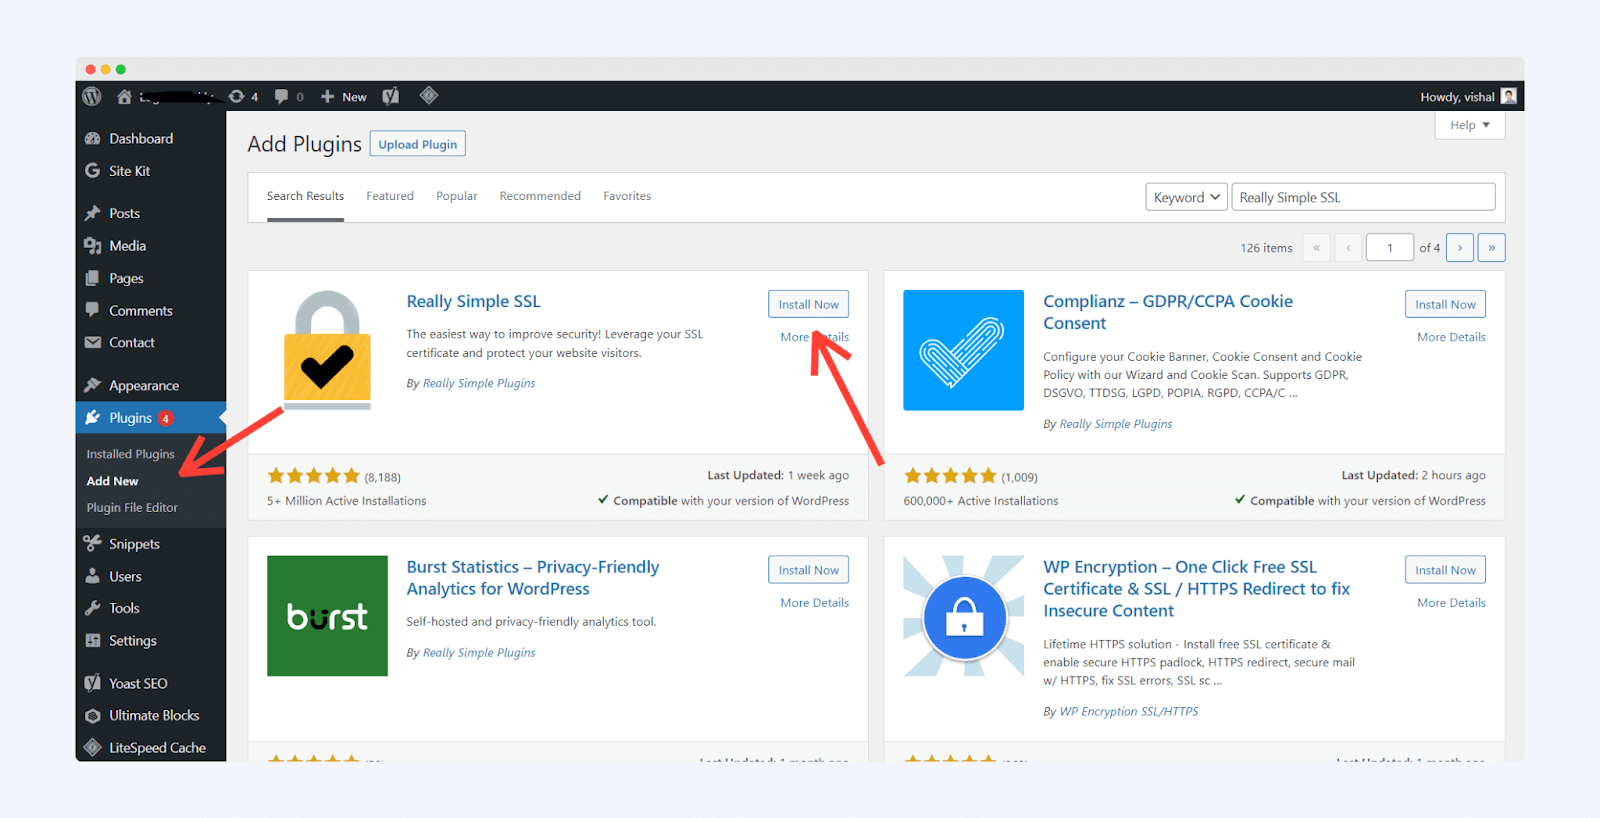
Once you find the plugin, click on “Install” and then “Activate” to install and activate the plugin on your website. After the plugin is installed on your website, you need to enable HTTPS redirection.
After completing the setup, visit your website, and you’ll notice that it now serves content securely using HTTPS instead of the unsecured HTTP version. Additionally, any mixed content issues should be resolved.
Also, note that this plugin is not the permanent and foolproof solution to the issue, but it works in most conditions, mostly this plugin is used to solve the “Mixed Content” error on WordPress websites.
How to Force HTTPS on WordPress by Editing the ‘.htaccess’ File?
Modifying the “.htaccess” file to force HTTPS on your WordPress site is the most reliable and permanent solution for your website without using tons of plugins and slowing down your website. Editing this “.htaccess” file is quite simple, and you can do it through cPanel, FTP connection, or by simply using a plugin like “Htaccess Editor by WebFactory.”
In this tutorial, I’ll show how to edit the “.htaccess” file using cPanel. You need to carefully follow the instructions below to complete the process – but make sure to download the full backup of your website before doing so, as it might also break your website.
Before editing the “.htaccess” file, you need to update your WordPress website’s general settings. First, log in to your WordPress site by visiting “yourdomain.com/wp-admin,” entering your username and password, and then clicking the login button.
You’ll be redirected to your WordPress admin area. Scroll down and find the “Settings > General” option. On this page, you’ll see the “WordPress” and “Site URL Address” fields.
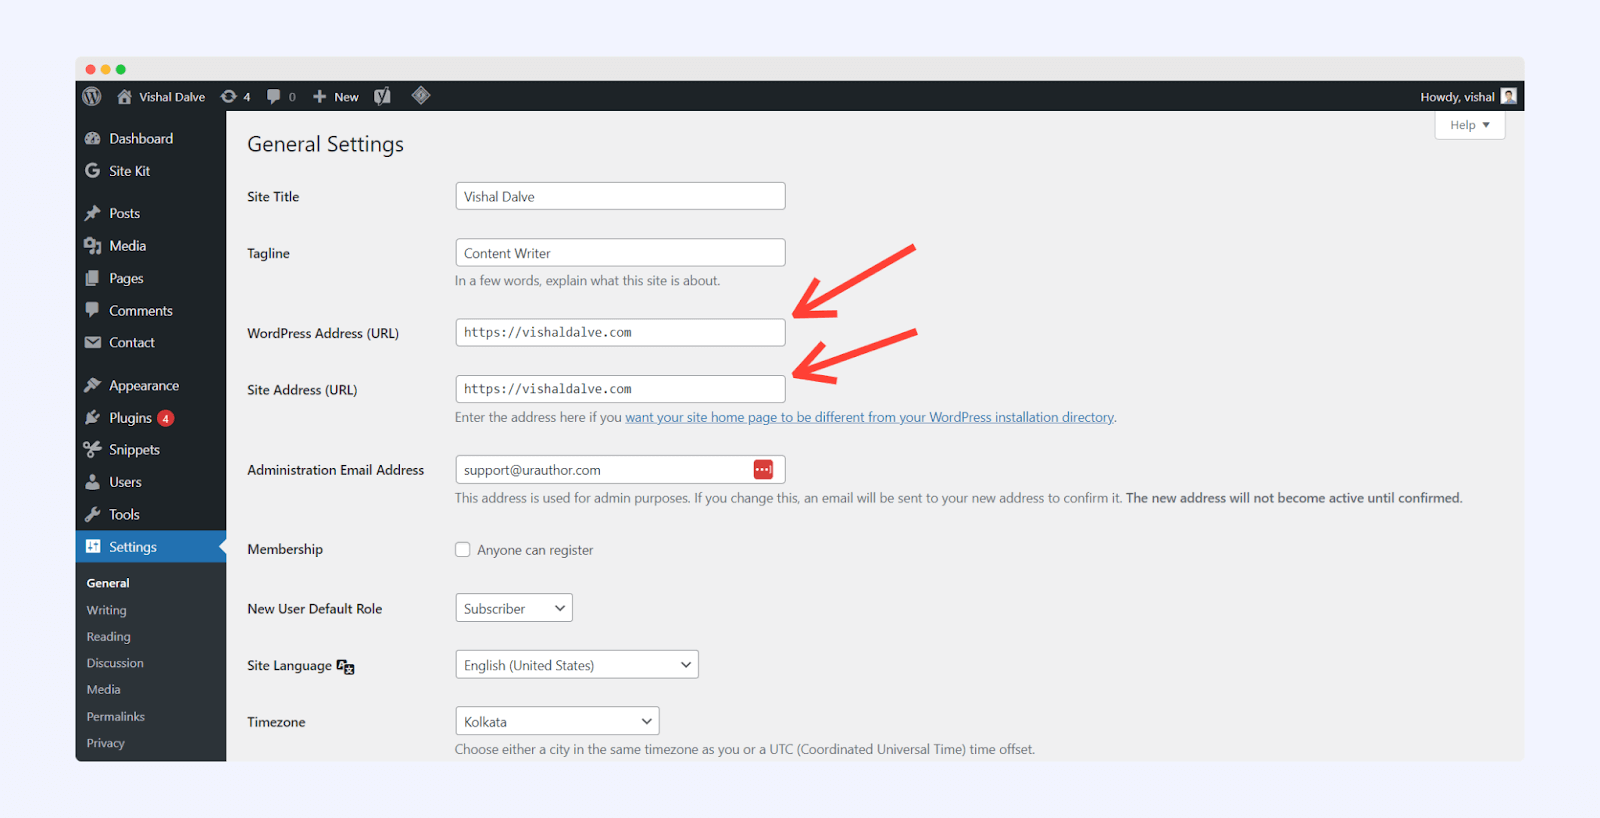
Now, you need to replace HTTP with HTTPS in both fields, as I’ve done in the image above. Once you’ve made these changes, you need to click on “Save Changes” to save all these changes to the database.
After that, you need to log in to your cPanel account.
Once you’ve logged in to your hosting control panel (cPanel), you’ll need to modify the “.htaccess” file to set up 301 redirects from all HTTP URLs to their HTTPS counterparts. This ensures that users will be directed to the secure HTTPS version of your website, even if they enter the HTTP URL or click on an old HTTP hyperlink.
To do this, follow these steps:
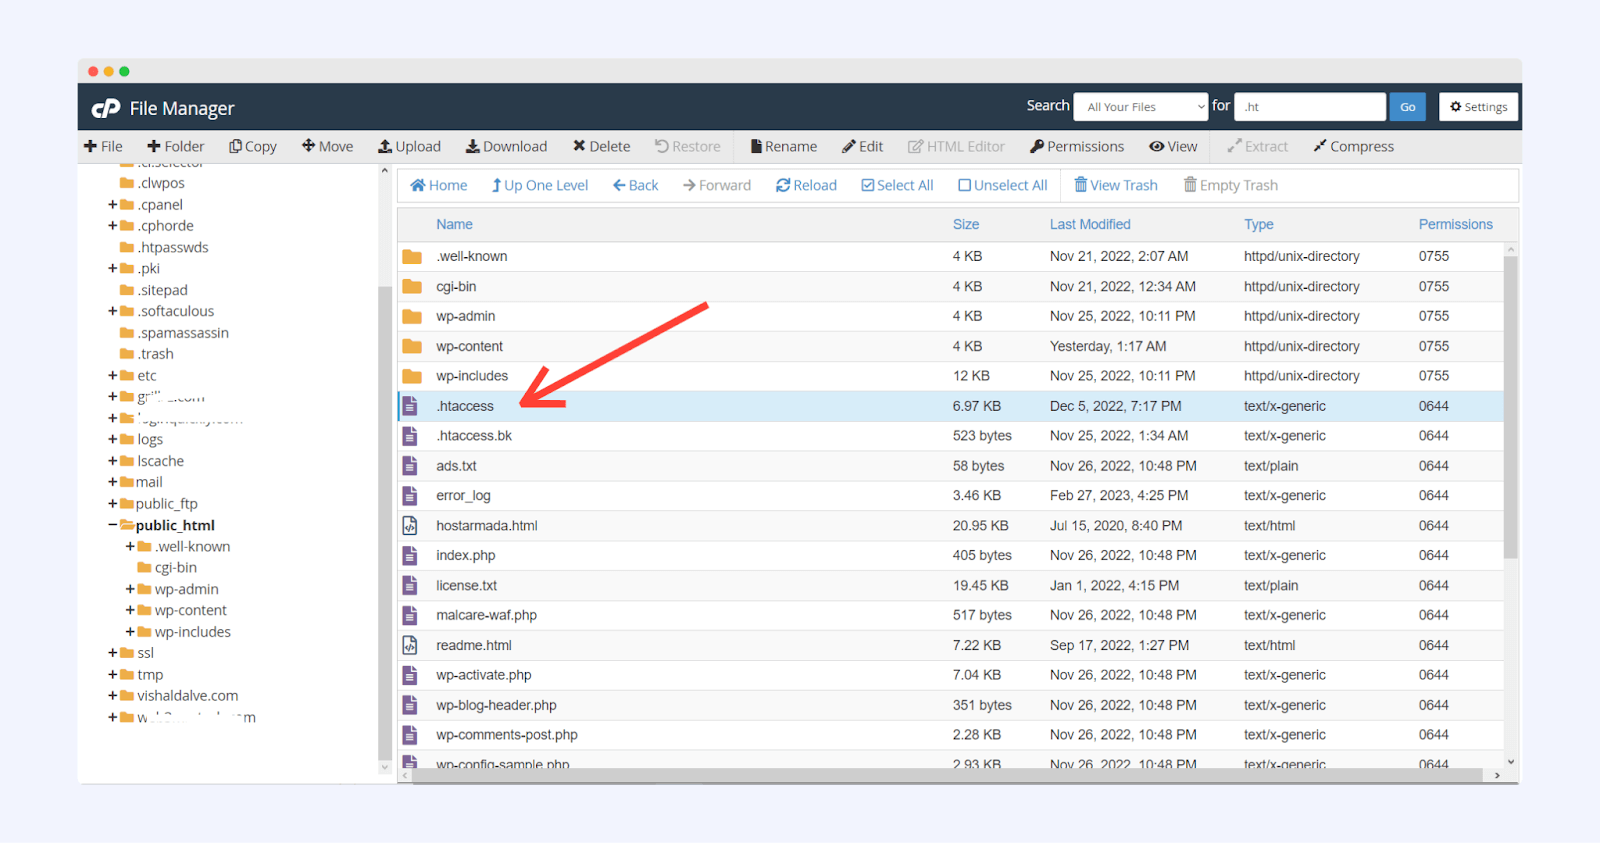
- Log in to your server’s cPanel.
- Navigate to “File Manager > public_html” to locate the ‘.htaccess’ file.
- Right-click on the “.htaccess” file and select “Edit” to open it in the web code editor.
💡 Keynote:
In case you’re not able to find the “.htaccess” file on your web server, it might be hidden. And to edit it, you’ll first need to unhide the file. Here’s how you can do it;
- In your cPanel’s File Manager, click on the “Settings” button located in the upper-right corner.
- In the “Preferences” window, check the box next to “Show Hidden Files (dotfiles)” and click on the “Save” option.
- The “.htaccess” file should now be visible, allowing you to edit it as needed.
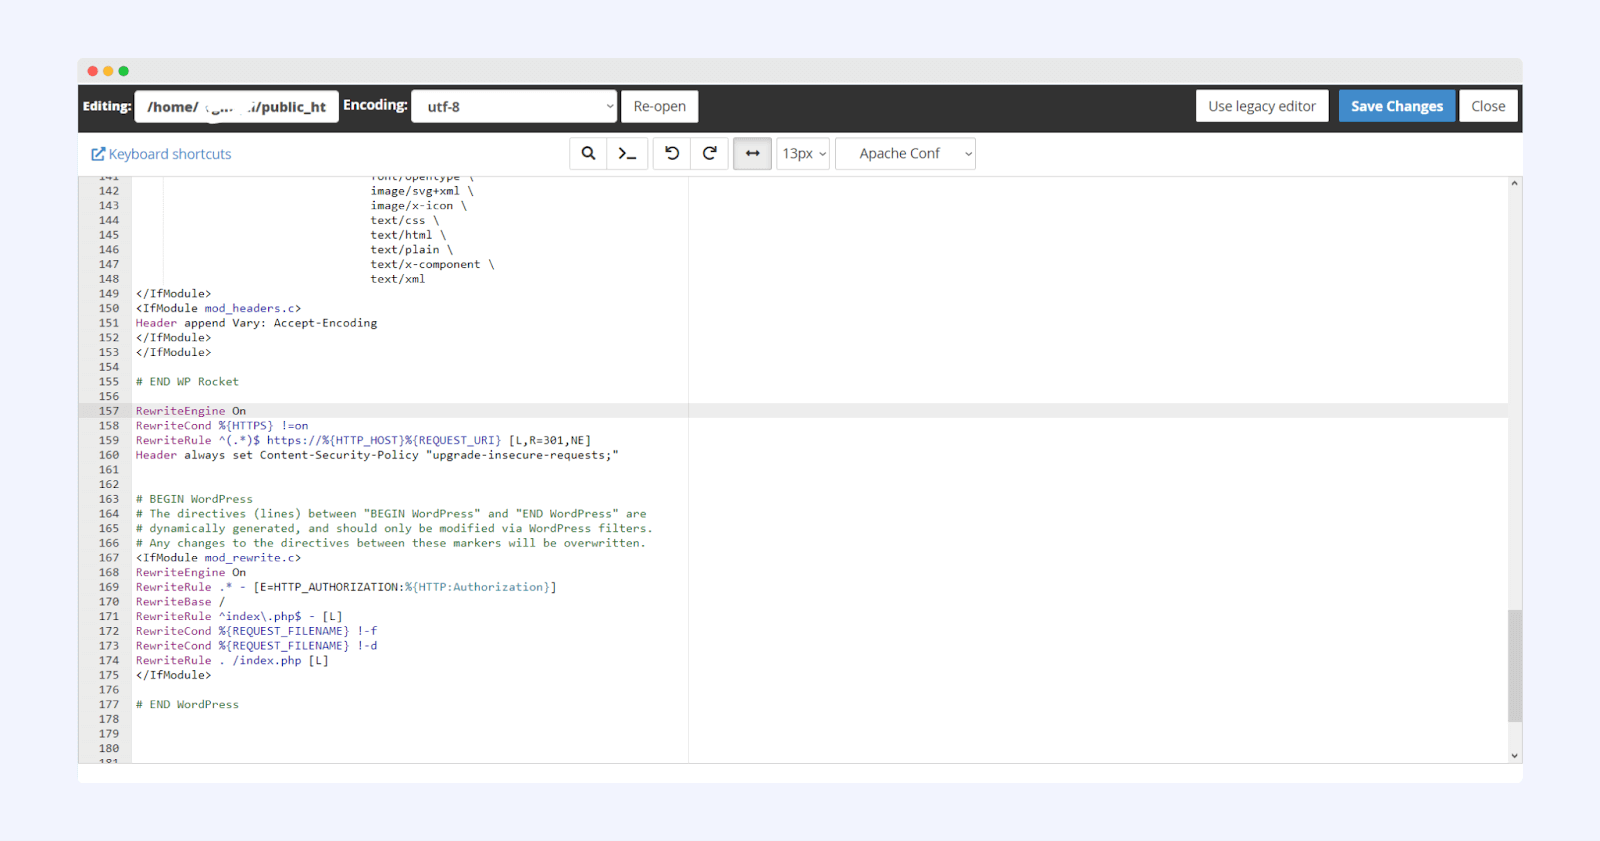
Once you’re inside the .htaccess file, you need to insert the code we’re sharing below;
RewriteEngine On
RewriteCond %{HTTPS} !=on
RewriteRule ^(.*)$ https://%{HTTP_HOST}%{REQUEST_URI} [L,R=301,NE]
Header always set Content-Security-Policy "upgrade-insecure-requests;"
Once you’ve added the code to your .htaccess file, click on “Save the file” to save the changes. Now you’ve done half of the work.
This will redirect the site from HTTP to HTTPS – but now you might encounter a “Mixed Content” error when you visit your website. This error occurs because the media files on your site are still using the old HTTP version.
Follow the below steps to solve it;
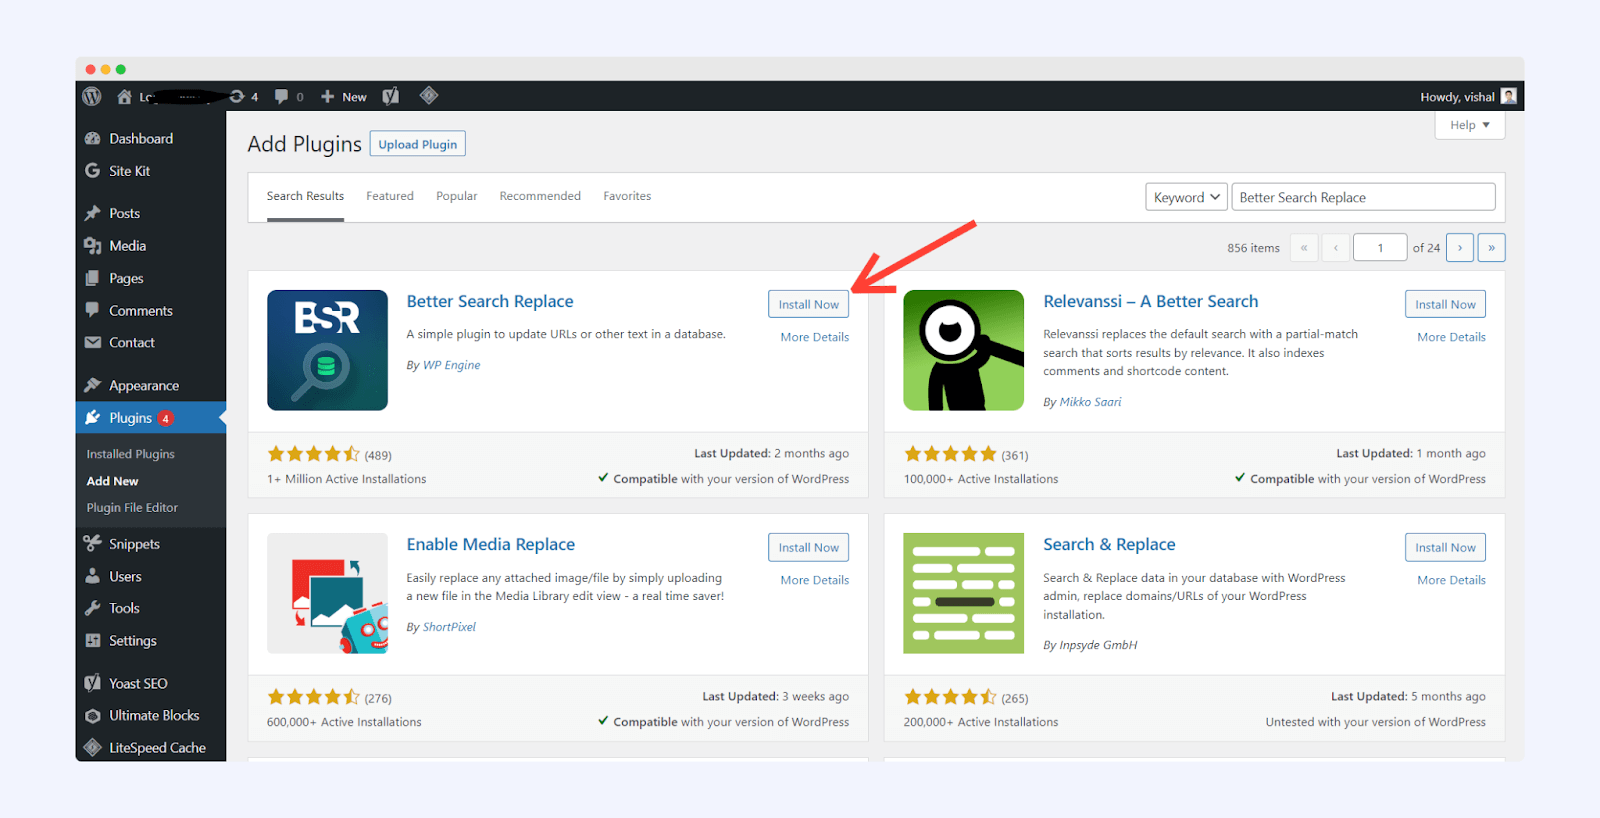
To fix the mixed content issue on your website, you need to change the image and other media URLs to HTTPS from HTTP. To do so, install the “Better Search Replace” plugin on your WordPress website, and follow these steps:
- Log in to your WordPress dashboard.
- Navigate to “Plugins” and click on “Add New.“
- In the search bar, type “Better Search Replace” and hit Enter.
- Locate the plugin in the search results, then click “Install” followed by “Activate” to enable the plugin on your site.
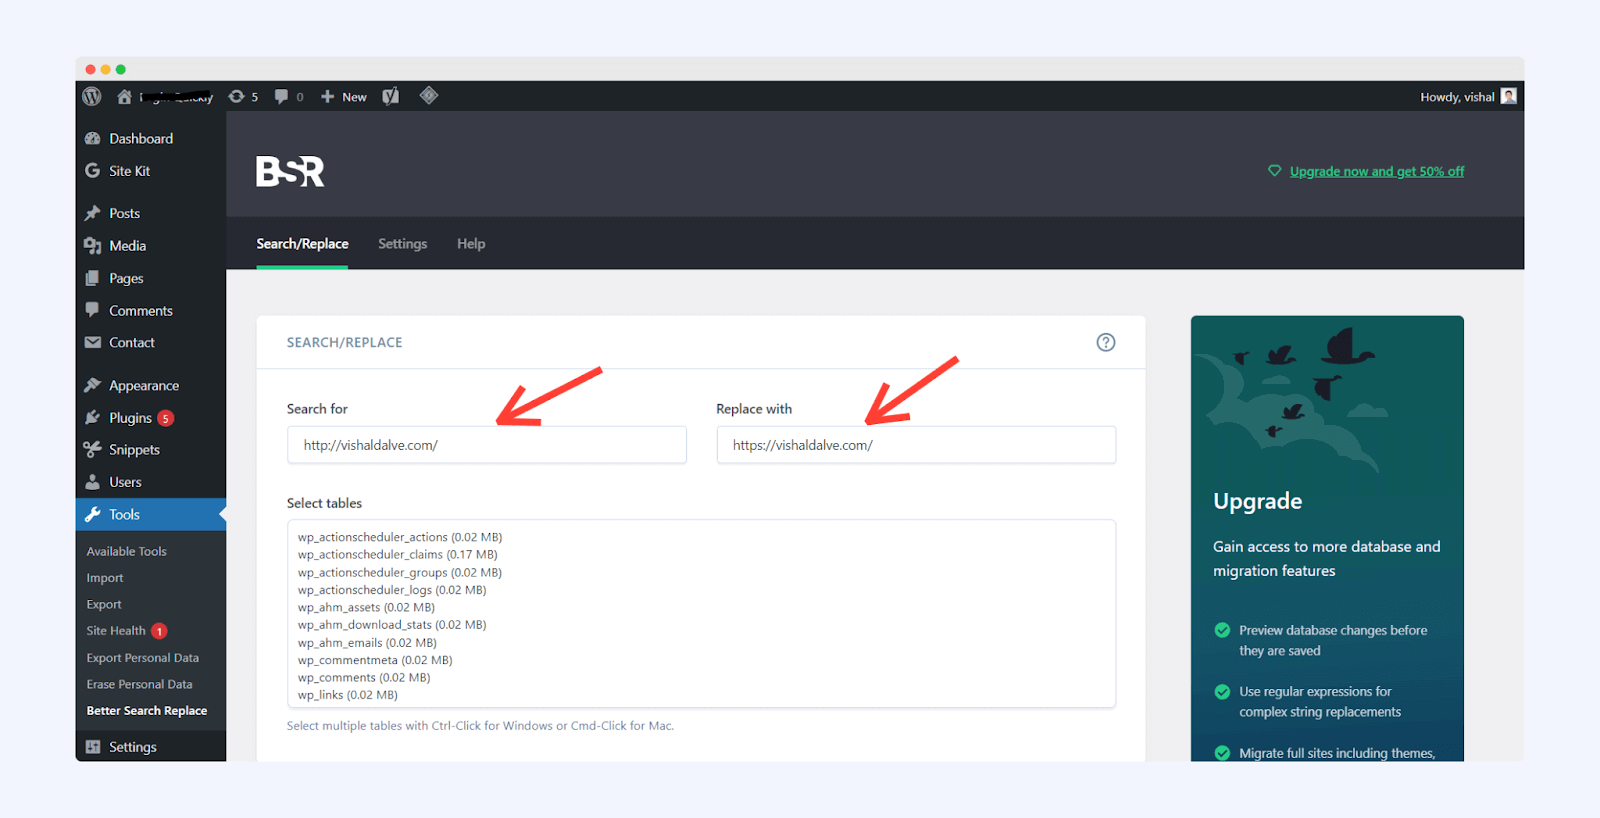
To use the “Better Search Replace” plugin to update URLs on your website, follow these steps:
- In your WordPress dashboard, navigate to “Tools” and click on “Better Search Replace.“
- You’ll see two fields: “Search for” and “Replace with.” In the “Search for” field, enter your website’s HTTP URL. In the “Replace with” field, enter the HTTPS version of your website URL.
- Select all the database tables to ensure the plugin updates all HTTP URLs to HTTPS across your entire site.
- Uncheck the box next to “Run as dry run?” to perform the actual search and replace operation.
- Finally, click on the “Run Search/Replace” button to initiate the process.
This plugin will further scan your website’s database tables for all HTTP URLs and replace them with secured HTTPS URLs. The total duration of this process depends on the size of your website’s database, so you need to wait till the process is completed.
Once the process is completed, your website will start loading without any issues in the secure HTTPS format, and you’ll no longer face the “mixed content” errors. If you still encounter these errors, there could be an issue with your website. So we recommend using the browser’s Inspect Tool to identify the problematic file and manually update its URL to the HTTPS version.
Bingo! now you’ve successfully fixed the issues and forced HTTPS on your website.
🤔 Did you know?
If you don’t have access to cPanel, you can still edit the .htaccess file directly from your WordPress dashboard using a free plugin called “Htaccess Editor by WebFactory”.
Alternatively, you can use FTP to edit the files as well. This will allow you to make the necessary changes to your .htaccess file without needing direct access to your hosting control panel.
How to Force HTTPS on WordPress using CloudFlare?
In the two methods we discussed earlier, we have talked about forcing HTTPS by modifying the WordPress file or by using a plugin. However, if you have already linked your WordPress website with CloudFlare, implementing HTTPS becomes much easier for you.
Here’s a step-by-step guide on enabling HTTPS on your website through CloudFlare;
In case you’ve not connected your website with Cloudflare, I highly recommend you doing so to enhance the overall performance of your website and for added security features.
But for now, let’s assume that you’ve connected your website with Cloudflare, now here are the steps you need to follow to activate Cloudflare SSL on your website and to force HTTPS;
First, you need to log in to your Cloudflare account and then select the website from the list. After selecting the website, you need to navigate to the “SSL/TLS” section.
On this page, you’ll find four different options for SSL, and these are;
- Off (not secure)
- Flexible
- Full
- Full (strict)
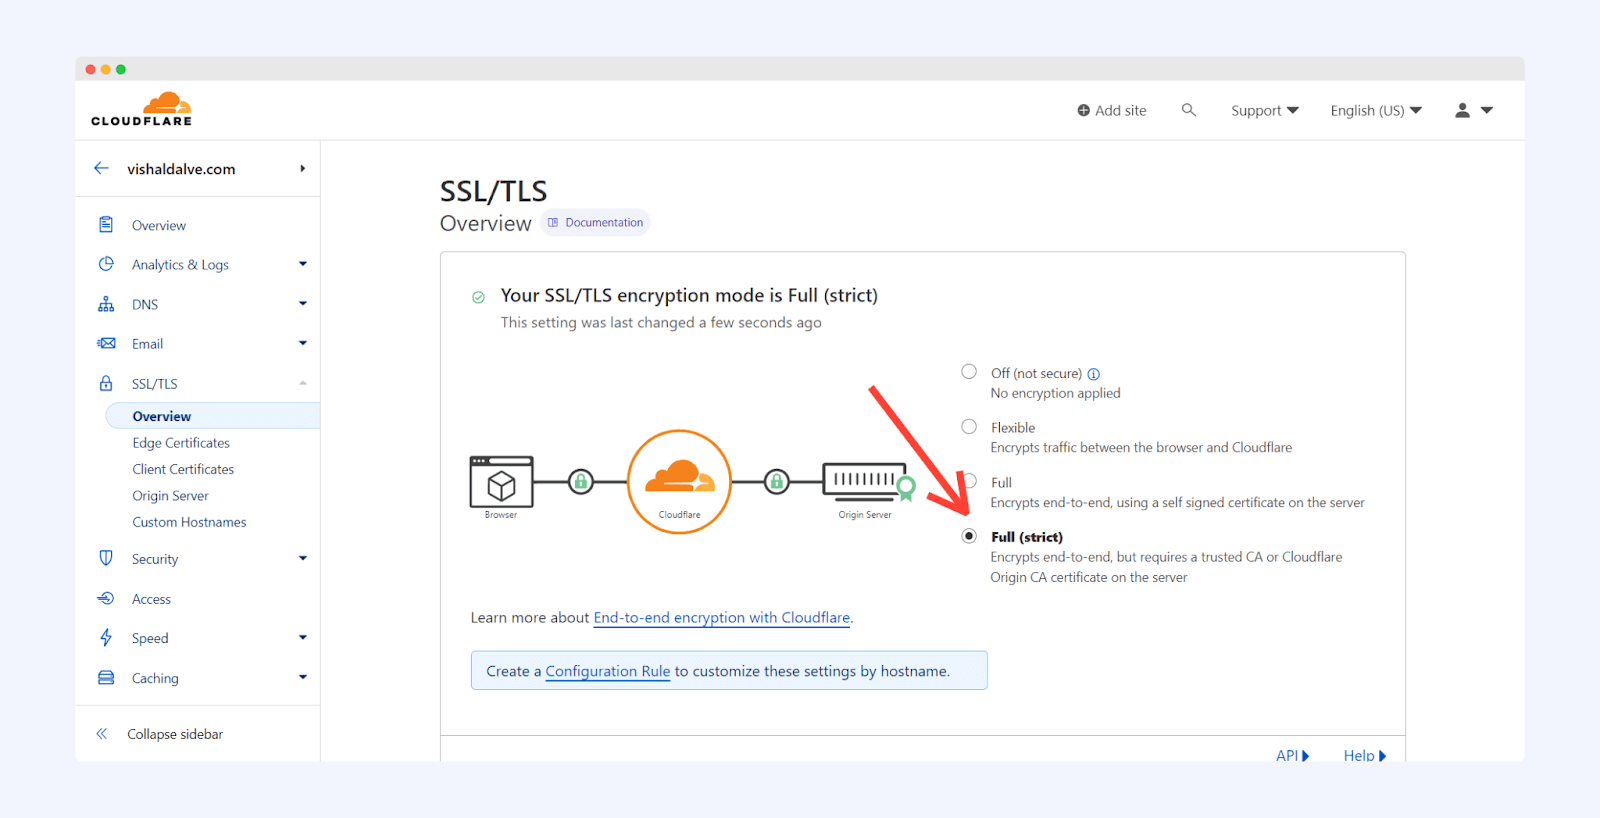
In my case, I’m selecting the “Full (Strict)” option from the list of SSL options.
After selecting the option, you need to navigate to the “Edge Certificate” tab, which is located under the SSL/TLS section. Here, in this section, you’ll find an option with the name “Always Use HTTPS“.
Simply toggle the settings to “On” to enable this option.
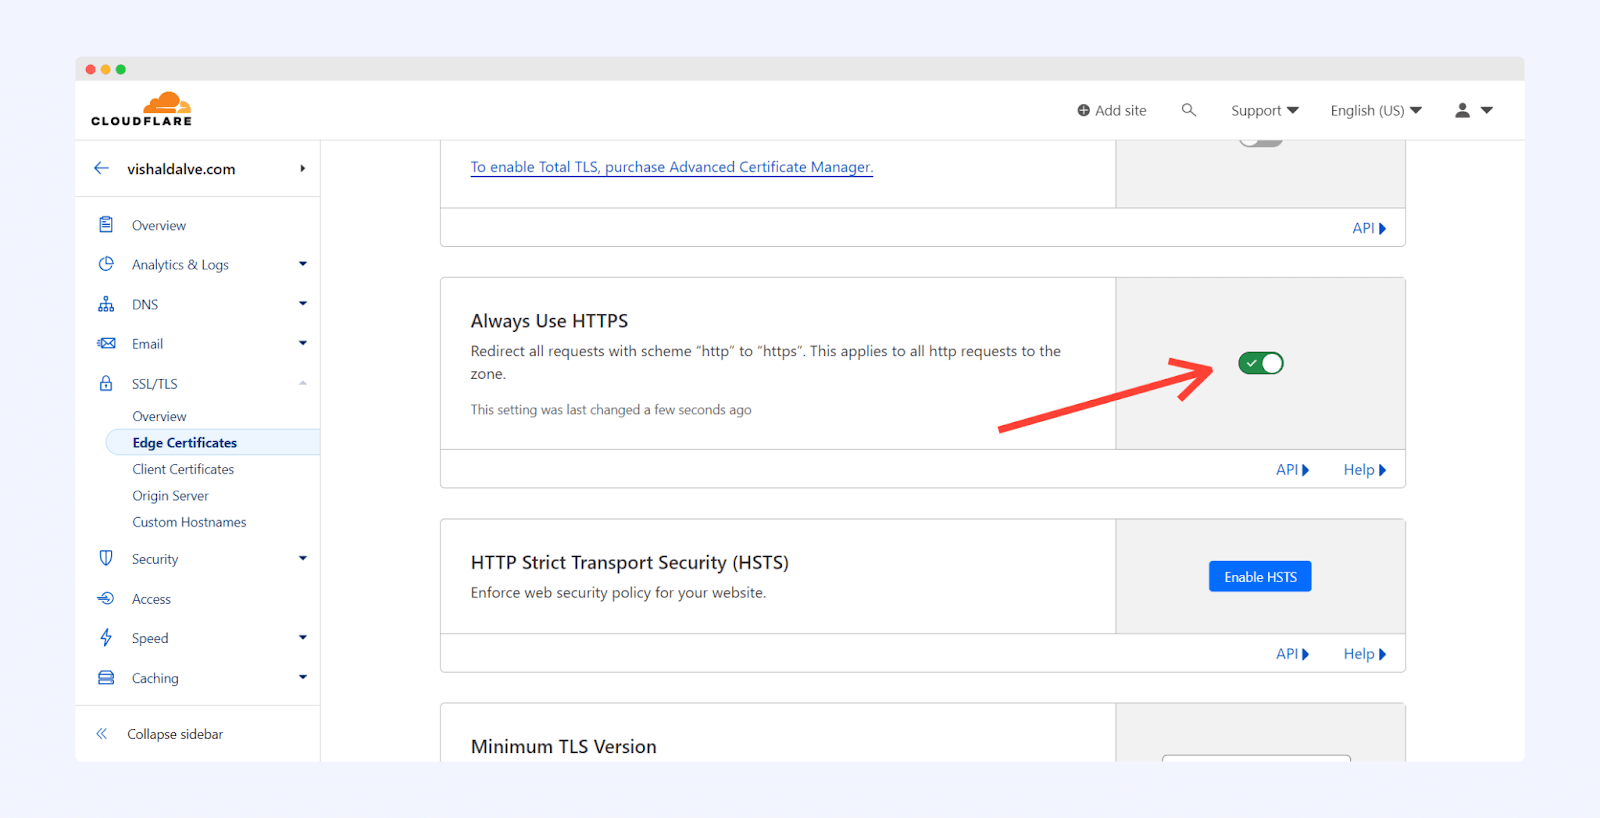
Bingo!
Now, CloudFlare will redirect all the user’s HTTP requests to HTTPS.
Frequently Asked Questions (FAQs)
Here in this guide, I’ve explained how to enforce HTTPS on your WordPress site. However, if you still have any doubts, please refer to these frequently asked questions for further details.
1. How do I add free HTTPS to WordPress?
To enable HTTPS on your WordPress website, you must install an SSL certificate. Most web hosting providers include free SSL certificates with their hosting plans. Check with your provider to install a free SSL on your server.
If your hosting provider does not offer a free SSL, you can still obtain HTTPS for your WordPress site by connecting it to Cloudflare and installing their SSL certificate on your website. As Cloudflare provides SSL certificates at no cost.
2. Why is my WordPress site HTTP, not HTTPS?
This occurs when SSL has not been installed on your WordPress site.
But occasionally, even with SSL installed, your site may still open in HTTP. In such cases, it’s necessary to force HTTPS on your WordPress website.
3. How do I enable HTTPS on my website for free?
You can activate HTTPS on your WordPress site at no cost by obtaining a free SSL certificate. Verify if your web hosting provider offers free SSL; if so, request them to install it.
Alternatively, you can utilize Cloudflare’s free SSL service.
4. Is a website safe if it doesn’t have HTTPS?
No, a website without HTTPS is not considered secure. Google prioritizes ranking sites with secure HTTP connections, so it’s essential to install SSL on your WordPress site.
5. Am I 100% safe using an HTTPS URL?
No, having an SSL certificate installed on your website does not guarantee 100% safety. The security level provided by SSL depends on the type of SSL certificate you have chosen.
6. What is the cost of an SSL certificate?
There are various SSL certificates available for purchase, ranging from a few dollars to several hundred dollars. But for a standard blog or business website, I recommend using the free SSL offered by your hosting provider or Cloudflare.
Final Words
Here in this guide, I’ve shared various methods that might be helpful for you to force HTTPS on your WordPress website. From the methods above, if you’re not sure which method to choose, I recommend using a plugin.
If you want, you can also make changes to your .htaccess file – but if you’re not a coder, you might not be comfortable doing so. Also, editing the code of your website might break your site entirely.
I hope this guide on forcing HTTPS on your WordPress website has been helpful. If you encounter any issues following these steps or have any questions, please leave a comment below.
