

Are you looking to change Font Awesome icon color in WordPress & HTML and not sure how to do it? If yes, then you’re at the right place.
In this article today, I’m going to write a detailed step-by-step guide on changing the fontawesome icon color using a single line of CSS code. You know, there was a time when many of my friends and I faced similar issues on their blogs. Unfortunately, at that time, there were limited resources and guides available on the INTERNET, and we were not a developer, so it was a bit harder for us to make these changes.
I also believe in helping others, so I thought, why not share this and guide others who face similar types of issues on their blog? That is when I came up with this guide, and fret not; this requires only a little knowledge of CSS to change the icon colors.
So, let’s get started…
What is Font Awesome Icon?
For my non-technical friends who are new to this field, I would first like to clarify what Font Awesome Icon is and what you can do with it.

To begin, Font Awesome is one of the biggest icon libraries which is used by plenty of developers, designers, and UI/UX developers. They provide more than 7,000 different types of icons for you to choose from.
If you browse their website, you’ll find different types of icons catering to different needs, like social media icons and UI/web-related icons. They’re one of the best icon websites and are highly preferred by designers because of their easy implementation, vast icon library, flexibility in styling, efficiency, and others.
And things don’t just STOP here; they also provide other exciting options like rotation, pulling, scaling, and animation of the icons.
Why Should You Change Icons Color
There are many reasons you might want to change the color of Font Awesome icons. Maybe the current colors do not match the vibe of your website, or perhaps they don’t provide the aesthetic look you always wanted on your website.
Based on these, here I have listed several reasons why you need to change the color of icons on your website. These are:
- Branding: It is one of the most important reasons why anyone should change the color of icons on their website. I also believe in “Keep it Visible.” To make my website visually appealing, I always prefer to change the icon color to make it more brandable.
- Accessibility: This is another important reason to change the color of your icons. As you know, nearly 300 million people suffer from some kind of visual impairment, and I don’t want them to face any barriers while visiting the website, so in this case, I’ll change the color.
- Emphasis: Colors have their own meaning; red stands for danger, blue for trust, and pink symbolizes love. This same thing applies to websites, too. So, whenever we’re highlighting something on our website, it is really important for us to change the color of its icon, text, and background to make it more noticeable.
- Aesthetics: As I previously said, “Keep it Visible”. I don’t want visitors to feel bored or stressed while surfing my website. So, to make it visually appealing, I always try to add eye-catching colors.
How to Change Font Awesome Color?
Changing the color of the icon in Font Awesome is really easy. You can do it by writing just a single line of CSS code. In this section, I’ll explain how.
So, let’s understand it with some examples:
Suppose you want to change the background color of your social icon button, for example Facebook icon with fa-facebook icon code. You can easily do this by adding a CSS property named “background-color” to either your “fa” or “fa-facebook” CSS class.
For your understanding, here is how you can do it;
.fa-facebook {
     background-color: #243c64;
}
✍️ Author’s Note;
Here in these steps, I recommend using the “background-color” value in the “fa-facebook” properties instead of using it in “fa” property. It’s because if you add the property to “fa” property, it will change the background-color of every font awesome icon present on your website.
Let’s take another example.
Now, suppose you are willing to change the color of the icon instead of the background-color. For this, you need to use the “color” property in either your “fa” or “fa-facebook” CSS class.
For a clear understanding, here is how you can do it;
.fa-facebook {
     color: #243c64;
}
Points to remember:
- If you have the same CSS variable for two or more icons, then using the above method, you will end up changing the color code of both or every icon that has the same CSS variable. So, to prevent this, you need to use CSS inline code.
- Writing inline code is not hard; all you need to do is add style=”color: #243c64″ to the HTML tag of the icon you wanted to apply changes.
Here’s how,
You need to change this code on your website
<i class="fa fa-facebook"><!-- icon --></i>
to this one…
<i class="fa fa-facebook" style="color:#243c64;"><!-- icon --></i>
Also, if you use Page Builder plugins like Elementor, Divi, or Visual Composer, then you don’t need to do all this; instead, you can directly change the Font Awesome color from your Page Builder dashboard.
How to Add CSS Code in WordPress?
It’s very easy to add CSS code in WordPress. You just need to follow these steps after selecting the icon you want to change.
First, click on Appearance, then select Customizer, and at the end, choose Additional CSS. Here, you need to add the CSS code.

After adding the CSS code, click on the “Publish” button at the top left of the page. This will ensure that all changes are saved and are visible on your website.
How to Add CSS Code in Page Builders?
If you use Divi and Elementor to make your website’s landing pages, then this section is made for you. In the following section, you will find the steps to add CSS in Page Builders like Divi and Elementor.
How to Add CSS Code to Change Font Awesome Color in Divi?
If we talk about the page builders, and especially about the Divi builder, then there are two many ways to change the color of your icon. However, I mainly use Divi’s theme options for adding custom CSS codes to my website.
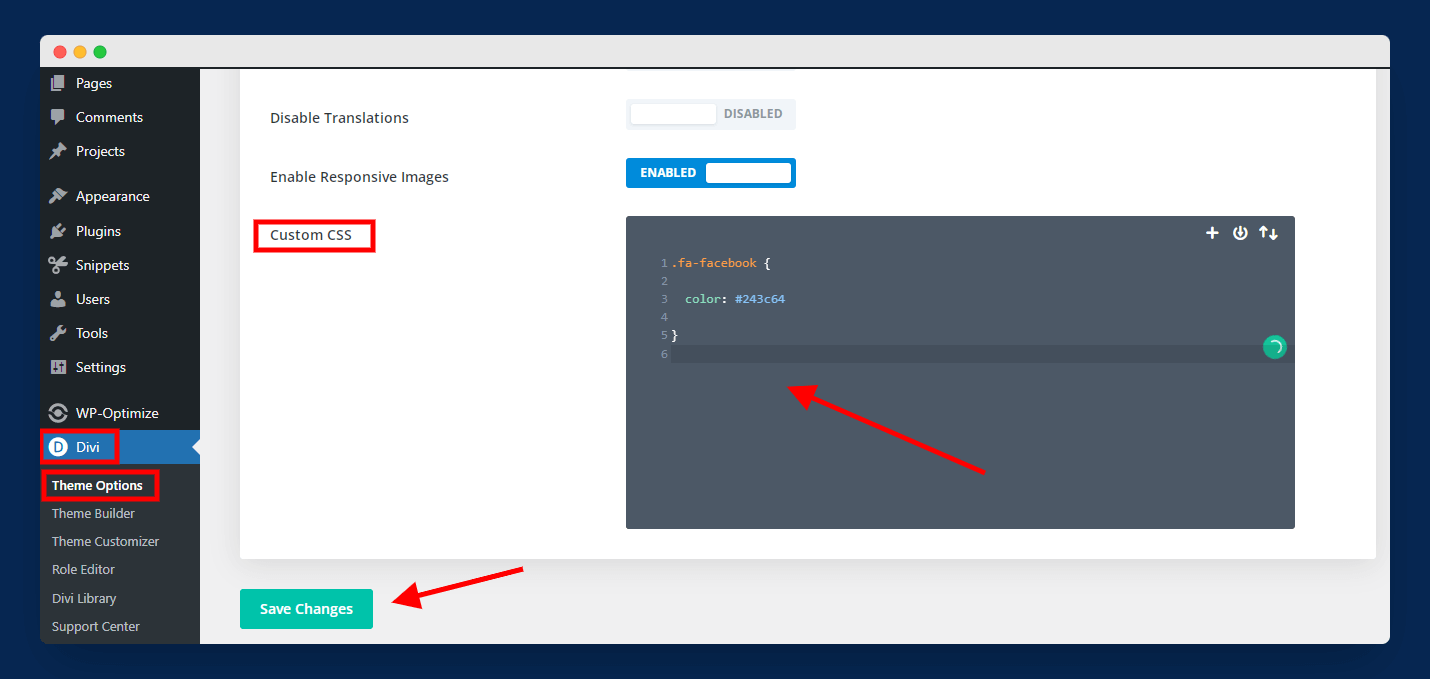
To change the icon color of your Font Awesome, you first need to go to Divi > Theme Options from your WordPress dashboard. After that, you need to scroll down to the bottom of the page, where you’ll see an option to add “Custom CSS”.
Next to the “Custom CSS” option, you’ll see a black box, just enter your CSS code there and then click on the “Save Changes” button.
Isn’t it easy? Now, let’s see how we can add CSS Code to change Font Awesome color in Elementor.
How to Add CSS Code to Change Font Awesome Color in Elementor?
Elementor comes with an icon library of more than 1,500+ font awesome icons, so you don’t need to install anything separately. Although, if you’re looking for the font awesome paid addons, then you can install them on your website.

Once the icons are installed and activated on your servers, you need to click on the three dots, as shown in the image above.
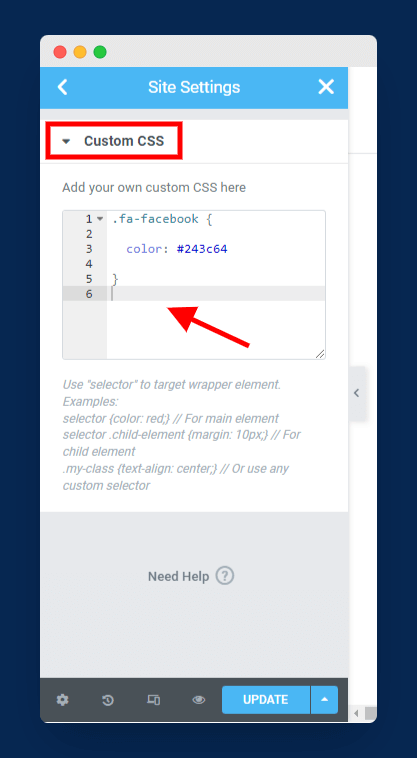
After that, you need to click on the “Site Settings” and from here you need to choose the “Custom CSS” option, like shown in the image. Now, you’ll see a code editor, here you need to add the code we have shared throught in this guide and have to change the name of the icons.
Once done, you’ll immediately see the changed version on your website.
Additional Tips and Tricks
If you have made it this far, then I’m sure you know how to change the color of your font’s awesome icons. Now, it’s time for the bonus section, where I have written some additional tips to improve the overall look of your website.
And these are…
Using Custom Color Palettes
Color palettes are one of the most important things for a website. If you’re building a website, then choosing the right color is as important as other things. Sometimes it is really hard for us to pick the right color, but now, there are a few websites like Adobe Color and Coolors that might help you with this.

To get started, first, you need to open the websites I mentioned above, and then you can select the color combination that best suits your tastes and preferences.
You can also work with a white-label website design agency that will provide you with expert guidance on how you can smoothly add these color palettes to your website for a visually unique appearance.
Animating Icon Colors
It’s 2024, and people love websites with animations. Animating icons will make your website look more appealing and interesting to readers, and people will most likely spend more time on your website.
You can easily do animations using Animate.css and Lottie. They have some amazing ready-made animations, and if you wish, you can create your own custom animations.
Using SVGs for More Customization
SVGs stand for Scalable Vector Graphics. Although there are many options in Font Awesome, the more, the merrier, as they offer a limited range of customization when it comes to color and shape.
SVGs offer greater advantages over Font Awesome, like color editing and intricate detailing. With this, you can design your icon the way you like without any limitations.
Note: Using SVGs needs extra knowledge and tools to edit and optimize them for web use. But it gives you the most control and customization over your icons.
Wrapping Up!
To sum up, you can easily change the color of your Font Awesome icons in just a few clicks and a few lines of code. In this guide, we learned various ways to change the color of icons and also the background color of the icons.
You can use this same way to change the color of other icons from different brands.
I’m sure this article has helped you find the answers you’re looking for. If it does, don’t forget to share our article with your fellow bloggers who are facing this same issue on their websites. If you still have doubts, you can also comment with your questions, and I’ll be happy to answer them.
That’s all from my side. Happy learning.
