
Image optimization is one of the most crucial processes that impact the SEO of a website. If you optimize your images correctly, then the chances are you will start to rank higher on Google and other search engines along with it, which increases your chances to show in Google Discover.
And you know what? There’s more to image SEO than writing a few alt tags.
I know some of you may even say that alt tags aren’t necessary anymore after Google’s recent advances in Machine learning. And even I believe this – but optimizing your images correctly with the methods I’m going to share in this post will increase the chances of ranking even higher than usual.
But before proceeding to the guide, let’s take a look at Google Vision API;
To test Google’s advances in Machine Learning, I uploaded an image after deleting all the metadata from it. I also changed the image’s name to “IMG_20201025.jpg,” but it correctly guesses the image label and image category.
Here I’m sharing the result;
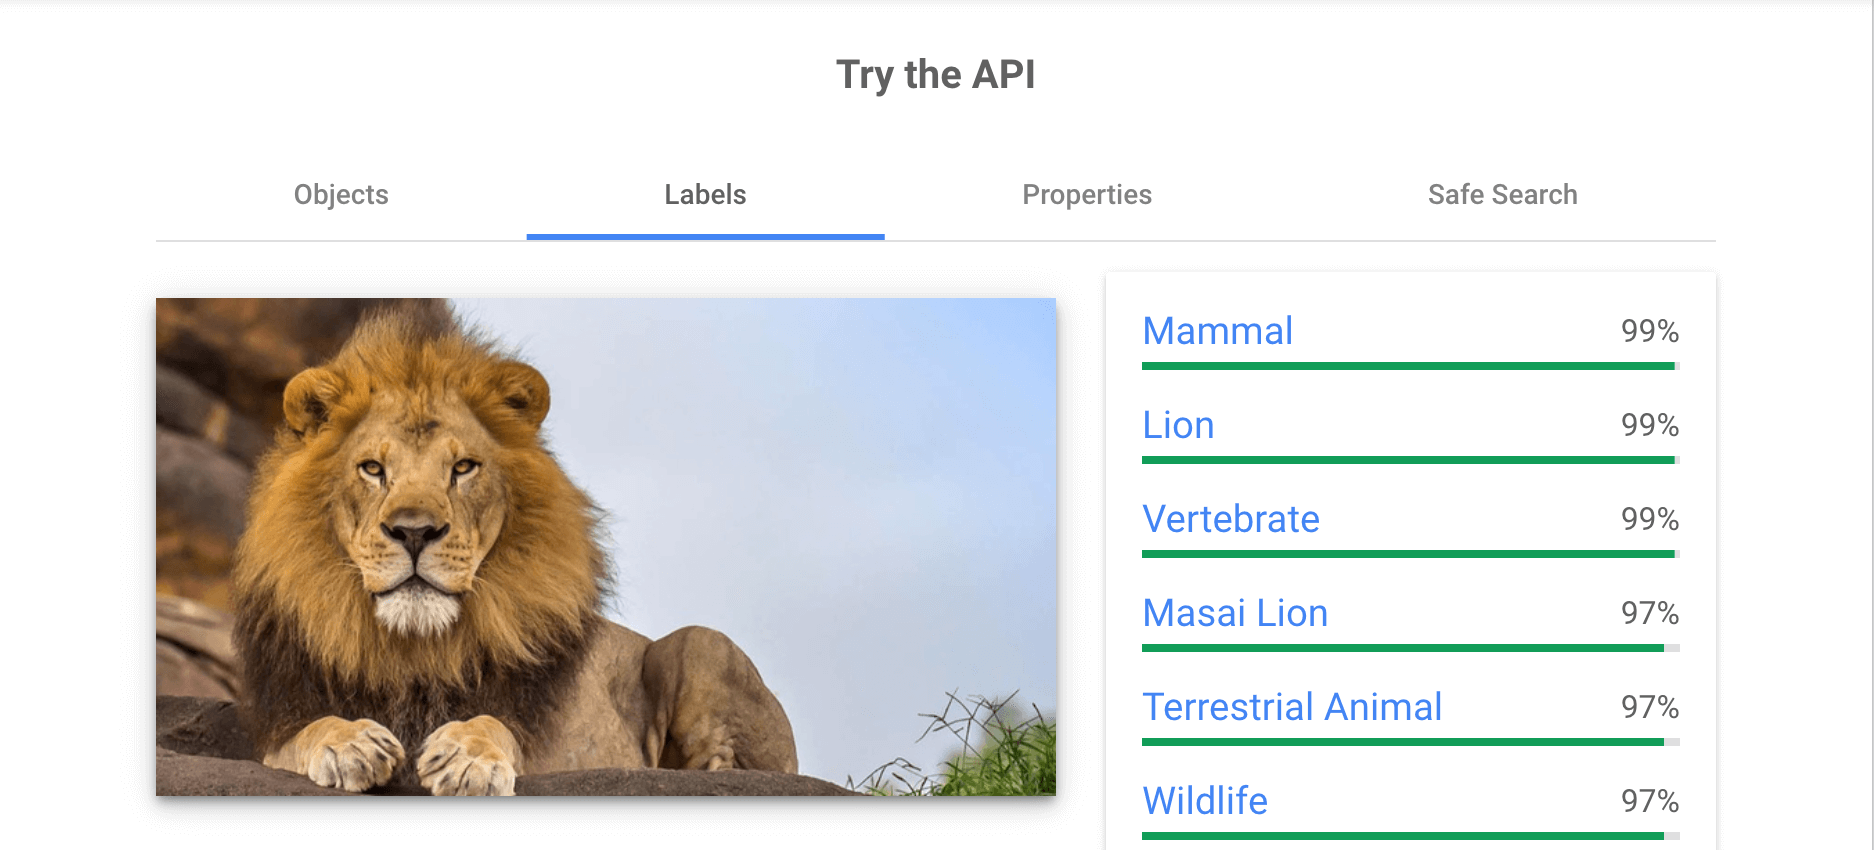
After this, we can be sure that alt tags don’t matter at all.
So what’s the matter of adding alt tags in images if Google itself understands the meaning of images? Is image SEO dead?
Not at all.
And to prove this, I’m sharing some actionable tips on image optimization and how it can increase your organic traffic to your website.
Also, do you know? According to 2018 data from Jumpshot, over 20% of all US web searches happen on Google Images.
Now, wasting no more time, let’s come to the actionable tips on optimizing images for better SEO. I’ll also explain some automated ways to optimize your images in this guide, so read the article till the end.
The first thing that matters is the “Name of the Image,” so you’ve to…
1. Name your Images Properly
So the first thing you should have to follow is naming your images correctly.
Whenever you upload any images to your website, you have to check carefully whether you’ve added the name to your images or not.
Here’s what Google says about images;
[…] the filename can give Google clues about the subject matter of the image. For example, my-new-black-kitten.jpg is better than IMG00023.JPG.
To again test why naming your image matters, we have again tested Google’s Vision API, and let’s see the result;
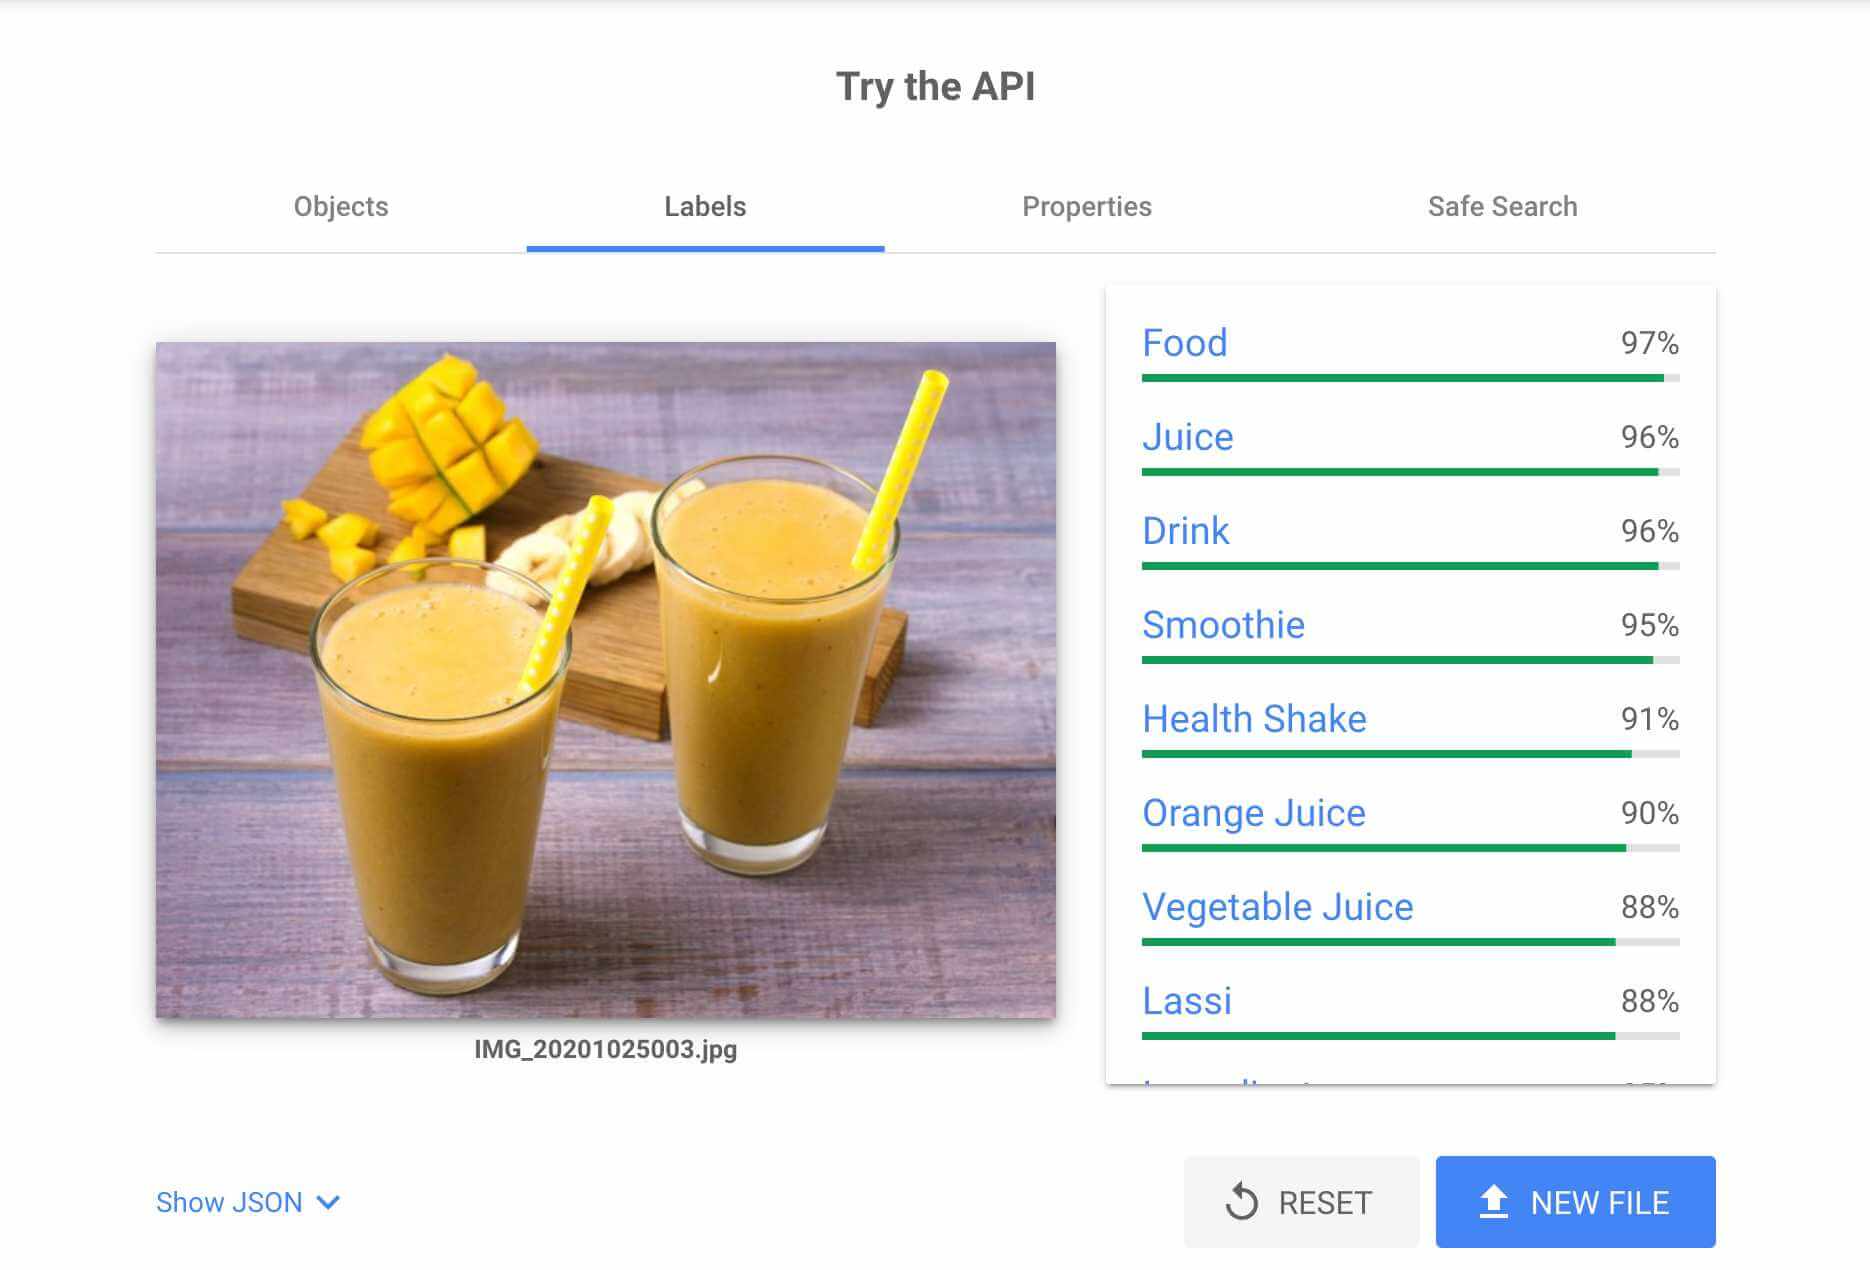
So in the image above, it has detected various labels, including “Drink, Smoothie, Health Shake,” and according to Google’s Machine Learning, they’re 90% sure that it can be “Orange Juice” – but actually, the image is “Mango Shake.”
We know mango shakes and orange juice look similar, but the point is that Google isn’t perfect, and therefore you have to take care of these to improve the ranking of your images on Google.
That doesn’t mean you do keyword stuffing in the name of your images, but make it descriptive, simple, and straightforward.
For example;
- Good filename: mangoshake.jpg
- Bad filename: mangoshake-mango-juice.jpg
Optimizing the name of your images will hardly take a few seconds. And for better image optimization, I don’t think investing a few seconds is an issue for anyone.
2. Use Descriptive ALT Tags
Optimizing and using descriptive alt text is another most crucial step for image SEO. Along with Google’s Machine Learning, Google uses alt text to understand the image’s subject matter.
Another important reason we have to use the alt text properly is that browsers also show the alt text when they cannot render the image correctly.
Don’t trust me?
No worries, here is the small part of Google’s official document where they clearly mentioned using alt text in images;
Google uses alt text along with computer vision algorithms and the contents of the page to understand the subject matter of the image. Also, alt text in images is useful as anchor text if you decide to use an image as a link.
When choosing alt text, focus on creating useful, information-rich content that uses keywords appropriately and is in the context of the content of the page. Avoid filling alt attributes with keywords (keyword stuffing) as it results in a negative user experience and may cause your site to be seen as spam.
Here’s the HTML Syntax for Using ALT Tags
- Bad (missing alt text): <img src=”mangoshake.jpg”/>
- Bad (keyword stuffing): <img src=”mangoshake.jpg” alt=”mango shake mango shake recipe mango shake calories mangoshake mango juice”/>
- Better: <img src=”mangoshake.jpg” alt=”mango shake”/>
- Best: <img src=”mangoshake.jpg” alt=”Mango shake recipe with ice cream”/>
But how to write proper alt text for images?
If you don’t know how to write the alt text for your images, don’t worry!
According to Ahrefs, the basic shortcut that works perfectly for writing alt text is removing the conjunctions or connections (e.g., a/an) from the resulting sentence and using the last part as your alt text.
Here are a few examples from Ahrefs;
“This is a photograph of a chocolate cheesecake.“<img src="chocolate-cheesecake.jpg" alt="Chocolate cheesecake"/>
“This is a drawing of my cat, Mark, playing with his toys.“<img src="mark-the-cat.jpg" alt="My cat, Mark, playing with his toys"/>
Simple Tips for You
If you have got a website and you haven’t followed the proper image optimization, then Ahrefs Audit and SEMrush Audit tool will help you to audit your website for free and list out all the errors, including missing alt text and title errors in images.
These tools are really helpful in solving these kinds of issues on your website, and I highly recommend you analyze your website with these tools once and fix the image issues on your website.
Ahrefs Audit

SEMrush Audi
Edit: The images I shared above were taken on two separate dates, that’s why one of them shows an image issue error on my website, but another one isn’t showing any image issue error.
Also, don’t forget to use an image caption in your article because what google says about the caption is;
Google extracts information about the subject matter of the image from the content of the page, including captions and image titles. Wherever possible, make sure images are placed near relevant text and on pages that are relevant to the image subject matter.
3. Compress Your Image
Another thing that matters a lot in image SEO is using the correct image size according to your dimensions and decreasing the image’s size after compressing it.
When we visit our website from a typical monitor with having 22″ screen size or from a laptop with a 15.6″ screen size, we can easily notice a white space on both sides of our blog. That’s because our blog content’s maximum size is 720px by default (it depends upon what you set up while customizing your WordPress theme).

As you can see in the image above, I customized the whole theme according to my needs, set the blog content area to 880px, and added padding on both sides of the featured image. After all this, my image’s size is 720px wide, and the images in the blog section are 880px.
So no matter what the screen size of your device is, when you visit our website, it shows the 720px featured image and 880px wider image on post, but the images are never displayed wider than 880px.
I’m sure you may think, what’s the matter of all this and why I’m telling you all these things?
I’m telling you all this because, no matter what the pixel size of your image is, if you’re using a wider image, it will automatically fit the image size to 720px (only if you’re using a well-coded theme like GeneratePress or Divi). But the main thing is, that your browser loads the actual size of the image.
Instead of using an image wider than 720px, I recommend you once to check the size of the images on your blog post and then scale your images to the same dimension. It will help you save a lot of space on your hard disk and decrease the size of your web page, thus increasing the website speed.
Along with it, the second step is to compress images to decrease the actual size.
Compressing images is another most important factor in ranking your website even more on google and other search engines. It helps you to decrease the size of your image without making any visible changes in your image.
But how do optimize images? Can I upload high-quality images on my server and let plugins like Smush optimize it for me?
Optimizing images is way easier than producing them. Once your image is ready to upload to your web server, before uploading your images, I highly recommend using online tools to optimize your image and then upload it to your server.
You can also upload a high-quality image directly into your web server and let plugins like Smush optimize it – but if you’re doing this way, the web disk of your server will fill up in no time, and it will be hard for you to manage them later.
But which tools should I use to optimize my images? And does it degrade the quality of images?
If I talk about myself, I prefer using two websites for image optimization. These are TinyPNG, Image Optimizer, and Squoosh (It is a tool officially developed by the GoogleChromeLabs team on GitHub). I developed the Image Optimizer tool, which I mentioned above, for my personal use. I use this website to fine-tune the quality of the images according to my needs.

When you visit my website, you’ll see various options for optimizing the quality of the image. These options are;
- Lossless Compression: This compression mode is suitable for images of 100-200kb size.
- Normal Compression: This compression is suitable for images having a size over 300-500kb or more.
- High Compression: This compression module is suitable for images larger than 1-2MB in size.
- Smart Compression: Suitable for all, you must manually enter the compression quality from 0 to 100. Here, 0 stands for the highest compression, and 100 for the lowest compression size.
Once you have done selecting the compression quality, upload your image and hit the ‘compress‘ button. It will optimize the image for you.
Keynote: Optimizing the image will degrade the quality to some level, which isn’t visible easily. If you over-optimize your images, the degraded quality of the image will be easily visible to everyone.
Google also has some serious extensive documentation on optimizing the image on your website. If you want, you can read them here – but don’t worry, we will cover all of them in this guide with proper documentation for the WordPress website.
4. Choose the Best Image Format
You’ll find various types of image file formats on the web, and four of them, including JPG, PNG, WebP, and GIF, are the most popular among others.
Do you know each of them uses a different compression method?
If every file format of the images uses a different compression method, then the same images with different file formats have drastic changes in size.
That’s important, you know why?
Because images are the primary reason for the increase and the decrease in the size of any web page, page speed is one of the major factors that affect the ranking of the web page.
So,
What can I do to optimize the page size?
Well, the task is simple. You’ve to choose the appropriate size for the images. You can do it by simply choosing the most convenient format for you and your readers with the least visible changes.
But how can I know which format is best for my images?
Generally speaking, JPEG is the best file format for images with complex images with lots of color information. For example, Photographs.
Where PNG is best suited for a simple image with little color information; for example, the logo of a website uses PNG format.
And don’t forget to use videos instead of GIFs for better page loading speed.
For this, you can use Lighthouse to check your site for GIFs that can be converted to videos. If your website uses GIFs, then the Lighthouse will show you the recommendation to use a video format for animated content instead of using GIFs.

You can easily create an MPEG video for your GIF content by using the FFmpeg tool. You can use the command I’m sharing below to convert your food.gif to an MP4 video.
ffmpeg -i food.gif -b:v 0 -crf 25 -f mp4 -vcodec libx264 -pix_fmt yuv420p my-food.mp4
This code will tell FFmpeg to take the food.gif as input and convert it to a video called food.mp4.
5. Create Unique Images
Creating unique images for a website is another important thing you must take care of. A unique image ranks much better in SERPs as compared with copied images.
Even when I talked about myself when I decided to create this website, I myself created a checklist to add unique images as much as possible. I also followed the same steps on my other website, and most of the images are ranked in the “image pack” of Google SERPs, and creating images is not as hard as you think; you can use tools like Canva, Stencil, and FotoJet or even a text-to-image generator like the one offered by Picsart to create custom images for your website.
Along with it, try to add EXIF data to your images.
I’ve noticed people use plugins to optimize their websites without proper configuration, which strips the valuable hidden EXIF data when optimizing images to reduce image size. This is not the correct way to optimize the images on your website, and you always have to take care of these settings on your website.

In the image above, I’m using the “Compress JPEG & PNG images” plugin, which is developed by the TinyPNG.com team for optimizing images on my website.
So, while setting up the blog, I enabled the Exif data that I needed on my images. You always have to take care of all these things to optimize your images carefully.
Luckily, for adding EXIF data in images, there is a website named theXifer.net. You can use this website to add EXIF data to your images with no hassle and quickly.

You just have to upload your image using the drag-and-drop method, and when your image is uploaded, click on the “Exif.me” button shown in blue color.
It will open a popup with various EXIF data, which you can add to your image, and once you’re done, just click on the “Go.eXifing” button shown in blue color.
6. Lazy Load Your Images
Lazy loading is another essential thing that you should have to take care of. We also know it as asynchronous loading, which means it defers the initialization of an object or image until the point at which it is needed.
It can save bandwidth, reduce the page size of your website, and boost website speed. Along with it, it saves the resources of your server, so it works efficiently and flawlessly.
There are several plugins through which you can enable lazy loading on your website. Most of the cache plugin supports lazy loading, and one of them that I like most is WP Rocket. It really helps to optimize your website’s overall speed and provides features like lazy loading images and iframe.
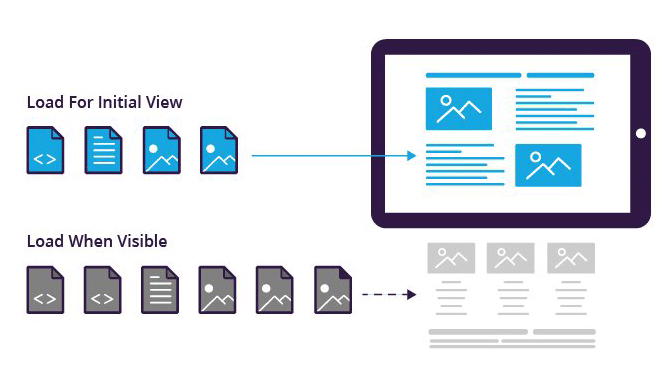
Here is an image from medium.com describing how lazy loading works;
Now it’s upon you what you prefer.
7. Leverage Browser Caching
The website’s page speed can significantly be increased by asking the users to save and reuse a few files of the website. It can be beneficial for repeat users and particularly effective on websites where users regularly revisit the same areas.
But how do they do it?
Whenever a user visits a website, the browser downloads some files (it can be CSS, JS, image, or other types of files) and store them on the user’s local cache to improve the speed.
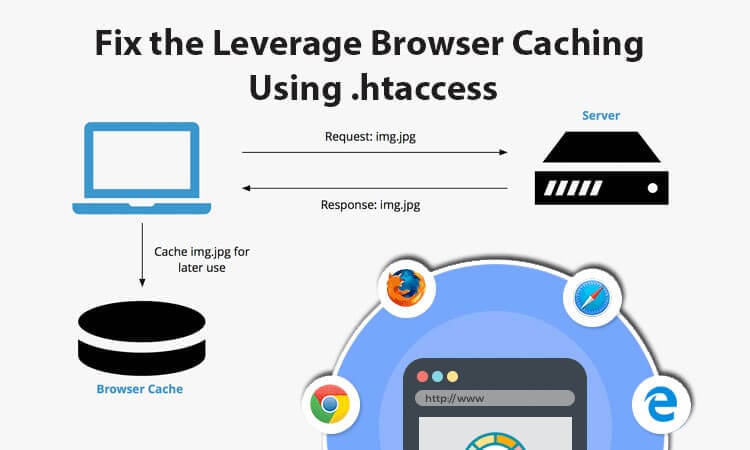
These files are small in size – maybe a couple of kilobytes and the caching can significantly improve the website load by loading the files from the local cache whenever the user visits the website for a second time or re-visits the same areas.
To add this feature, you’ve to add a few lines of code, which I’m sharing below to your .htaccess file.
Depending upon the file type of your website, you can set different expiry times. Once you edit these codes in the “.htaccess” file, save it, and it will be activated on your website.
8. Use Image CDNs
Last but not least method is using an Image CDN. I know you’re thinking about what an Image CDN is. Basically, it is a type of CDN that stores the images on its server like other CDNs do and serves you images with real-time optimizations according to the settings you chose during implementation.
It offers you real-time optimizations based on Network type, device type, operating type, and with several other types, and they also serve your files in WebP format (which is one of the best formats for images, and they only serve in this file format, if user’s device support WebP format).
And according to Can I Use, the WebP file format is supported by these browsers;

I highly recommend using Image CDNs to you, and when you check my website, you can easily find ImageKit links on my website. It is one of the best Image CDNs for optimizing your website’s images in real-time, along with several other customizations for images.
And do you know? Can you also use ImageKit to serve the CSS and JS files of your website? It makes them one of the best Image CDNs out there. Alternatively, you can also try BunnyCDN and KeyCDN, other popular CDN services for serving images and static files.
There are the top 8 best ways to optimize your images properly to rank even higher on Google. I also follow most of them on my website, and it really works like a charm for me.
Along with all these, I use some automated ways to automatically add alt and title attributes in my images, which I’m going to share below;
How to Add ALT, Title & Caption?
Most of you probably know this method to add ALT, Title, and Caption to your images. But to refresh you and for people who don’t know how to add these attributes in images manually, I’m going to share a full step-by-step method.
You can follow these methods to easily add these attributes to your image without any issues.
So the first thing is to upload your media (after optimizing it first and adding the EXIF data) to your “Media.” While writing the post, you can also upload the image from the “Add Media” option.

Once you click on it, it will ask you to upload the image, and you can also upload the image using the drag-and-drop option by simply dropping your image into the popup that appears after you click on the “Add Media” option.

Once your image is uploaded, it will show the option to add ALT, Title, Caption, and Description on the right sidebar of the image.
Here, you can add proper alt tags, the title, and the caption you want. Once it is done, click on the “Insert into post” option shown in the blue-colored button in the right sidebar of the uploaded media.
It will add your image along with the ALT, Title, and Caption you set in your image.
How to Add ALT & Title Attributes (Using Automated Ways)
For automatically adding alt tags and title attributes in the website’s images, here I’m using the RankMath SEO plugin. This plugin is one of the best for doing these things, and I highly recommend using it on your website for optimal SEO performance.
And the methods to implement this automation are simple;
You just have to activate the plugin and then go to WP Admin > Rank Math > Dashboard here. It will show tons of modules for your website and show the image SEO module to enable this automation.

Now activate the module and then click on the “Settings” button next to the image SEO box. It will now redirect you to the settings page from where you can make changes according to your needs.
With the Rank Math Image Optimization Settings here, you’ll get tons of options to choose from. Select what you want to fill in the alt and title attributes from the drop-down menu and then save the settings.
In the image above, I’ve chosen the %tags% to automatically fill in the alt attributes and the %title% to fill inside the title of the image, along with the %count(title)% for adding the numbering in images.
There are various other ways to set up the image SEO and add the title and tag attributes – but why use tons of plugins when we can do all things with a single one? This is why I just shared the methods using the Rank Math method only.
Frequently Asked Questions
Why is Image SEO important?
Image SEO is important because we can’t fully depend on Google’s algorithms to detect and rank the image accordingly. So, we have to manually add the details about the image with proper tags and EXIF data.
It is beneficial for Google to know more about our image, and adding it can help in ranking your website and its images higher in SERPs.
I’m Using Plugins for Optimizations, so do I need to optimize them first before uploading the image, or is it fine to upload high-quality images?
I highly recommend optimizing the images before you upload them to your WP media files. Yes, I believe these plugins can be useful to optimize the images, but optimizing them first and uploading them can save your server’s disk space size.
It can also be useful to migrate your website from one server to another because of the low disk space size.
Can I Use Other Plugins for Automated Image SEO instead of Rank Math?
Yes, you can use other plugins to optimize the images’ attributes. One of these plugins is ImageSEO.io, which is another great plugin to consider.
But before using them, I highly recommend you to deactivate the “Image SEO” module from the Rank Math plugin, or else it can collide with the other plugins.
Wrapping Up!
So, in this guide, I tried my best to explain why optimizing images on the website is essential. I also added a few lines on Google’s vision API and how it worked and showed you some examples in which it fails to detect the proper image details. So, we can’t completely depend on Google’s algorithm.
This is why adding the proper tags is essential and even optimizing them. I personally tested these optimizations, and they work like a charm for me. most of my images rank under the image pack.
If you know some other ways to optimize the images and want to share them with us, then you can use the comment section below to share a detailed guide on it, along with what you feel about this.
I hope this article is helpful for you 🙂
