
How often does it happen to you that you’re trying to update your WordPress website to the latest version, but for some unforeseen reason, it doesn’t work for you? And then you see an error message that says, “An automated WordPress update has failed to complete”?
I have been blogging for the last 7-8 years and using WordPress since the start, and you won’t believe me, but I have seen this error 100+ times.
Recently, one of my friends faced the same issue and came to me for a solution. I helped him, and then I thought, “Why not share the steps with people like him or like me?” And as you know, I write a lot about WordPress, so I thought, “Why not share it here?”
And do you know, this is a very common issue, and many people face it? The good news is that it’s not a big deal. It can be fixed easily. So, in this post, I will show you how you can fix the “An automated WordPress update has failed to complete” error without any hassle.
✍️ Author’s note;
This article may include some technical steps, and I would recommend taking a complete backup of your WordPress website from cPanel or FTP.
I know it’s a pain, but it’s always better to be safe than sorry!
Alright, now that we have that out of the way, let’s get started…
What Causes the “An Automated WordPress Update Has Failed to Complete” Error?
There are several reasons that can cause this error on your website. Still, mostly, it happens due to file permission issues on your hosting, higher resource utilization, and also because of some incompatible plugins or themes on your website.

When you try to update WordPress, it downloads the latest file from WordPress.org to your root directory and creates a file named “.maintenance.” Once the file is created, it signals WordPress that an update is in progress.
After the WordPress installation is complete, it automatically deletes the “.maintenance” file. But, if it can’t delete that file and the update is interrupted for some reason. And in this case, you’ll see this error message on your website – “An automated WordPress update has failed to complete.”
✍️ Author’s note;
If you’re frequently facing this issue on your website, then it means there is an issue with your hosting provider. And maybe because some higher CPU utilization causes this issue.
In this case, we recommend consulting with your hosting provider or shifting to some decent WordPress hosting providers like Cloudways, Kinsta, etc. Here, you can read this article on Kinsta hosting and its performance for skyrocketing your website’s speed.
The good news is that it can be fixed quite easily. Let’s see how.
How to Fix “An Automated WordPress Update Has Failed to Complete” Error
Fixing this error on your WordPress website is quite simple, and you can do it in three different ways.
So don’t worry!
Here, I’m going to show you all three methods, and you can choose the one which is best for you.
Deleting the “.maintenance” File from cPanel or FTP
This is one of the most straightforward methods that anyone can follow, whether you’re an adult or a kid. In this method, all you need to do is install any FTP client or use cPanel’s file manager to delete a file named “.maintenance” from the root directory of your WordPress installation.
Here’s a step-by-step guide on doing so;

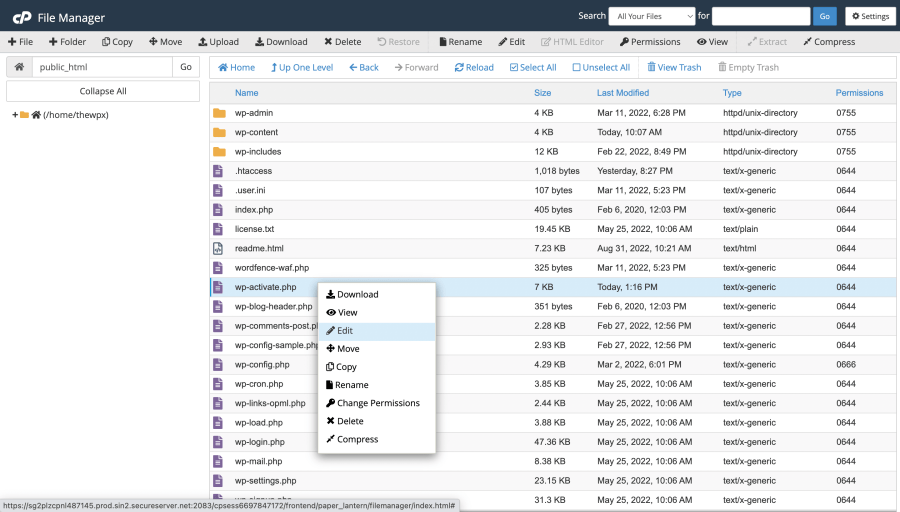
First, you need to log in to your cPanel hosting or FTP client to get started. For example, if you’re using some shared hosting, you simply need to enter “:2083” after your domain name to open cPanel.

Once you have opened the cPanel, you need to click on the “File Manager” option, as seen in the screenshot above. This will open the file manager through which you can access all your website files.
Now, you need to double-click on the “public_html” folder to open it.

After that, you’ll see all the files and folders related to your WordPress website. Find a file named “.maintenance.” Right-click on it and select the “delete” option from the dropdown menu.
That’s it
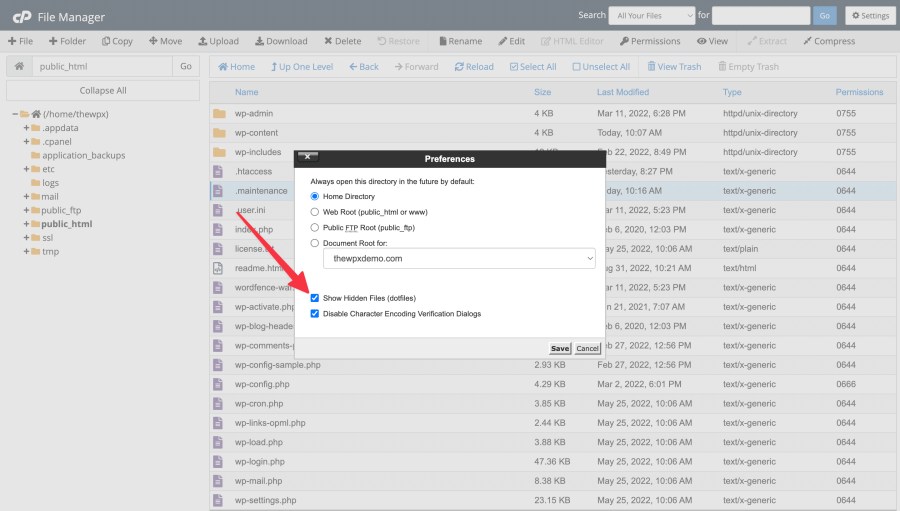
Once you have deleted the file, go back to your website and refresh it, and your website will be fixed. If you don’t see the file, make sure you have turned on “show hidden files” from the settings.
Using WordPress File Manager Plugins
cPanel is one of the most preferred methods, and we recommend using that option only. But sometimes, if you’re unable to access your cPanel or if it seems complicated to you, you can try using the file manager plugins in WordPress.
Although this method will not work every time, sometimes, when you get the “Briefly unavailable for scheduled maintenance error,” even the admin panel will not load. So, first, you need to check if you can access your admin panel, and if you can, you can follow the methods we shared below.
To delete the “.maintenance” file using this method, first, you need to install a file manager plugin like WP File Manager, Advanced File Manager, etc, on your website. If you’re unfamiliar with WordPress and its plugins, here’s a simple step-by-step guide to installing a plugin.
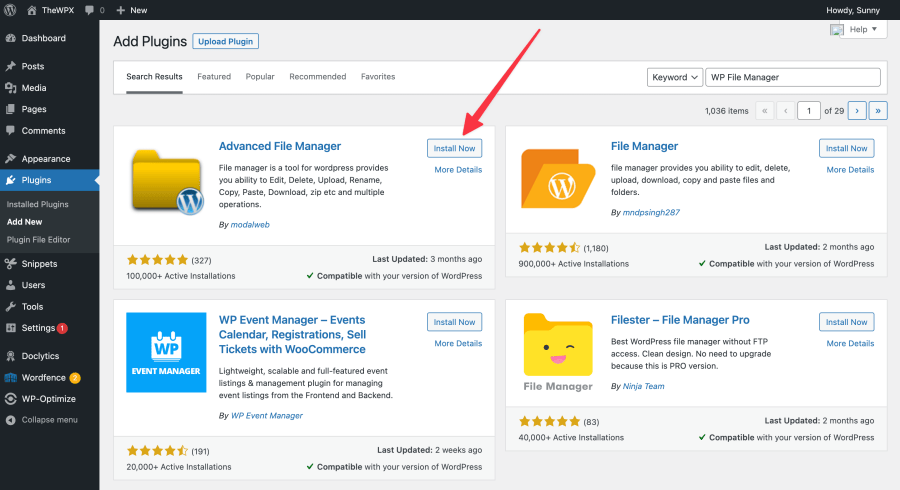
Here I’m using the “Advanced File Manager” plugin to share the steps. You can use any plugin you want; it doesn’t matter.
Once the plugin is installed and activated, go to “File Manager” under the left-hand menu. And once clicked, it will redirect you to the root directory of your WordPress installation.
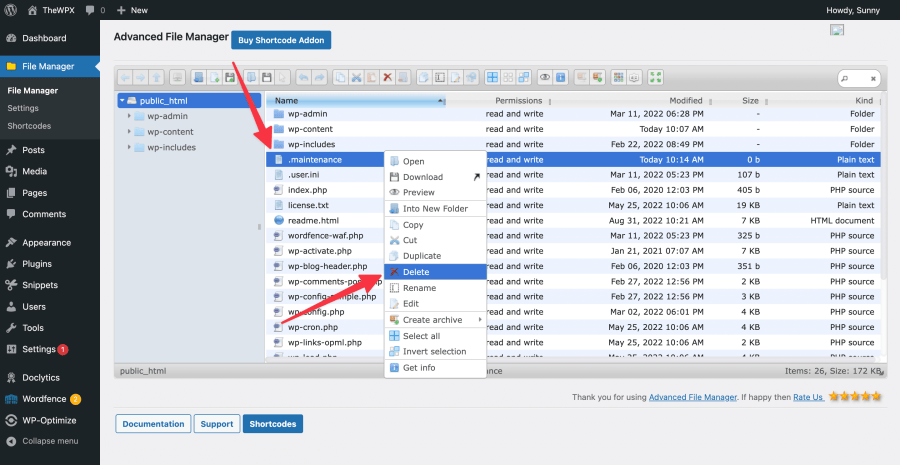
Here, you’ll see a file named “.maintenance” – click on it and then right-click to find the “Delete” option. Once the file is deleted, refresh your site again, and your website will be fixed.
And that’s all you need to do!
Editing “wp-activate.php” File
Have you deleted the “.maintenance” file from your server, and are you still facing the same issue? Don’t worry; sometimes, the reason for this error is something else, and even after deleting the file, it still throws the same error.
In this case, you need to edit the “wp-activate.php” file (which can be found inside the root directory) and change a small line of code. But this method involves editing the core files of WordPress, and I would only recommend you follow this method if you know what you’re doing.
Now, let’s try it…
First, you need to log in to your cPanel account or use an FTP client for logging in. Once you’re inside the “File Manager,” find and open the “wp-activate.php” file.
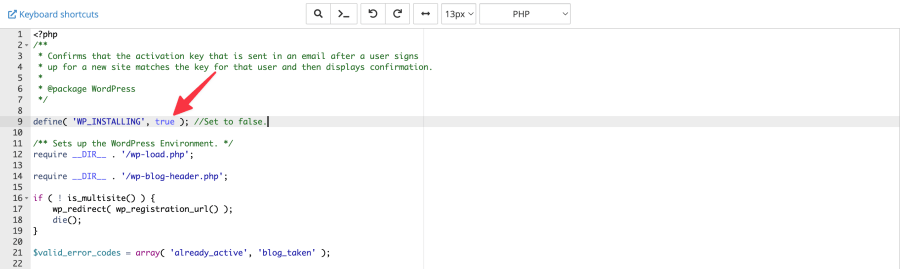
Now, you need to change a line of code that says: “define( ‘WP_INSTALLING’, true );” from “true” to “false“. And then click on the “Save Changes” button.
Afterward, go back to your website and refresh it, and your website will be fixed.
Final Thoughts
As you can see, fixing this issue is not rocket science. Simply delete the “.maintenance” file from the root directory of your WordPress website, and you’re ready to go!
And for deleting the file, you’ll see two different methods – both have their own pros and cons. But we do recommend deleting the file from cPanel. It’s because when you get this error, most of the time, you won’t be able to install or access any plugins on your website.
I hope this guide helped you fix this error, and if you’re still facing the issue, then let us know. Our team of experts at HeySERP will help you in fixing this issue.
