
Want to boost your WordPress site’s memory? You’ve come to the right spot! This guide is made for WordPress folks like you who are keen to up their memory game without messing up their site.
WordPress is super versatile, letting you play around with loads of media files, plugins, themes, and more. But sometimes, when you’re adding all this cool stuff, you might hit a wall – the WordPress memory limit error.
No worries! The internet’s got a bunch of fixes for this pesky problem. With these tricks up your sleeve, you’ll be back to adding more goodies to your WordPress blog in no time.
Alright, let’s dive into this detailed guide, where I’ll walk you through how you can give your WordPress memory limit a big jump. We’re going to explore three solid solutions, which are;
- Editing wp-config.php
- Editing PHP.ini file (changing server settings)
- Editing .htaccess file
So, without more delay, let’s get started.
💡 Quick Tip:
Before you install any plugin or make any changes to your website, it is always recommended that you take a full backup of your website and save it locally before experimenting with anything.
It is also a good idea to clone your WordPress website to some dummy domain, it will greatly reduce the chances of getting any type of error on your website in the future.
What is the WordPress PHP Memory Limit?
To process different tasks on your website like performing calculations, creating pages, and more, WordPress requires memory to process all these tasks.
Hence, PHP is a server-side programming language that enables us to create website pages. All the tasks we perform on our WordPress blog are processed by PHP.
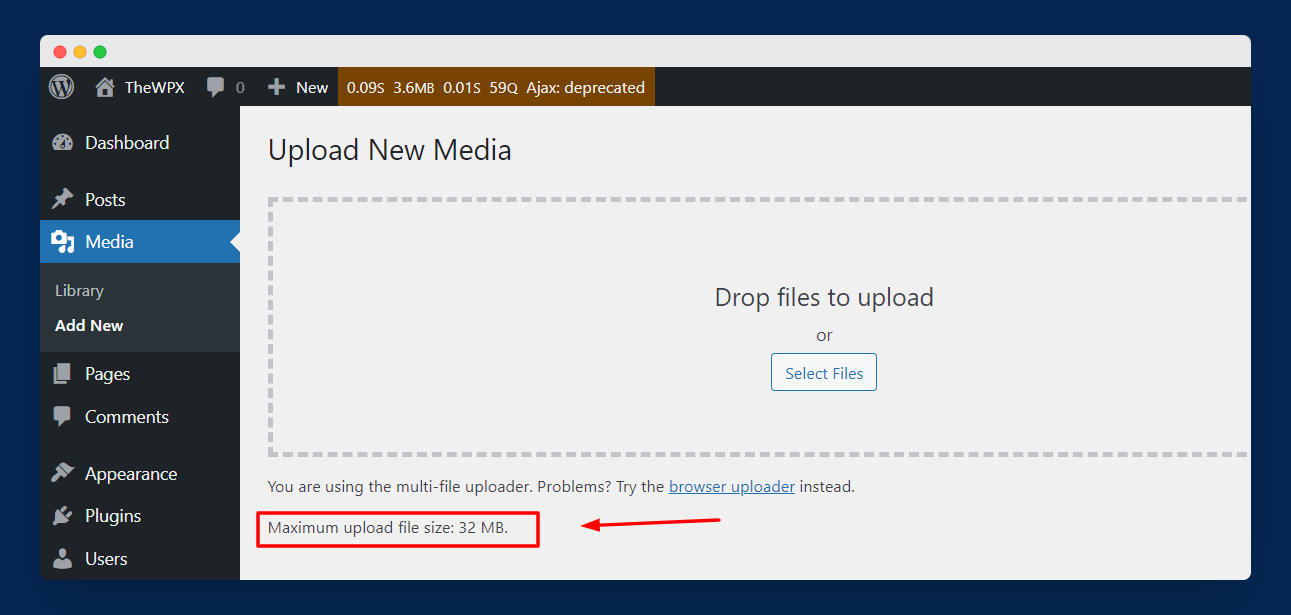
By default, the memory limit in WordPress is 32MB. You can also find the maximum upload limit by going to Media > Add New, as shown in the image below.
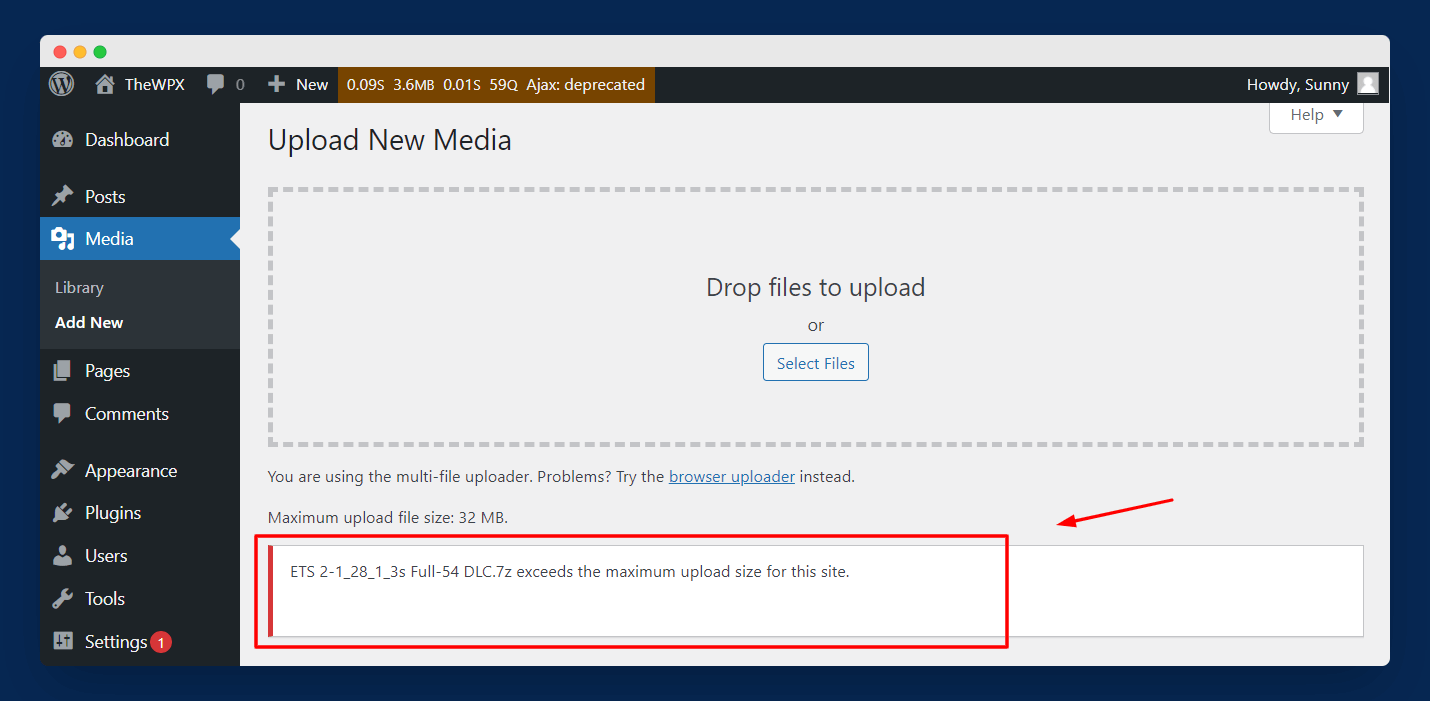
If you try to upload a file that is bigger than the allowed upload size, then you will get a fatal error for memory limit exhaust, see the image above.
To fix this error, we can increase our memory limit in WordPress.
Why Increase WordPress Memory Limit?
For most WordPress sites, the default WordPress memory limit is sufficient to keep the site running. But, sometimes, you need to install a big file, and here, you need to increase the memory limit.
For example, maybe you need to upload a heavy plugin or theme, or even a media file. So, in this case, you will receive a memory exhaust error that you can resolve by increasing your WordPress memory limit.
💡 Things to Remember
Insufficient WordPress memory limit can lead to a bad user experience. This can be eliminated by increasing your memory limit in WordPress. Also, upgrading the latest PHP version on your WordPress can make your site more effective and it also helps in boosting the memory capacity in WordPress.
How to Increase Memory Limit in WordPress
Below, I have described all the possible methods to increase the WordPress memory limit. But, it is not guaranteed that these ways will work for you because this largely depends on your web hosting.
Hence, I have shared four different methods so that at least one should work for you. Also, before proceeding with the solutions, we highly recommend you take a backup of your site.
To take a backup of your site, you can check out this guide that helps you back up your WordPress site with ease.
Now, without wasting time, let’s get started.
1. Edit wp-config.php File
The wp-config.php file is a popular WordPress file that contains many basic configuration information about your site. You can find this file in the root folder of your WordPress site.
The simplest solution to increase your WordPress memory limit is to make edits to your wp-config.php file.
To get started, the first step is to access your website files. To do this, you can take the help of any File Transfer Protocol (FTP) software like FileZilla.
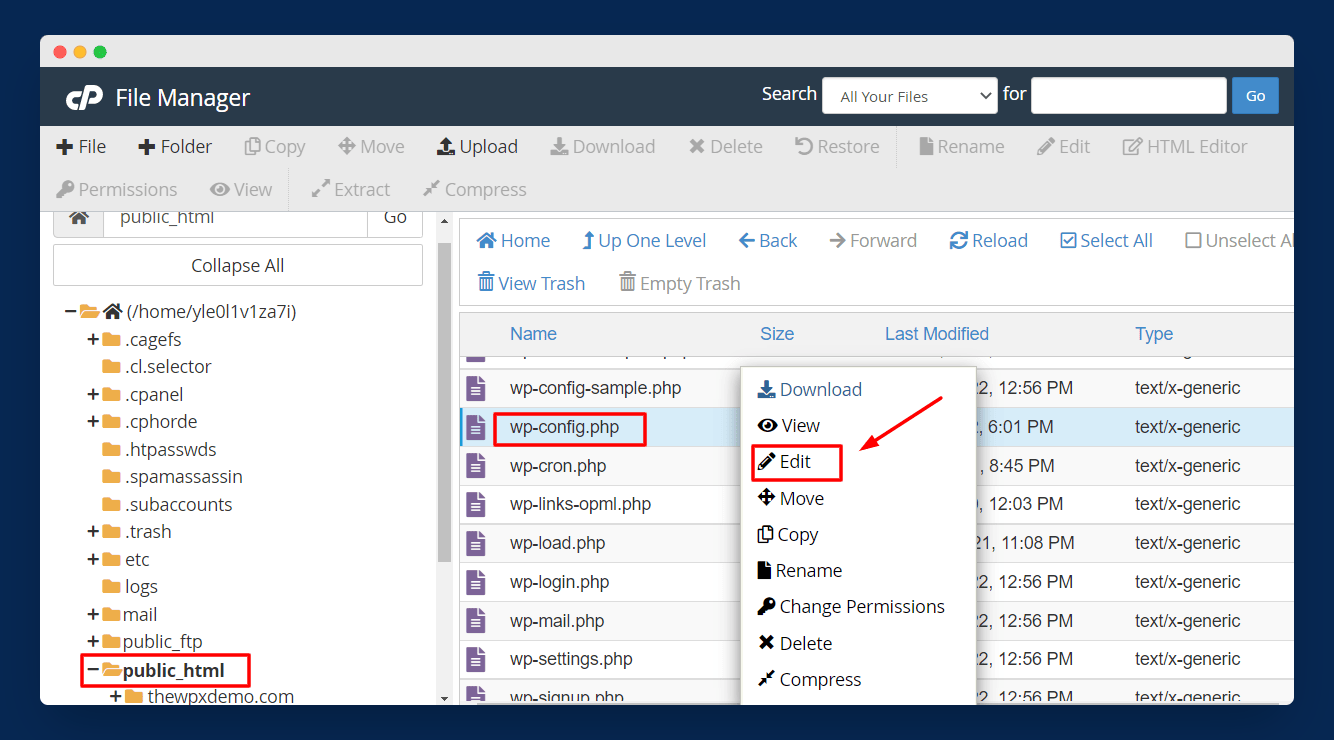
However, you can also access the files using your web hosting’s cPanel. You can access the files by logging into your cPanel and selecting File Manager, as shown in the image below.

Now, open the public_html folder and locate the wp-config.php file. Then you have to right-click your mouse and select Edit to start editing the file.
Once you open the wp-config.php file, search for the wp_memory_limit and look for something like this:
define( 'WP_MEMORY_LIMIT', '32M' );This code generally exists in almost every website’s wp-config.php file but if it doesn’t exist then you can add this code manually.
Now, you can simply change the memory limit to anything like 64M, 128M, or 265M. Here is how it looks after changing:
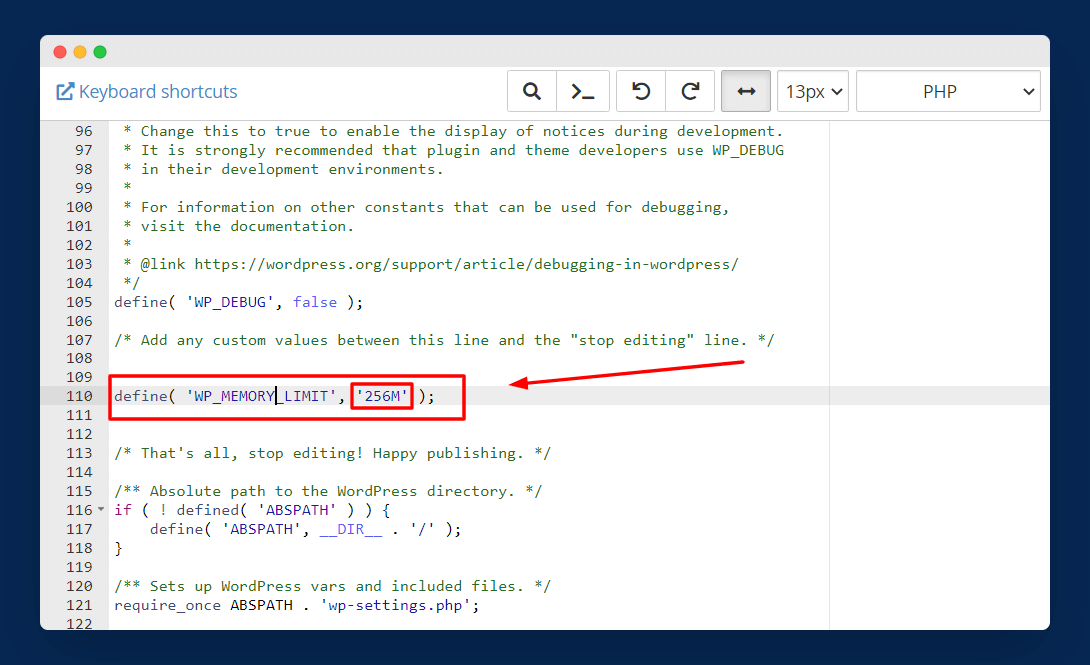
That’s it, you have successfully increased your WordPress memory limit. If this method doesn’t work for you, move to the next solution below.
2. Make edits to your PHP.ini file
If the above method doesn’t help you, then you can use this solution. In this method, you have to change your server settings by editing the PHP.ini file.
Not all web hosting provides this functionality to the customers. But, if you have access to the PHP.ini file, then you can locate it under the root directory of your site. If you can’t find the file, you can create one manually and save it under the root folder.
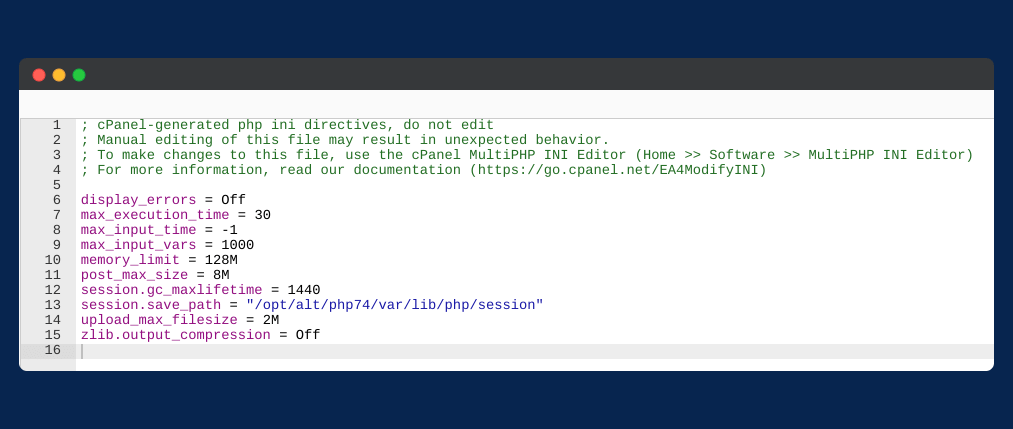
Now, you need to edit the PHP.ini file and search for the line ‘memory limit’. Here, you can change the default 32M to any of your desired values, like 256M or 512M.
To make the changes reflected in your site, you have to restart your server. After successfully restarting the server, you will get an increased memory limit.
3. Edit .htaccess file
If you don’t have access to your PHP.ini file, then you can make edits to your .htaccess file. To access this file, again you have to connect with your server via the FTP client app or you can also use your web hosting File Manager.
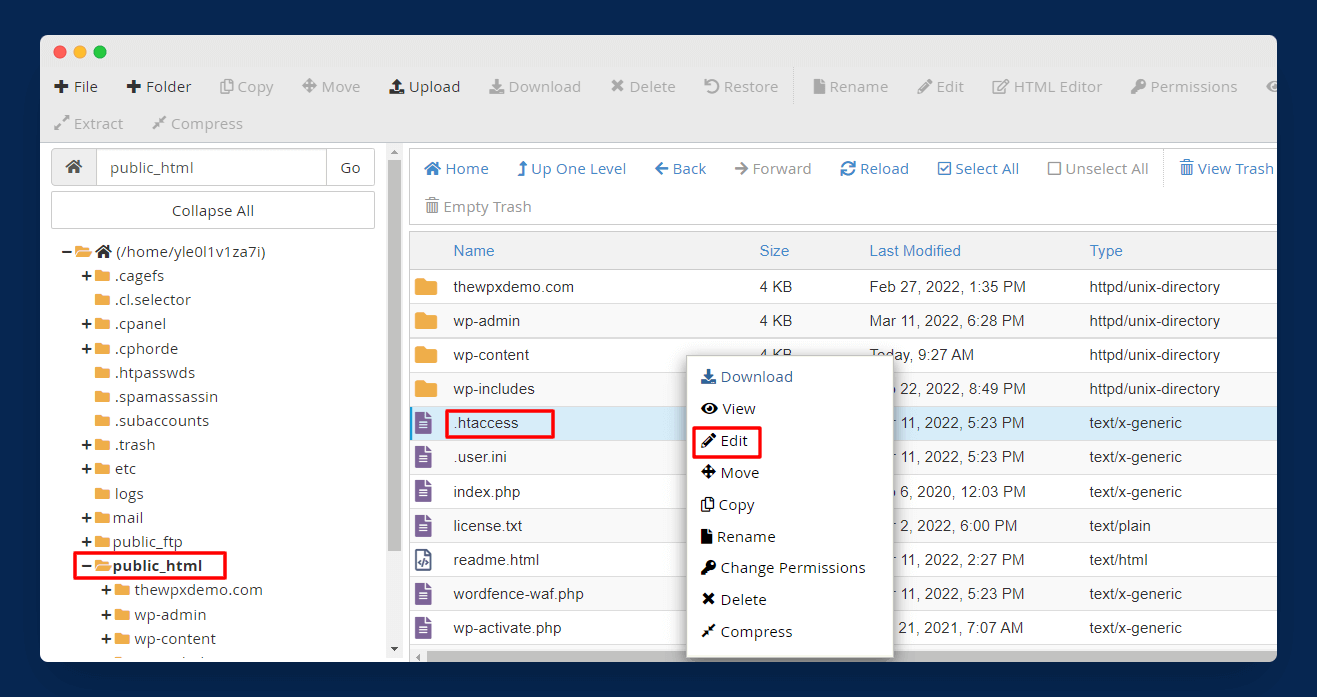
Simply, open the File Manager from the cPanel and locate the .htaccess file by going to the public_html folder. You have to open this file to make the required edits.
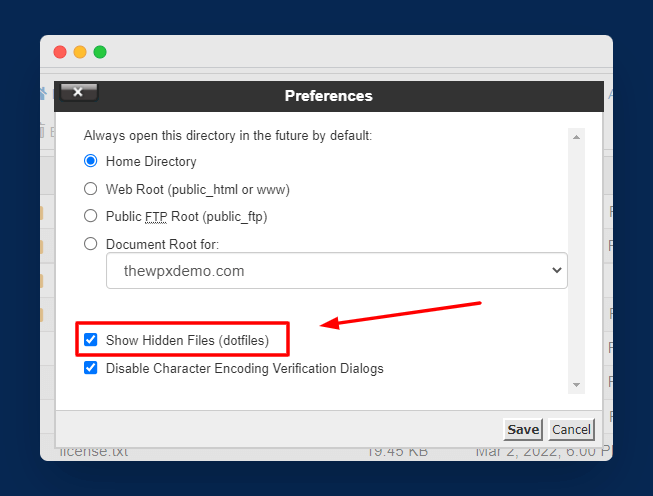
Sometimes you don’t see this file as it begins with a dot. In this case, you can open the settings and click on the Show Hidden Files option to access the .htaccess file.
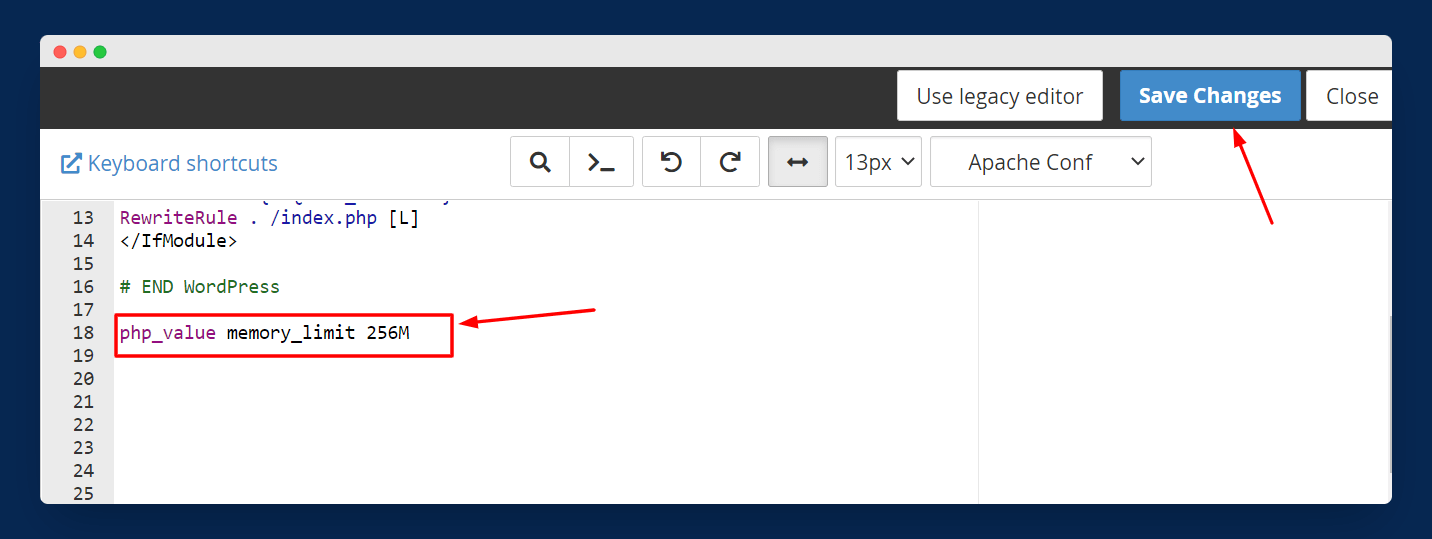
php_value memory_limit 256MNow, you need to add the code we shared above just after the # END WordPress line, similar to the image shared above. After adding the code, simply save the changes to reflect on the website.
Final Words
It can be very frustrating to deal with the memory limit problem in WordPress as it involves editing some files or configuring the server settings.
Most of the time, you don’t need an extra memory limit on your WordPress blog because the majority of media files, plugins, or themes are under the default memory limit size of WordPress. However, sometimes, you need to upload some big files, and here you can face the memory limit errors in WordPress.
You can use any of the above solutions to resolve this problem. But, the procedure of these solutions highly depends on your web hosting provider. However, the majority of the time, using the above methods can help you increase the memory limit in WordPress.
Still, if you need any help or have questions regarding how to increase the WordPress memory limit, let us know in the below comment section.
If you like this WordPress guide, then please share it on social media accounts and with your friends.
