Being one of the most popular site-building and content management systems in the world, a large part of WordPress’ popularity is due to its extendibility – It’s because there are literally thousands of plugins available for WordPress, each one adding new features and functionality to your site.
On WordPress.org, you can find plugins to add social media integration, contact forms, event calendars, ecommerce functionality, and much more. In this article, we will show you how to install a WordPress plugin from the WordPress.org plugin directory.
So let’s get started…
What is WordPress Plugin?
WordPress plugins are a piece of software that extends the functionality of WordPress websites. They can add new features or improve existing ones. There are thousands of plugins available, so you will find one that meets your needs.
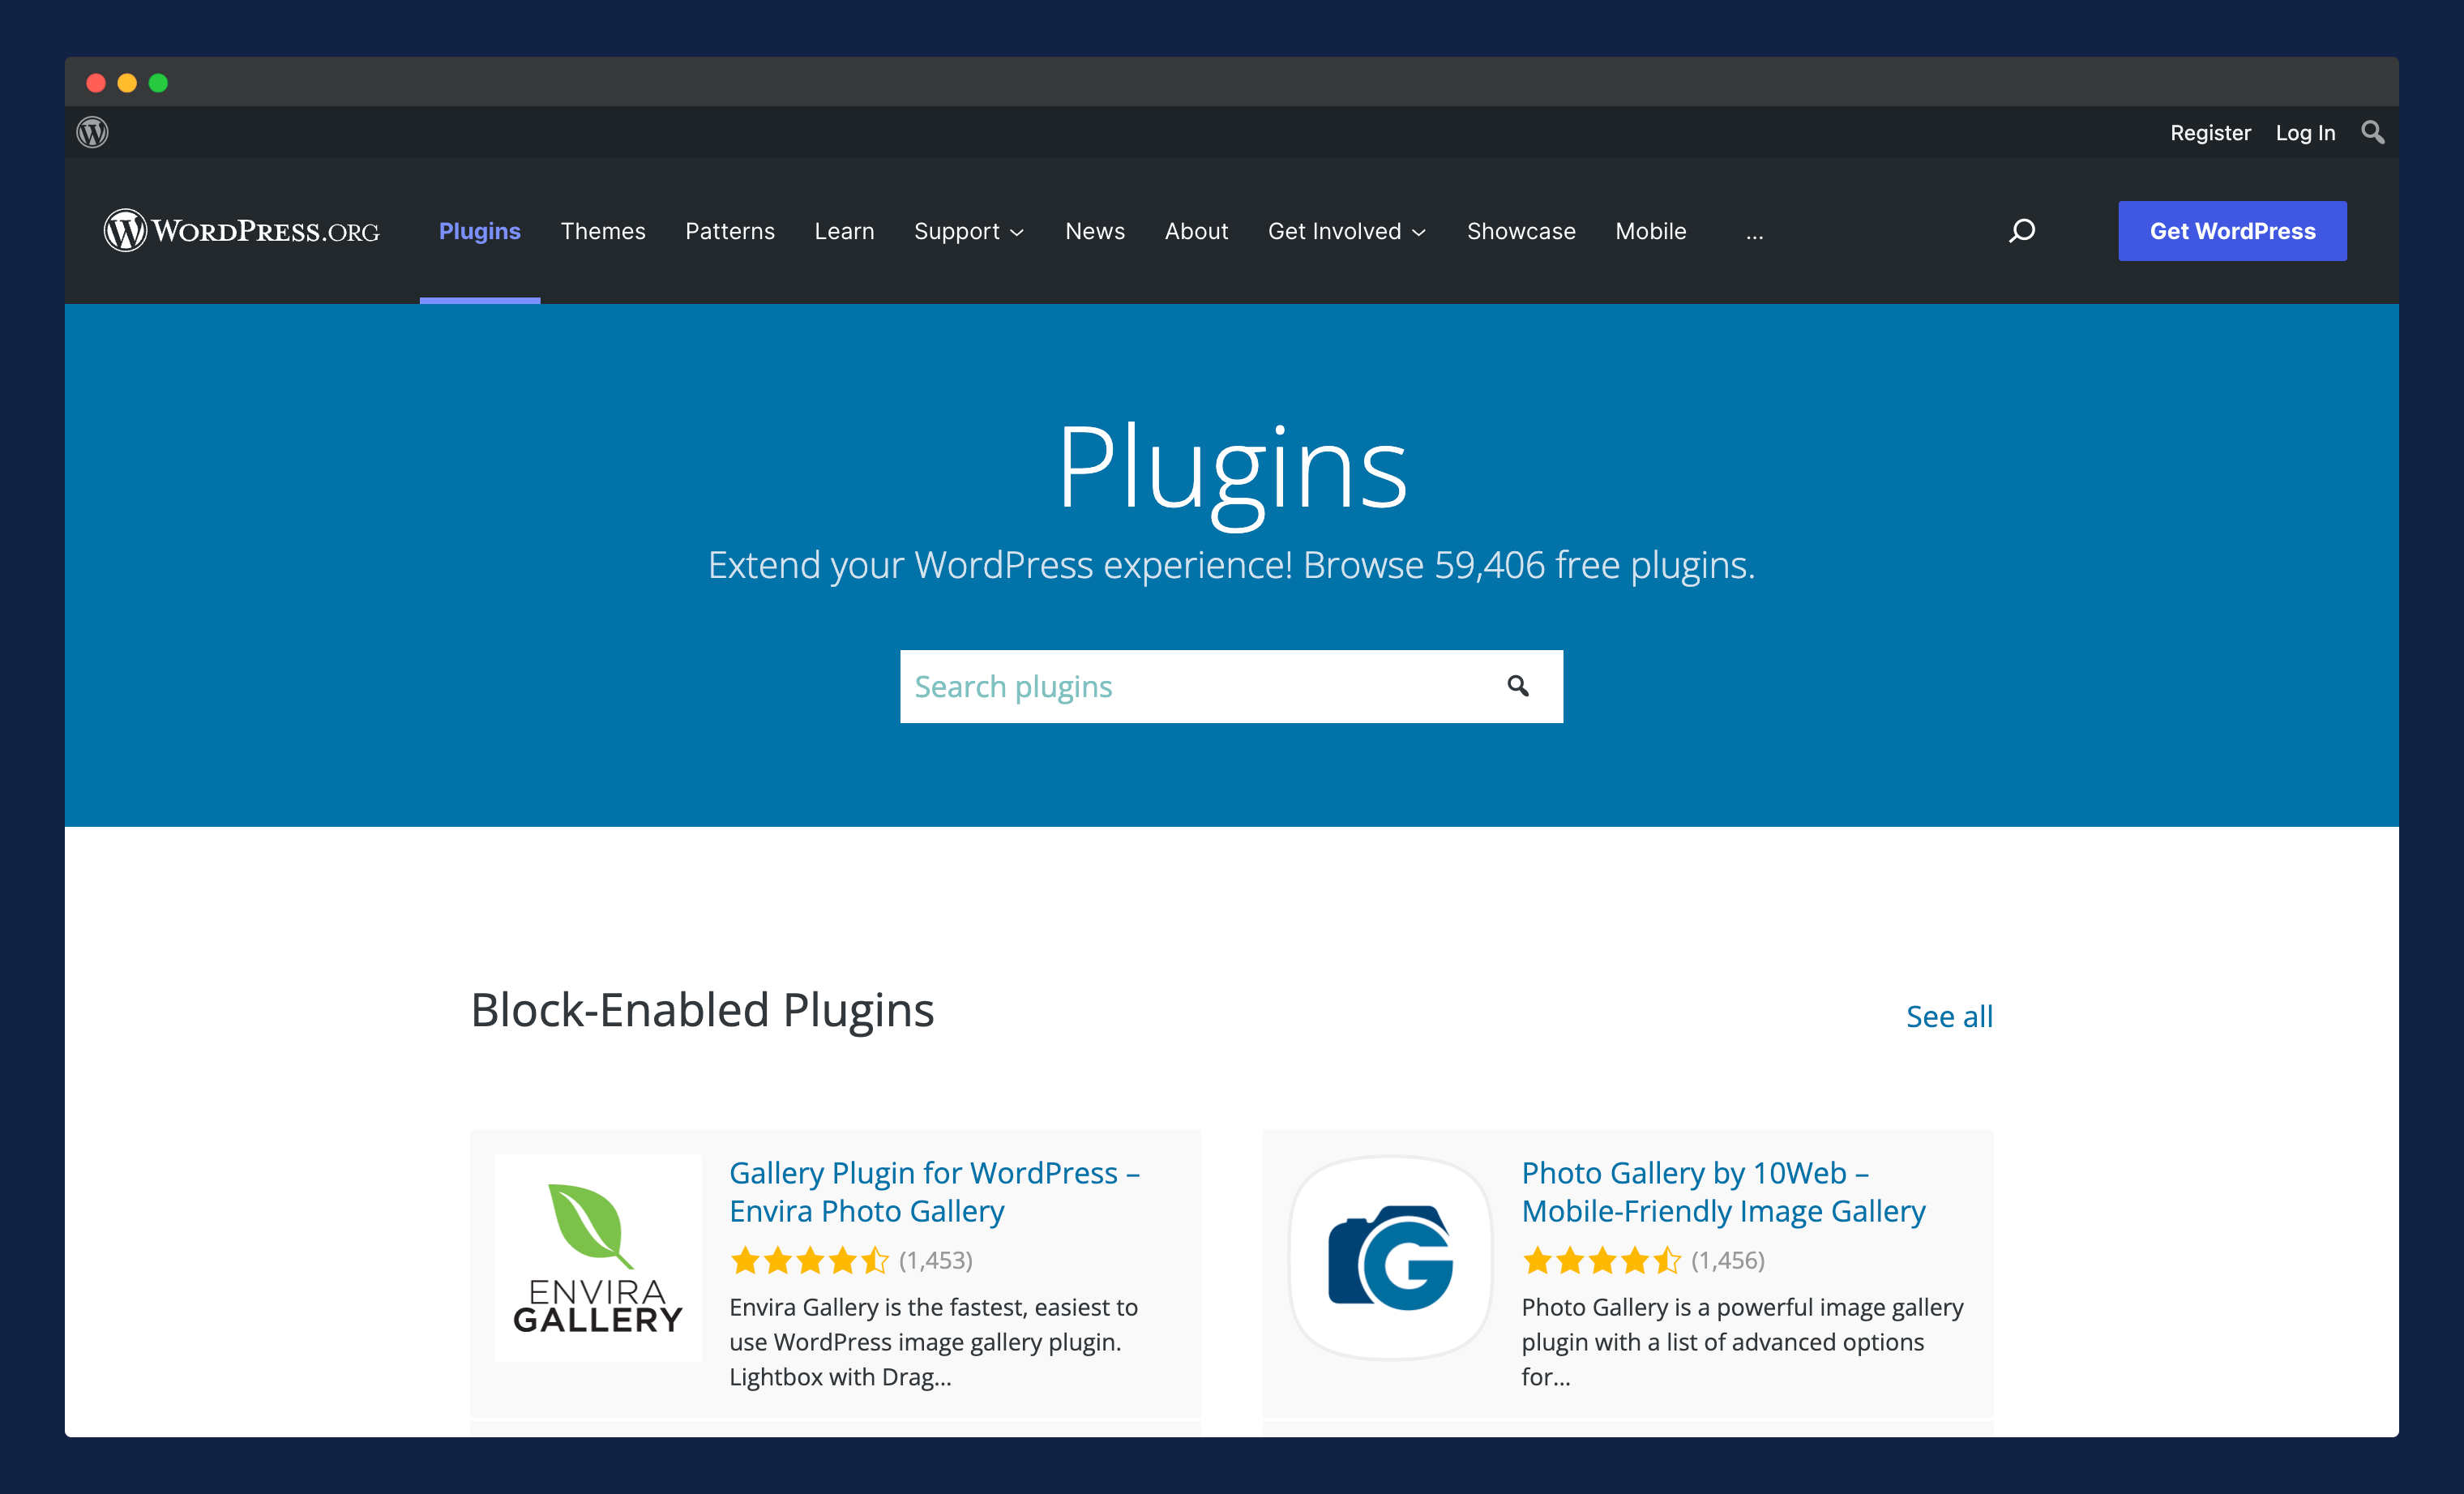
These plugins are written in the PHP programming language and integrate seamlessly with WordPress. These can be free plugins from the WordPress plugin repository (https://wordpress.org/plugins/) or can be premium plugins that you have to pay for.
And by using these plugins on your site, you can get some amazing features and functionality without having to write a single line of code.
Perks of using WordPress plugins on your site;
- Increase its extendability and functionality
- You can add features without having to write any code
- Automate complex tasks like social media integration, contact forms, event calendars, eCommerce, etc.
- Helps improve your website’s SEO using SEO-based plugins
…and many more.
So, if you’re looking to add some new features to your WordPress site, be sure to check out plugins!
How to Add WordPress Plugins to Our Website
Installing plugins from the WordPress plugin directory is easy and can be done in just a few clicks. In this section, we’ll walk you through how to install a plugin from the WordPress plugin directory.
There are a few different ways that you can install WordPress plugins:
- Installing Plugin from WordPress Repository
- Uploading Plugin to Your Site from Dashboard
- Installing a Plugin Manually via FTP or cPanel
We’ll cover all three methods in this article, so you can choose the one that works best for you.
Installing Plugin from WordPress Repository
The easiest and most recommended way to install WordPress plugins is directly from your WordPress dashboard.
Here’s how:
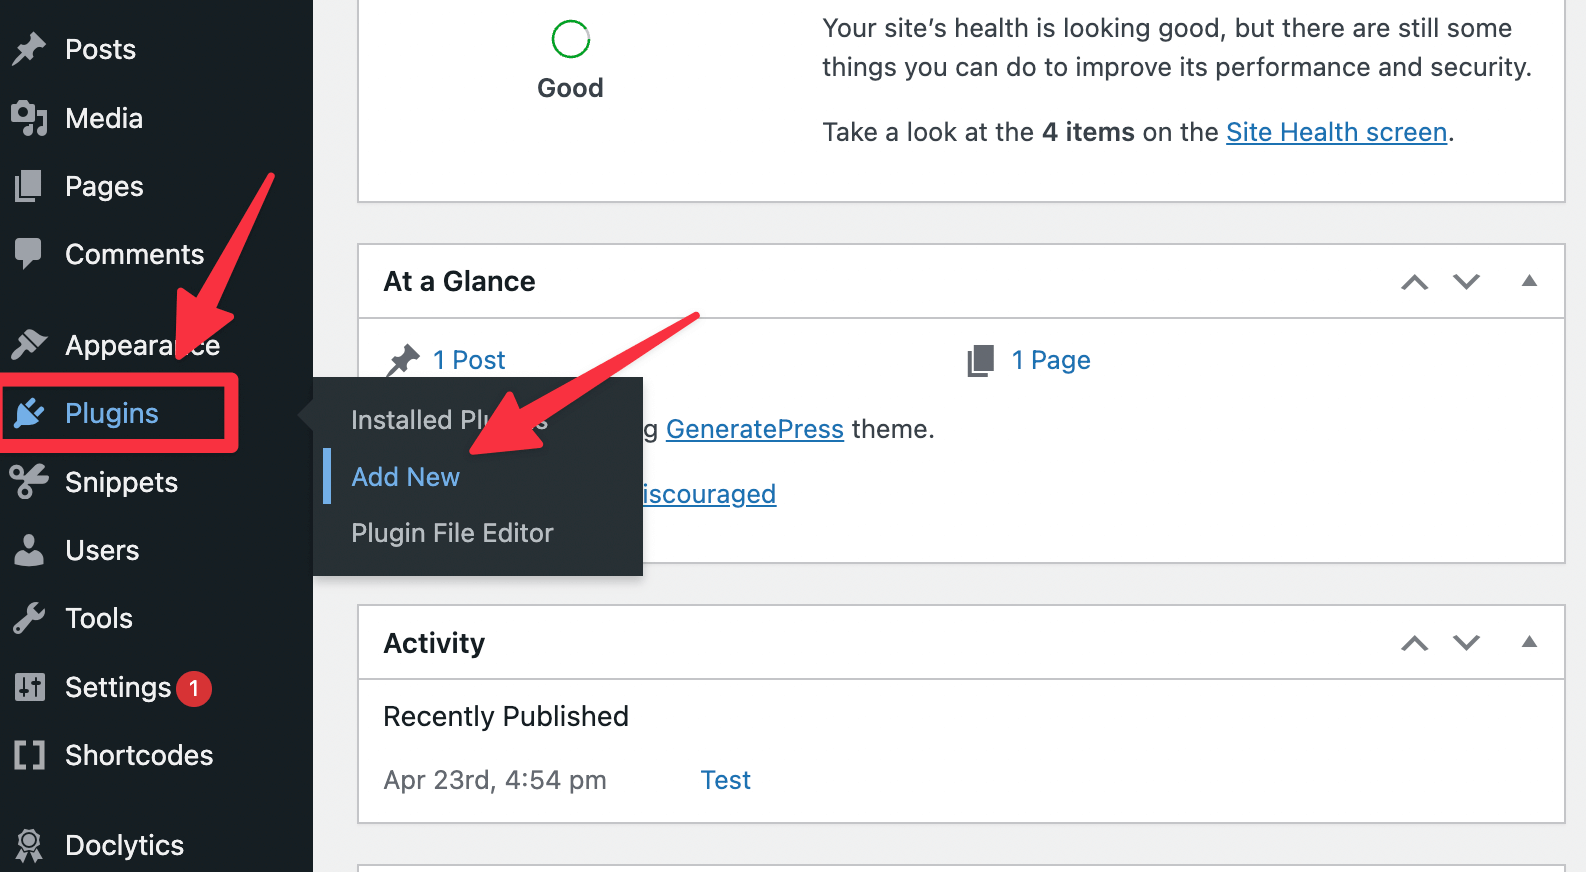
First of all, you need to login into your WordPress dashboard. After successfully logging into your account, hover over the “Plugins” option on the left-hand-side menu and click on “Add New.”
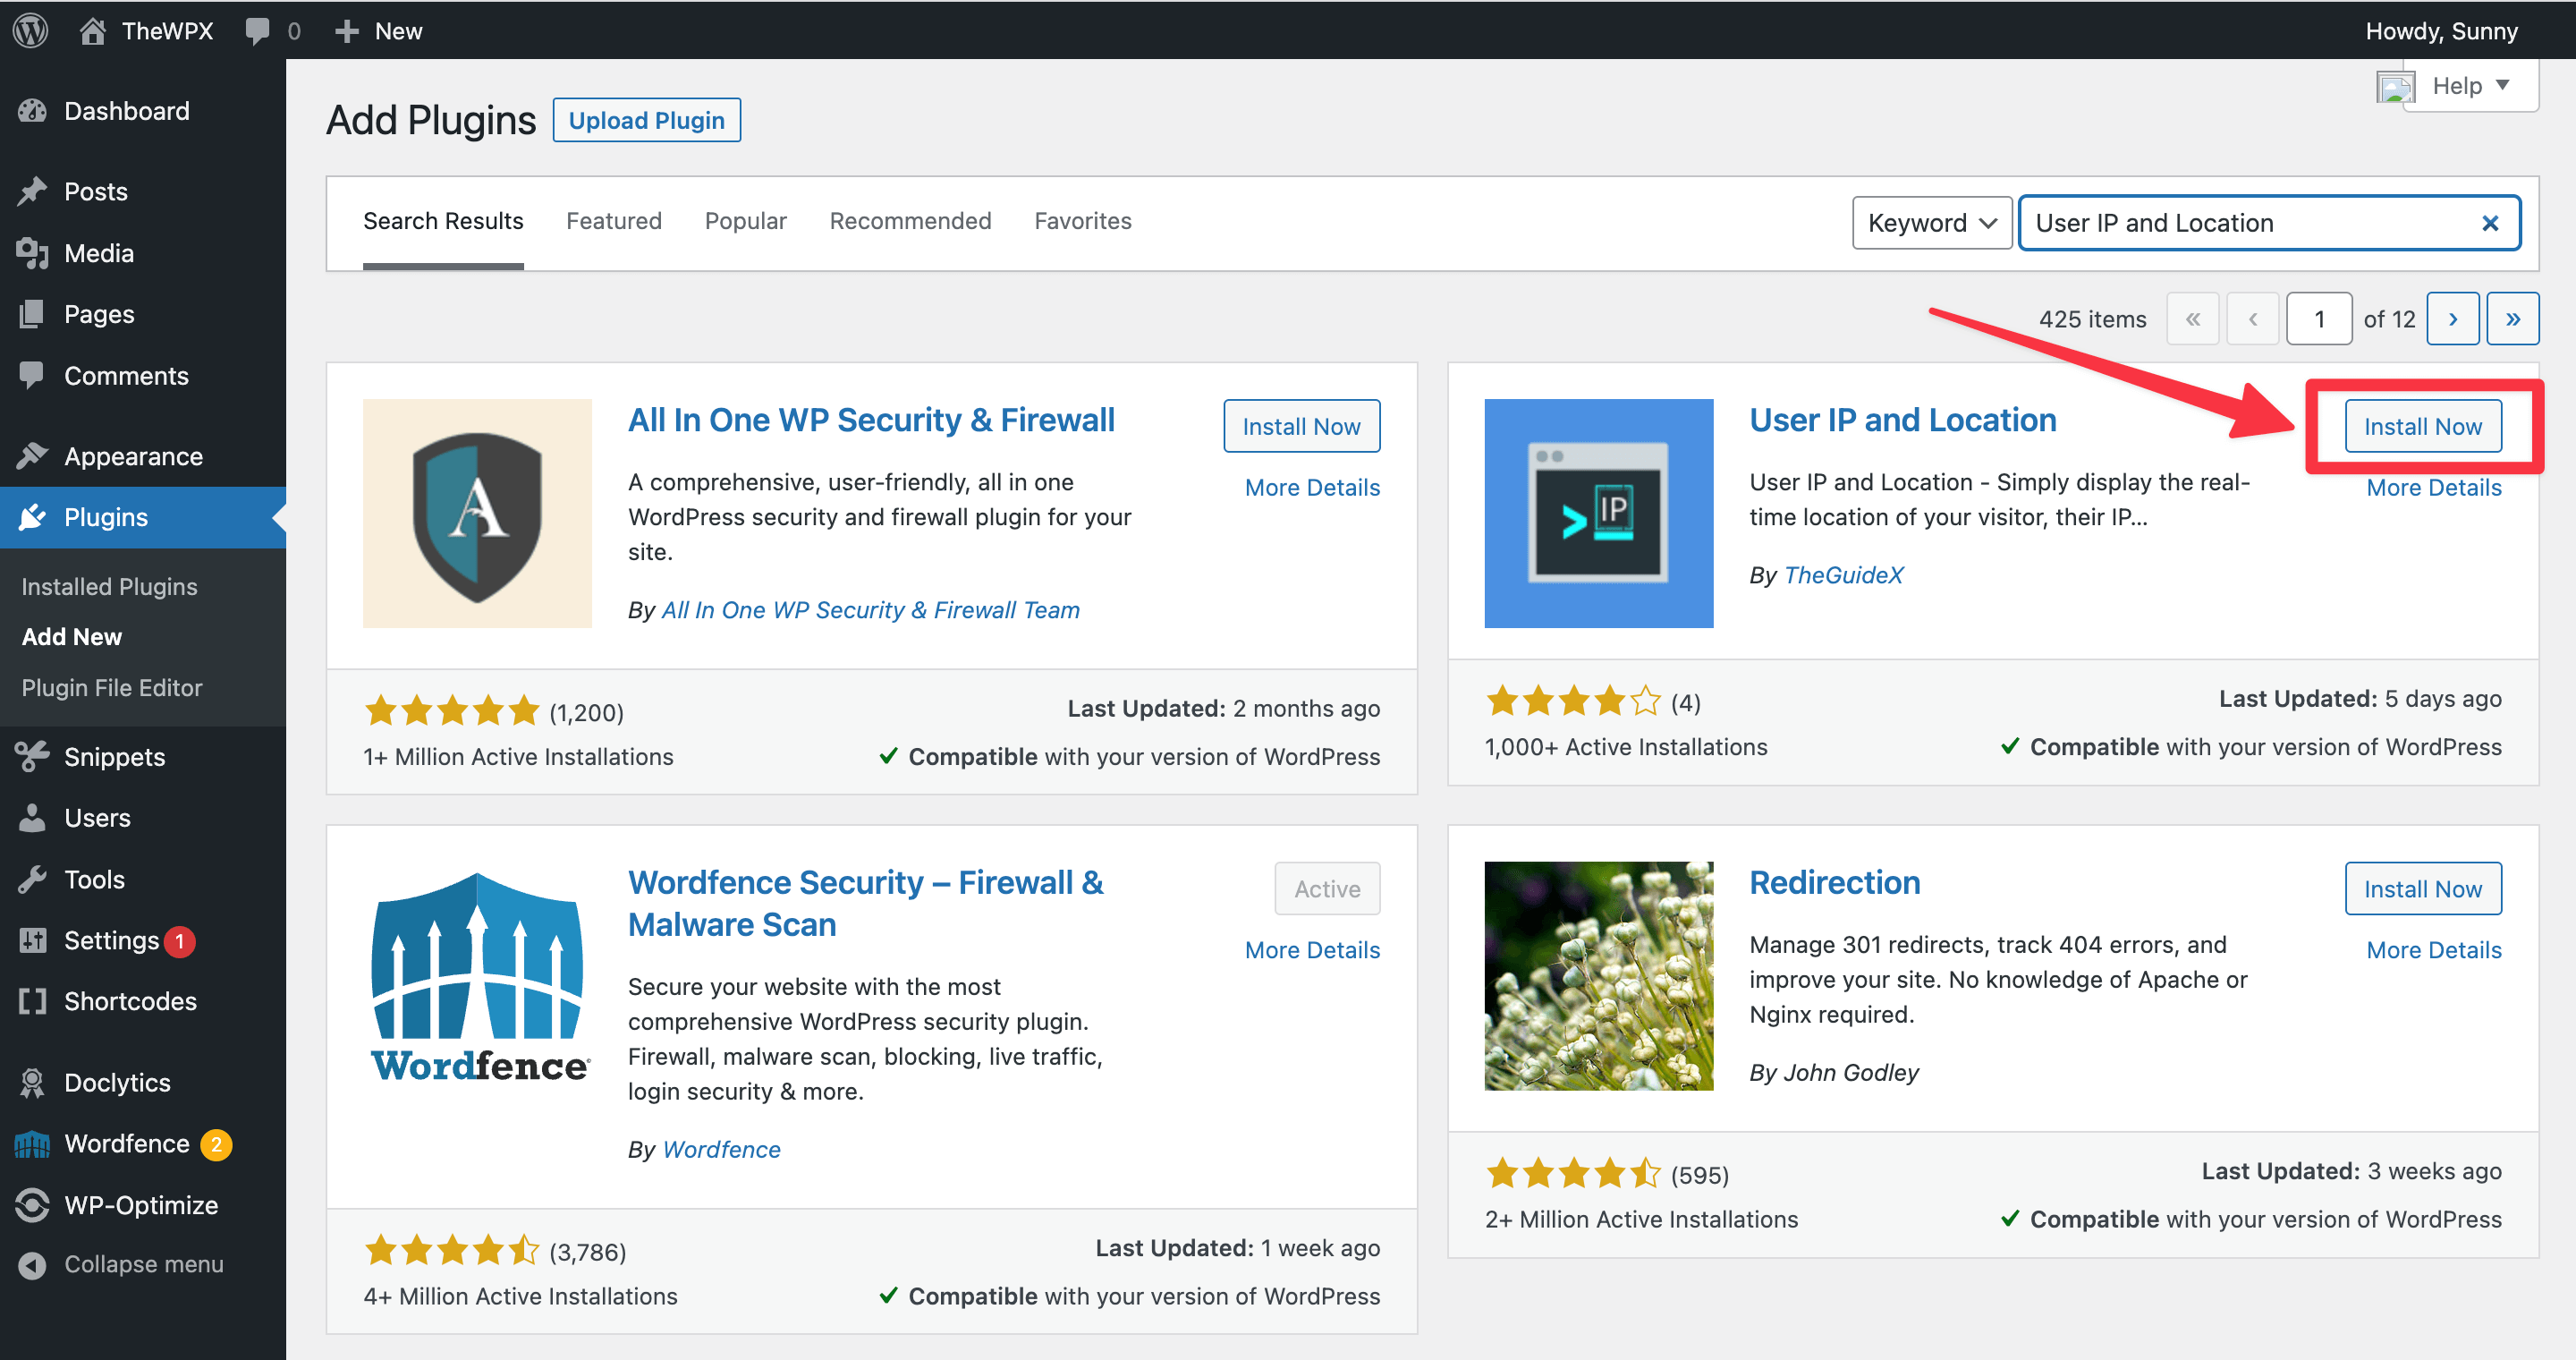
On the next page, you can either search for a specific plugin or browse through the popular, featured, and latest plugins. Once you’ve found a plugin you’d like to install, simply click on the “Install Now” button.
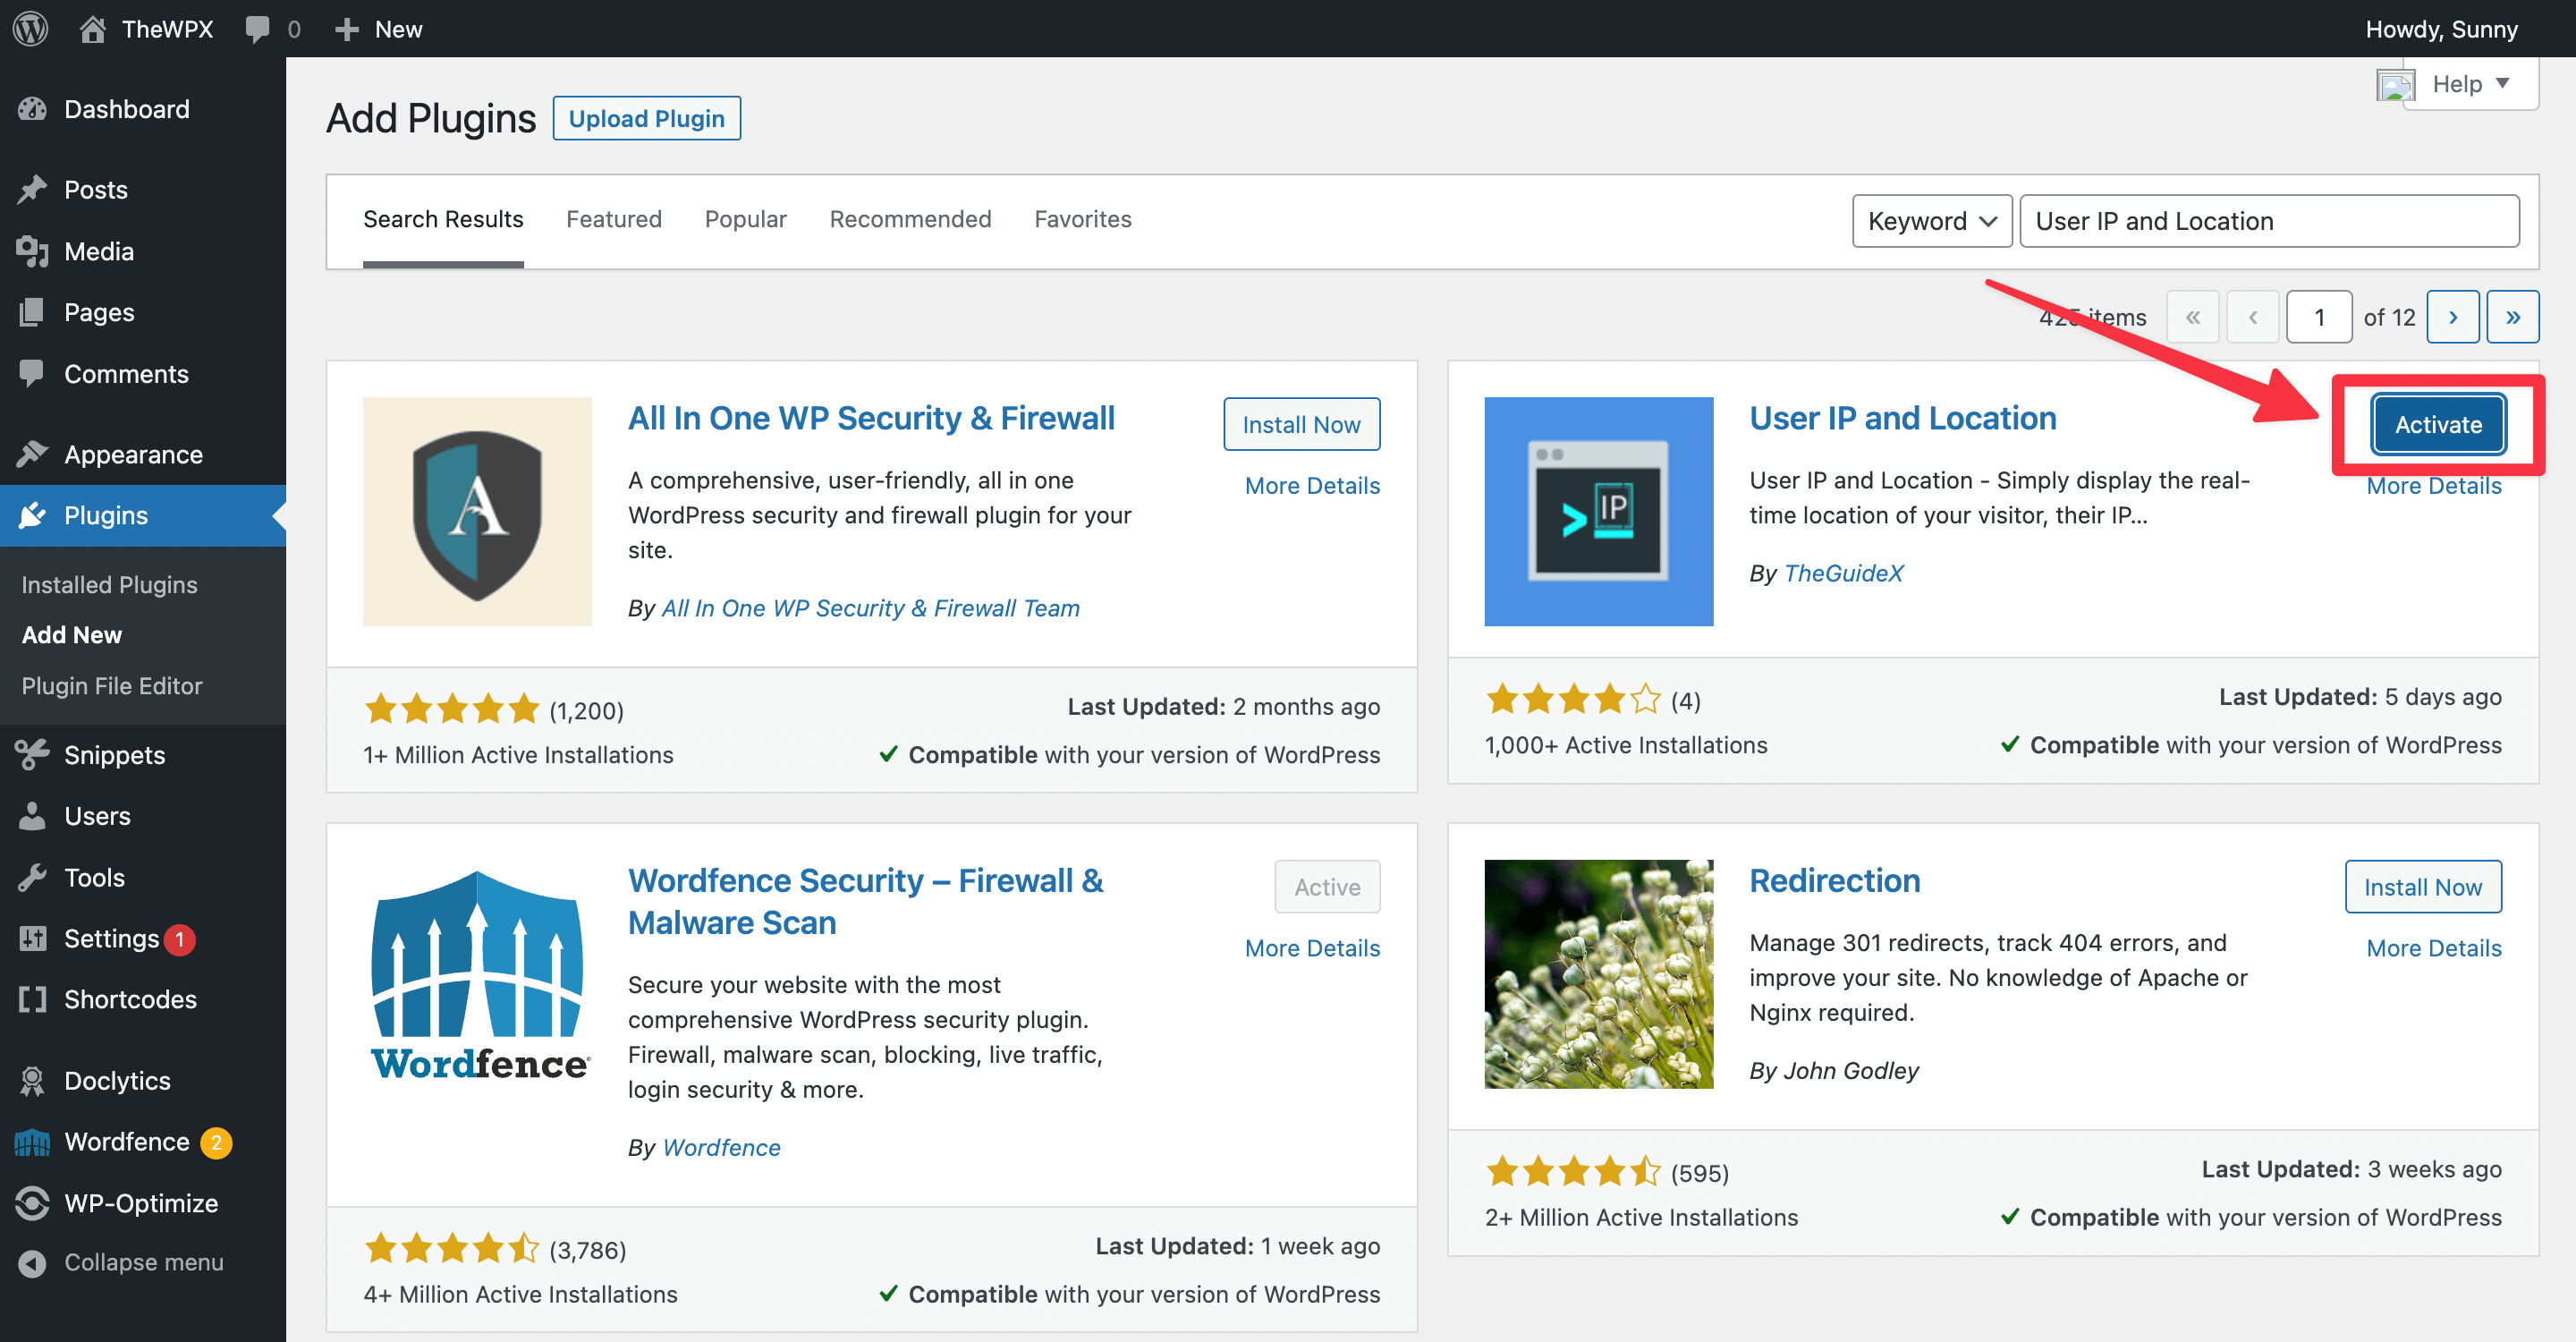
After the plugin has been installed, you will need to activate it. You can do this by clicking on the “Activate” button in your WordPress admin area.
And that’s it! Your plugin is now installed and activated.
Uploading Plugin to Your Site from Dashboard
Most of the time, you can install a WordPress plugin by simply searching for it in the WordPress plugin directory and clicking “Install.” However, if you have a plugin that’s not available in the directory, you can install it by uploading the plugin file to your WordPress site.
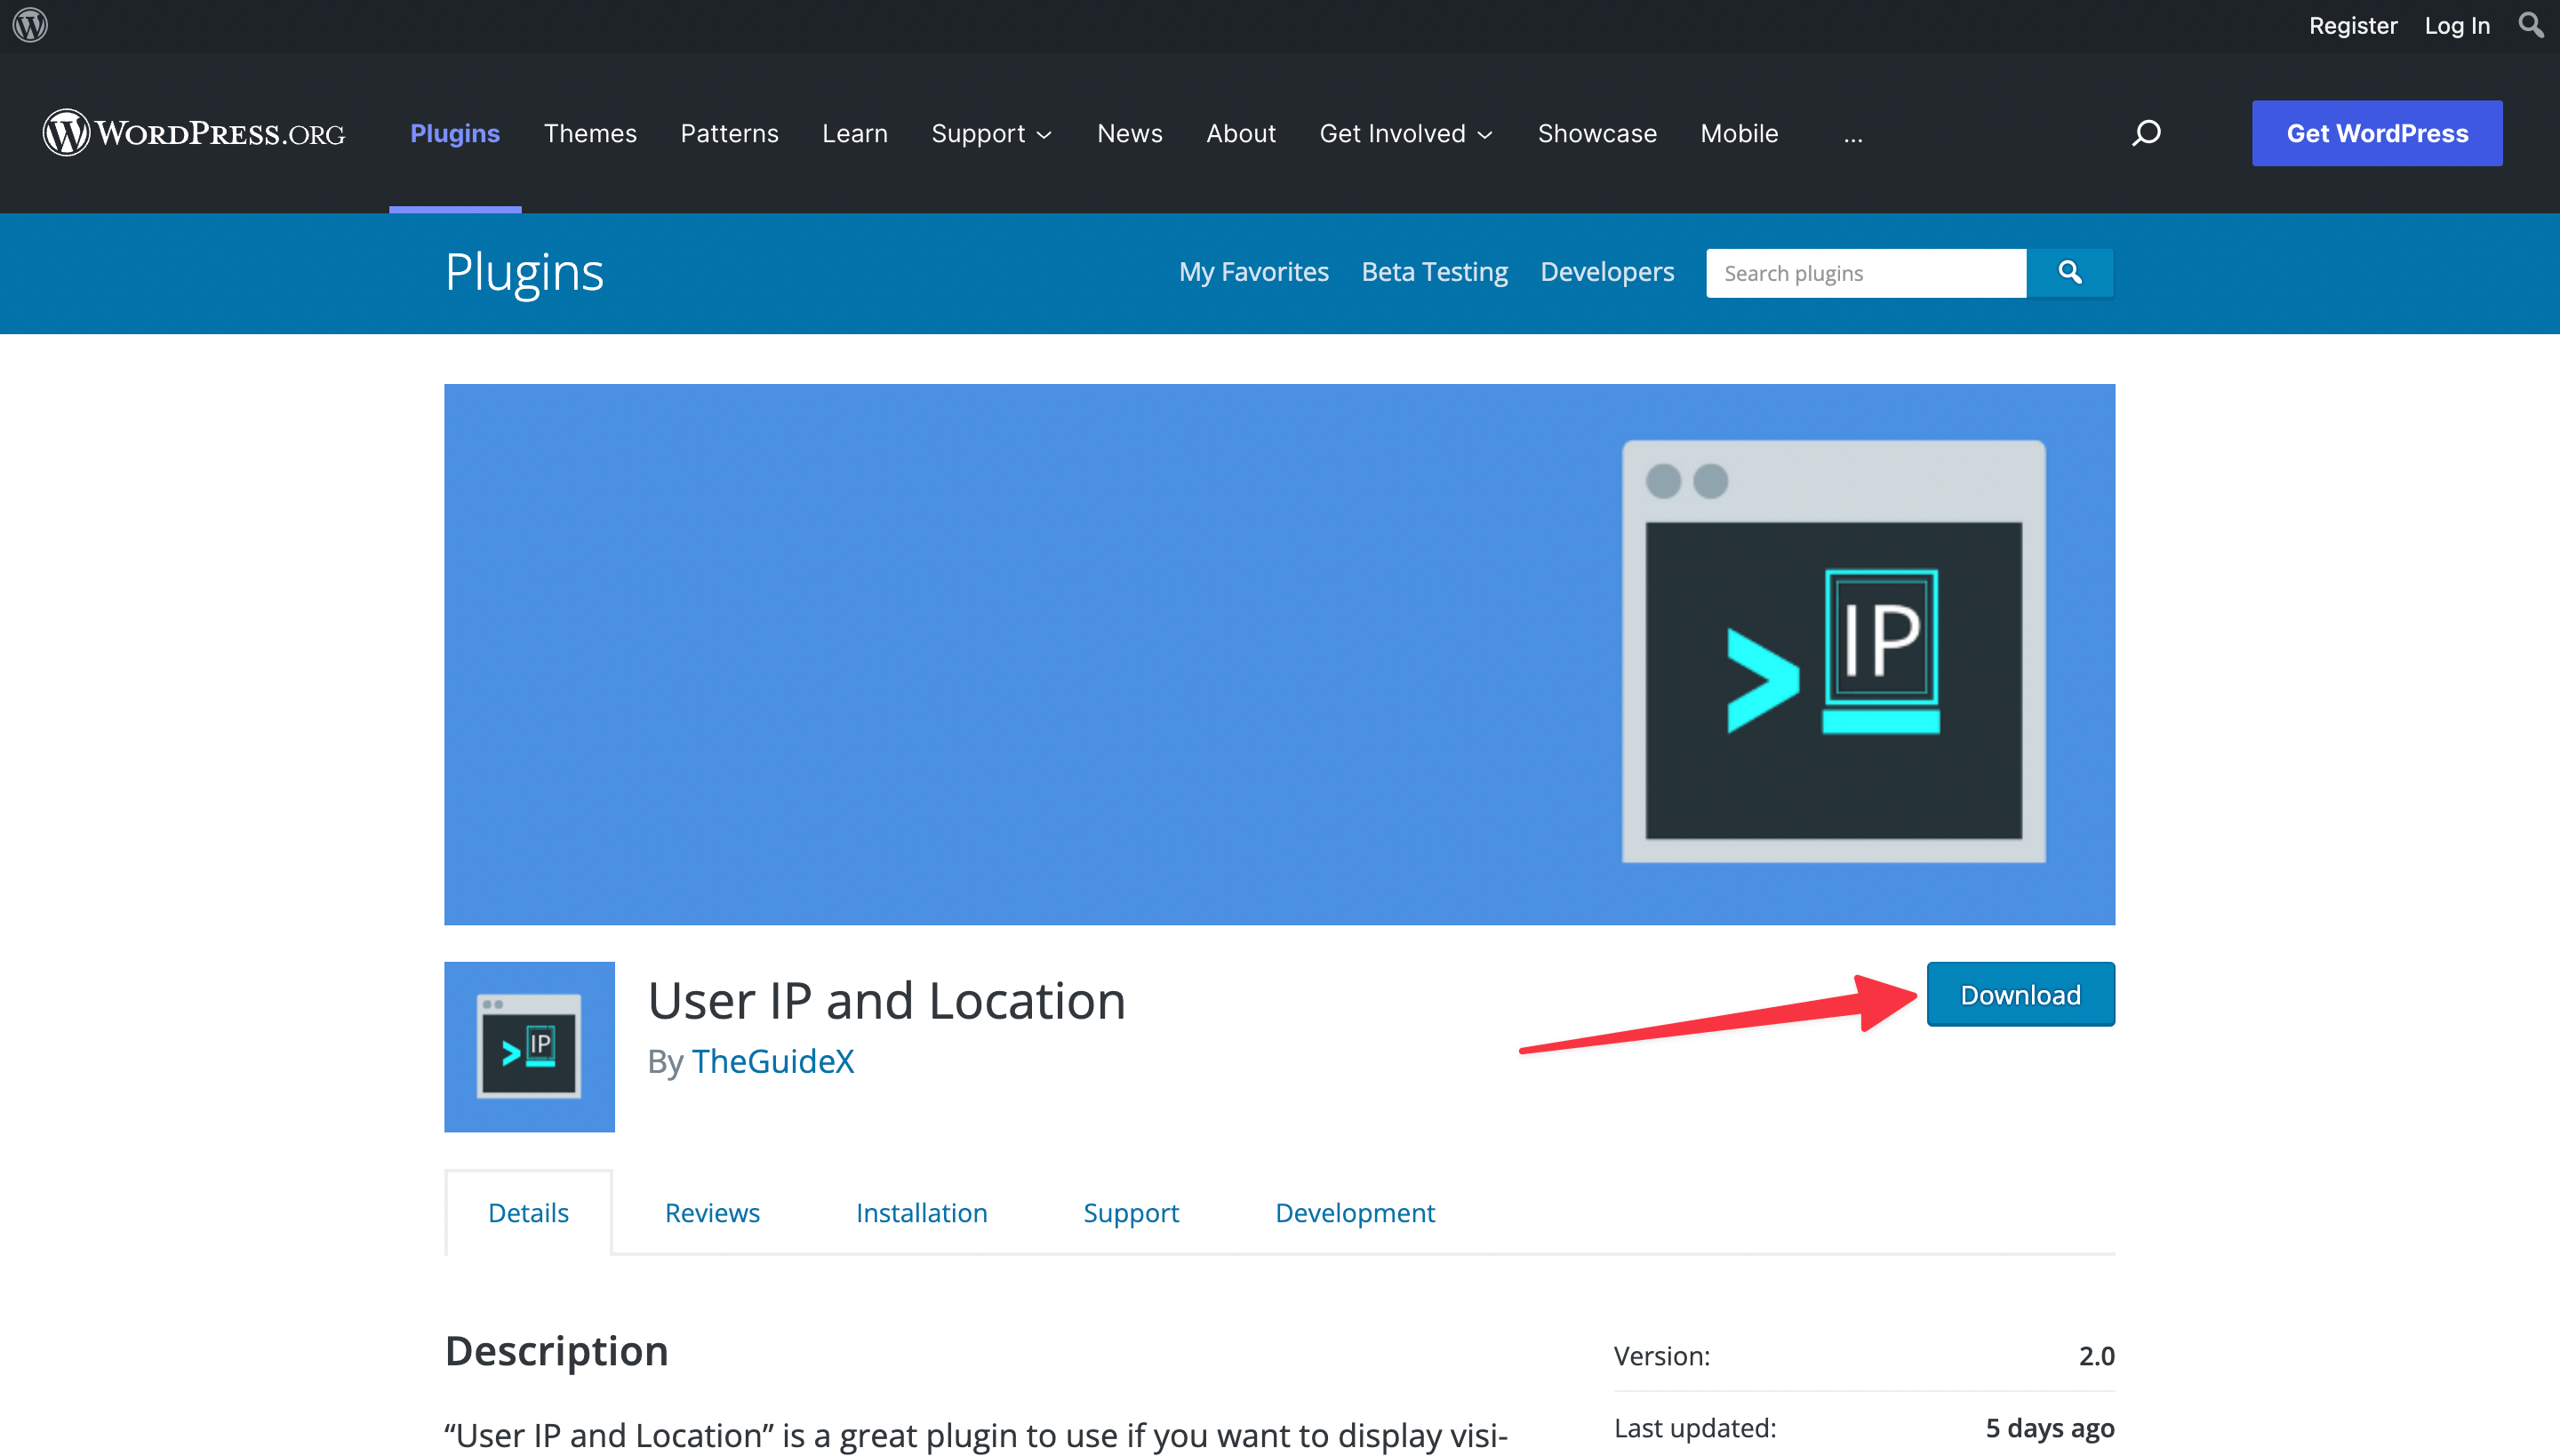
To install a new plugin in WordPress, first, you need to download the plugin’s zip file from its source. Once you have the plugin files (it will be a .zip file), go back to your WordPress dashboard and hover over the “Plugins” option on the left-hand side menu. Then, click on “Add New.”
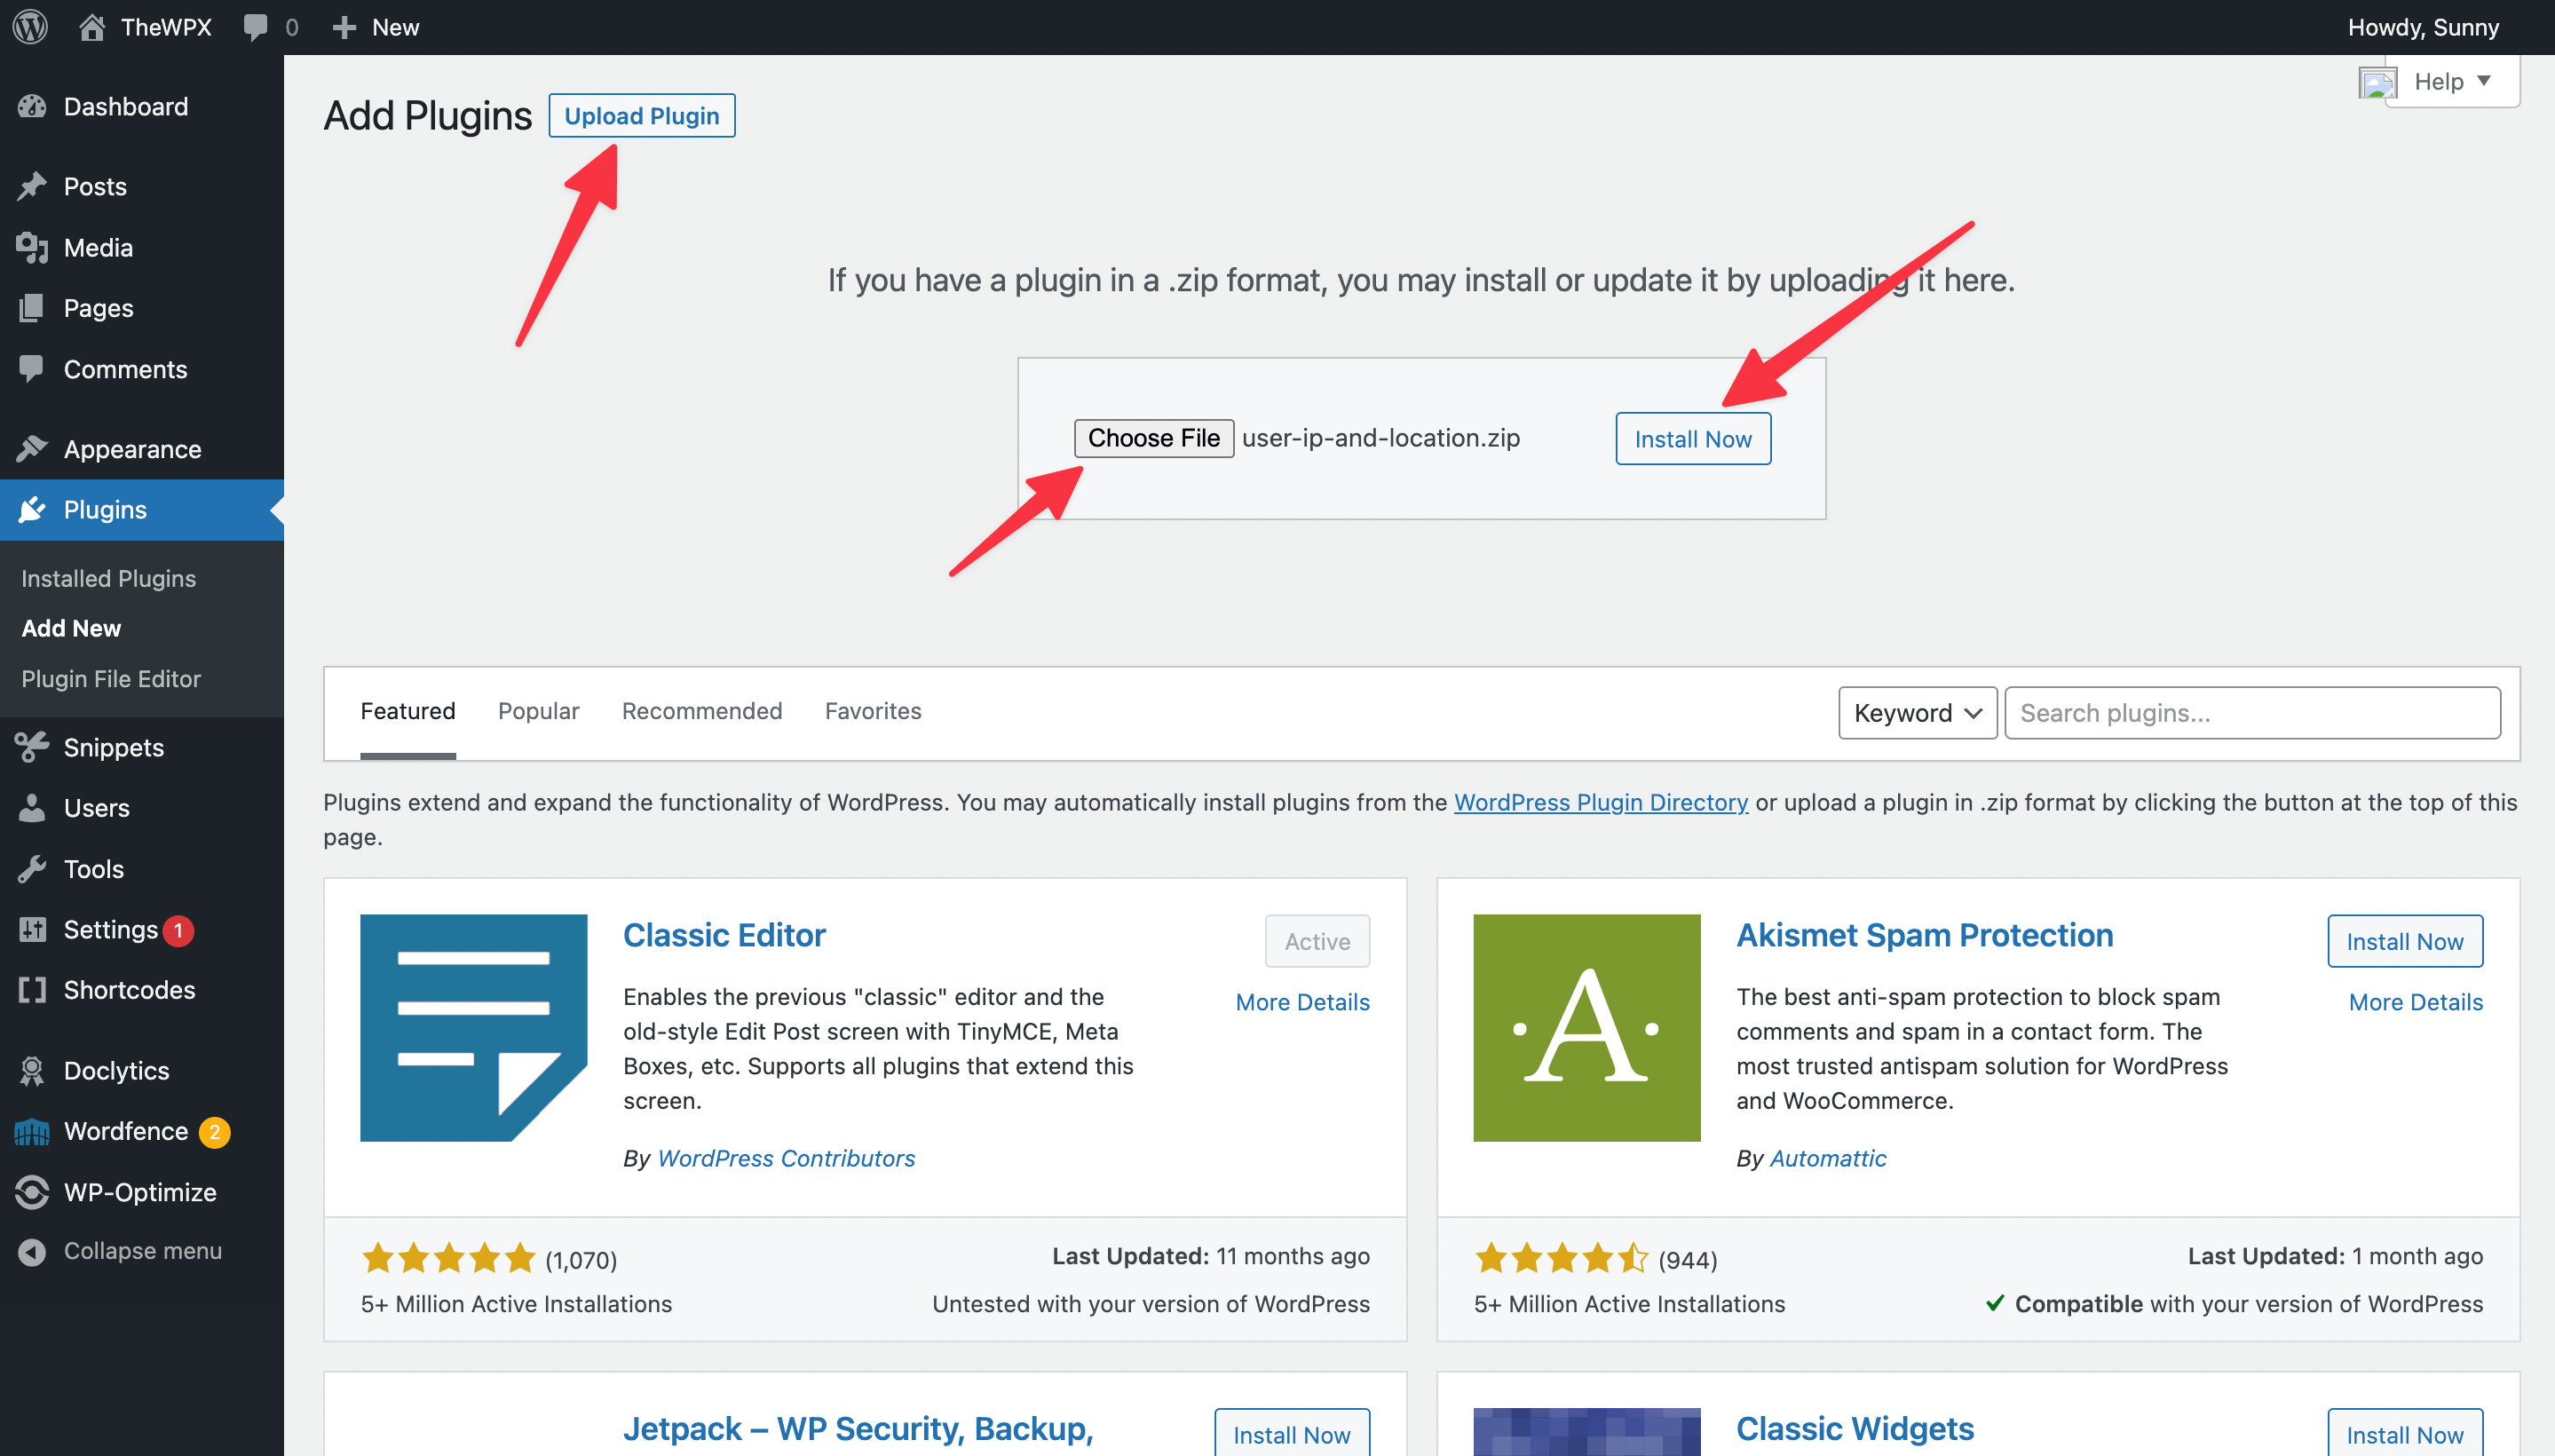
Once you’ve clicked on the “Add New” button, click on the “Upload Plugin” button showing on the top and select the file you just downloaded. After you’ve selected the file, click “Install Now.”
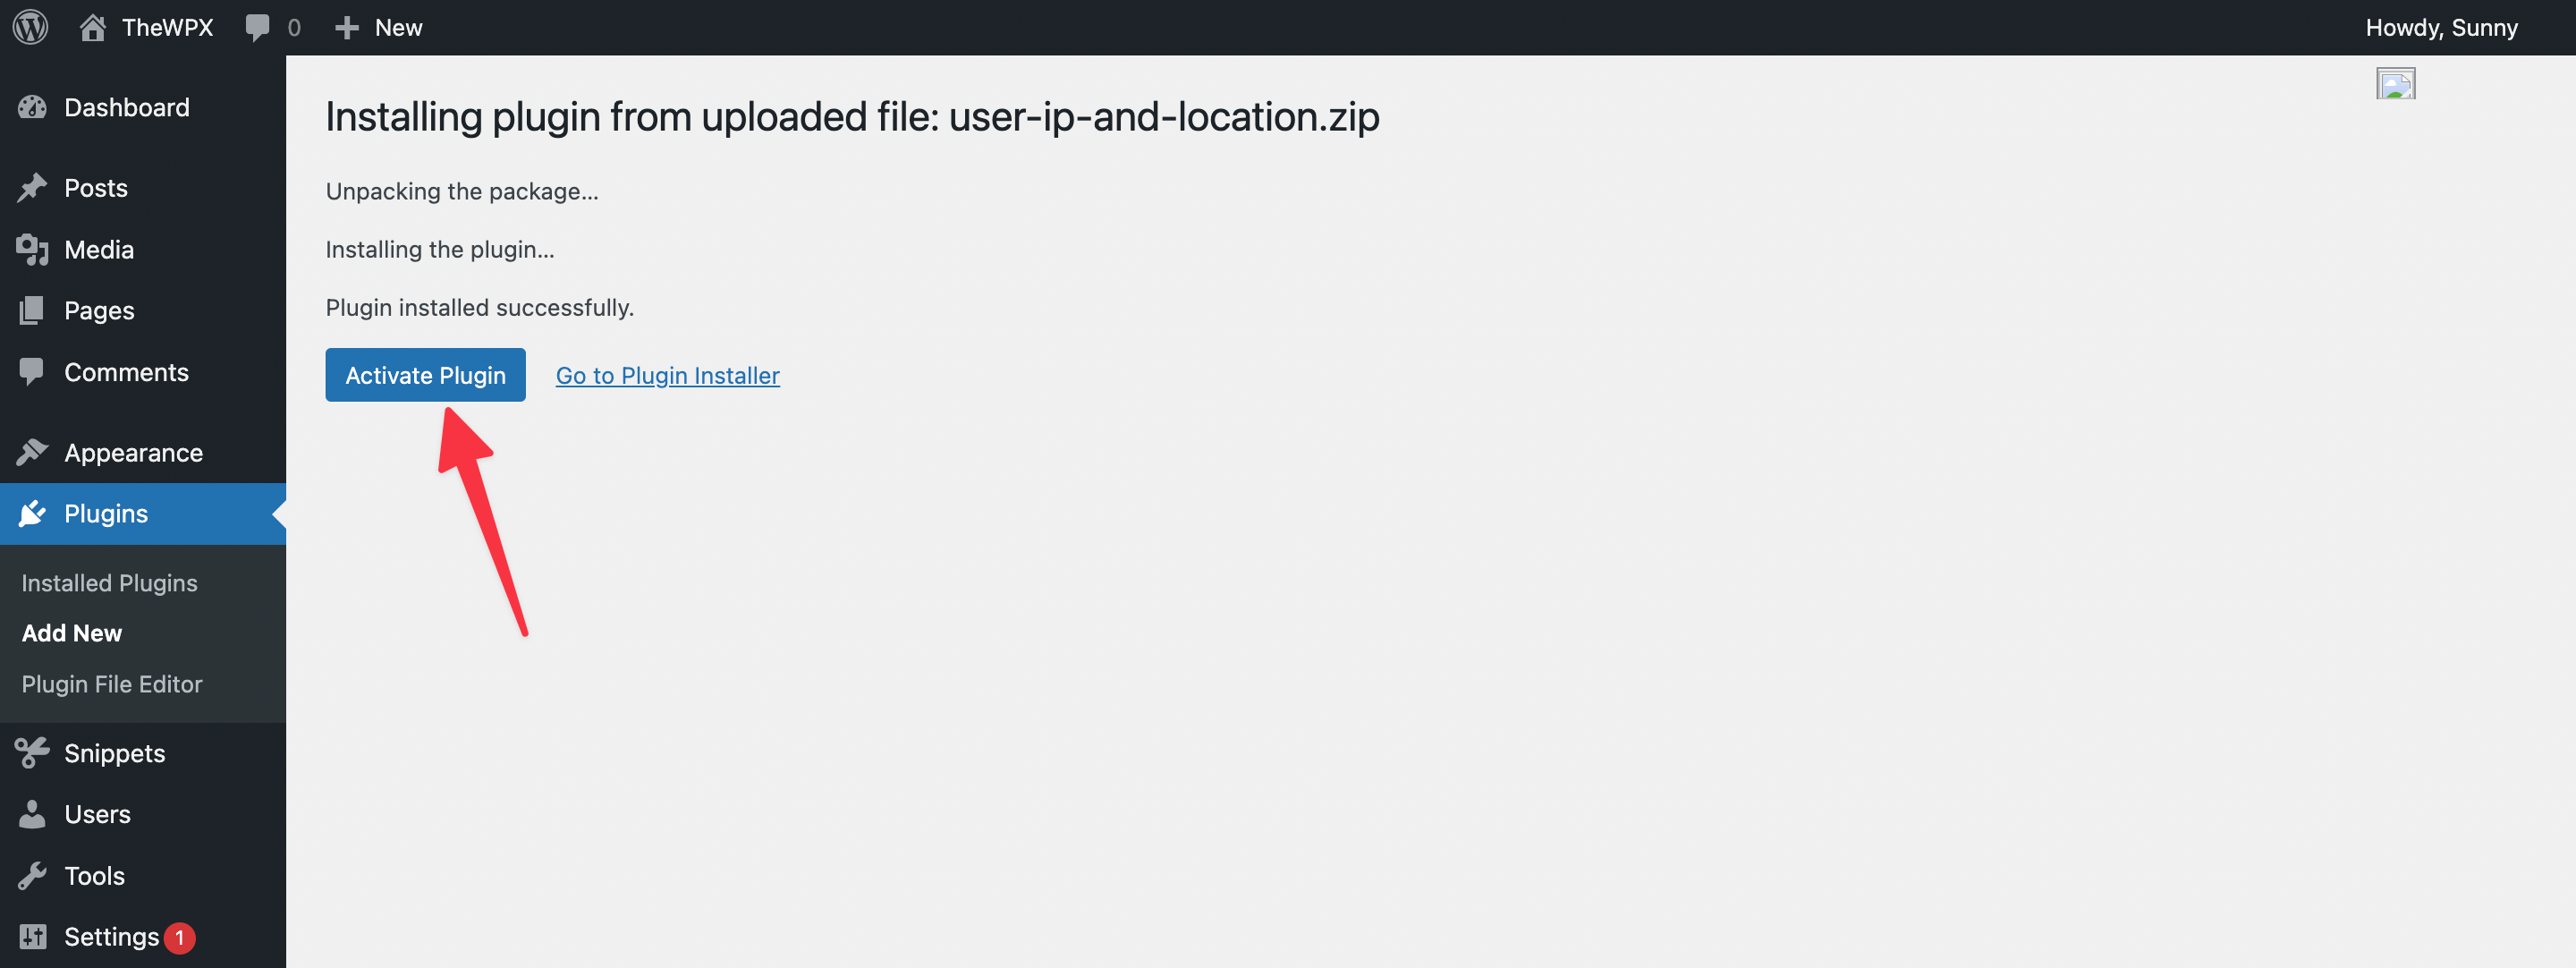
After the plugin is installed on your site, you’ll need to activate it. To do this, simply go to the plugin page and click on the “Activate Plugin” link.
That’s it! The plugin is now installed and activated on your WordPress site.
Using a FTP Client for Installing WordPress Plugin
Sometimes we face issues with our hosting provider and we’re not able to install the plugin from the repository. In this case, we may need to install a WordPress plugin manually via FTP or cPanel.
To install a WordPress plugin manually, first, you need to download the plugin file from its source. Once you have the downloaded file (it will be a .zip file), extract it and then upload the extracted folder to your website’s /wp-content/plugins/ directory.
Here’s how to upload the plugin folder to your website’s directory using your hosting provider’s cPanel:
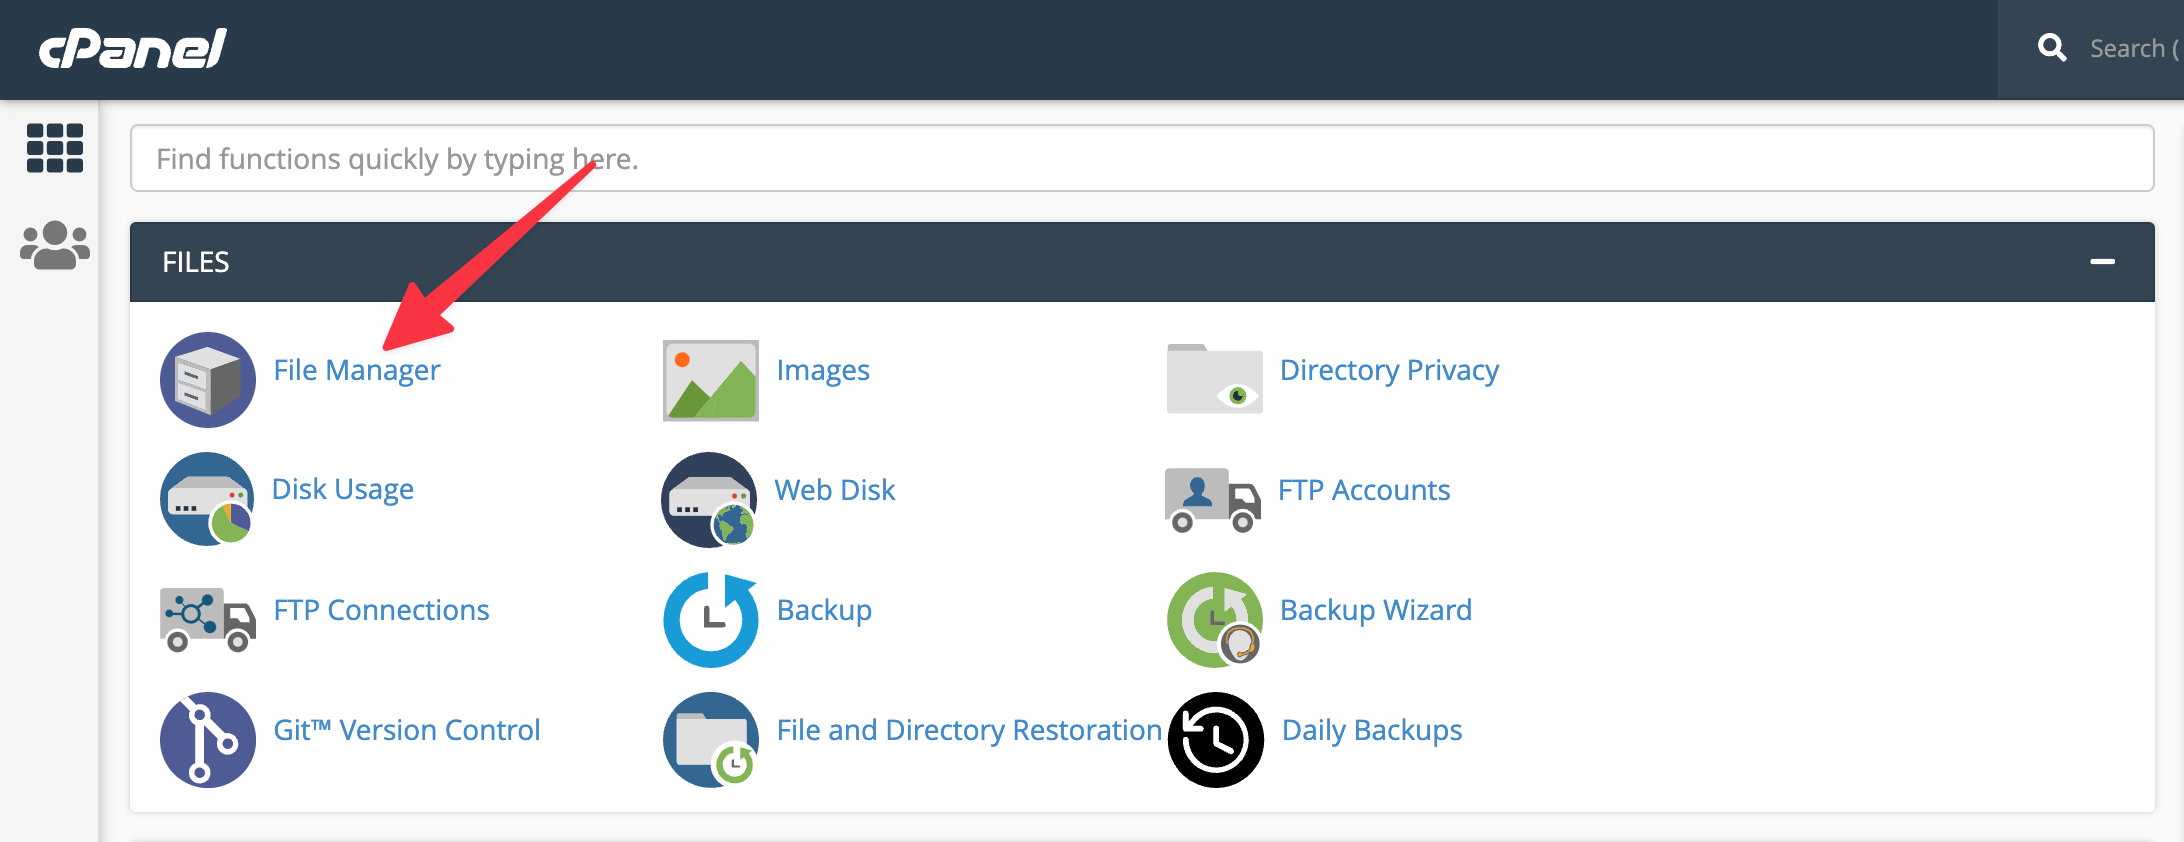
To start, you need to log into your cPanel account. Once you’re logged in, scroll down to the “Files” section and click on the “File Manager” icon.
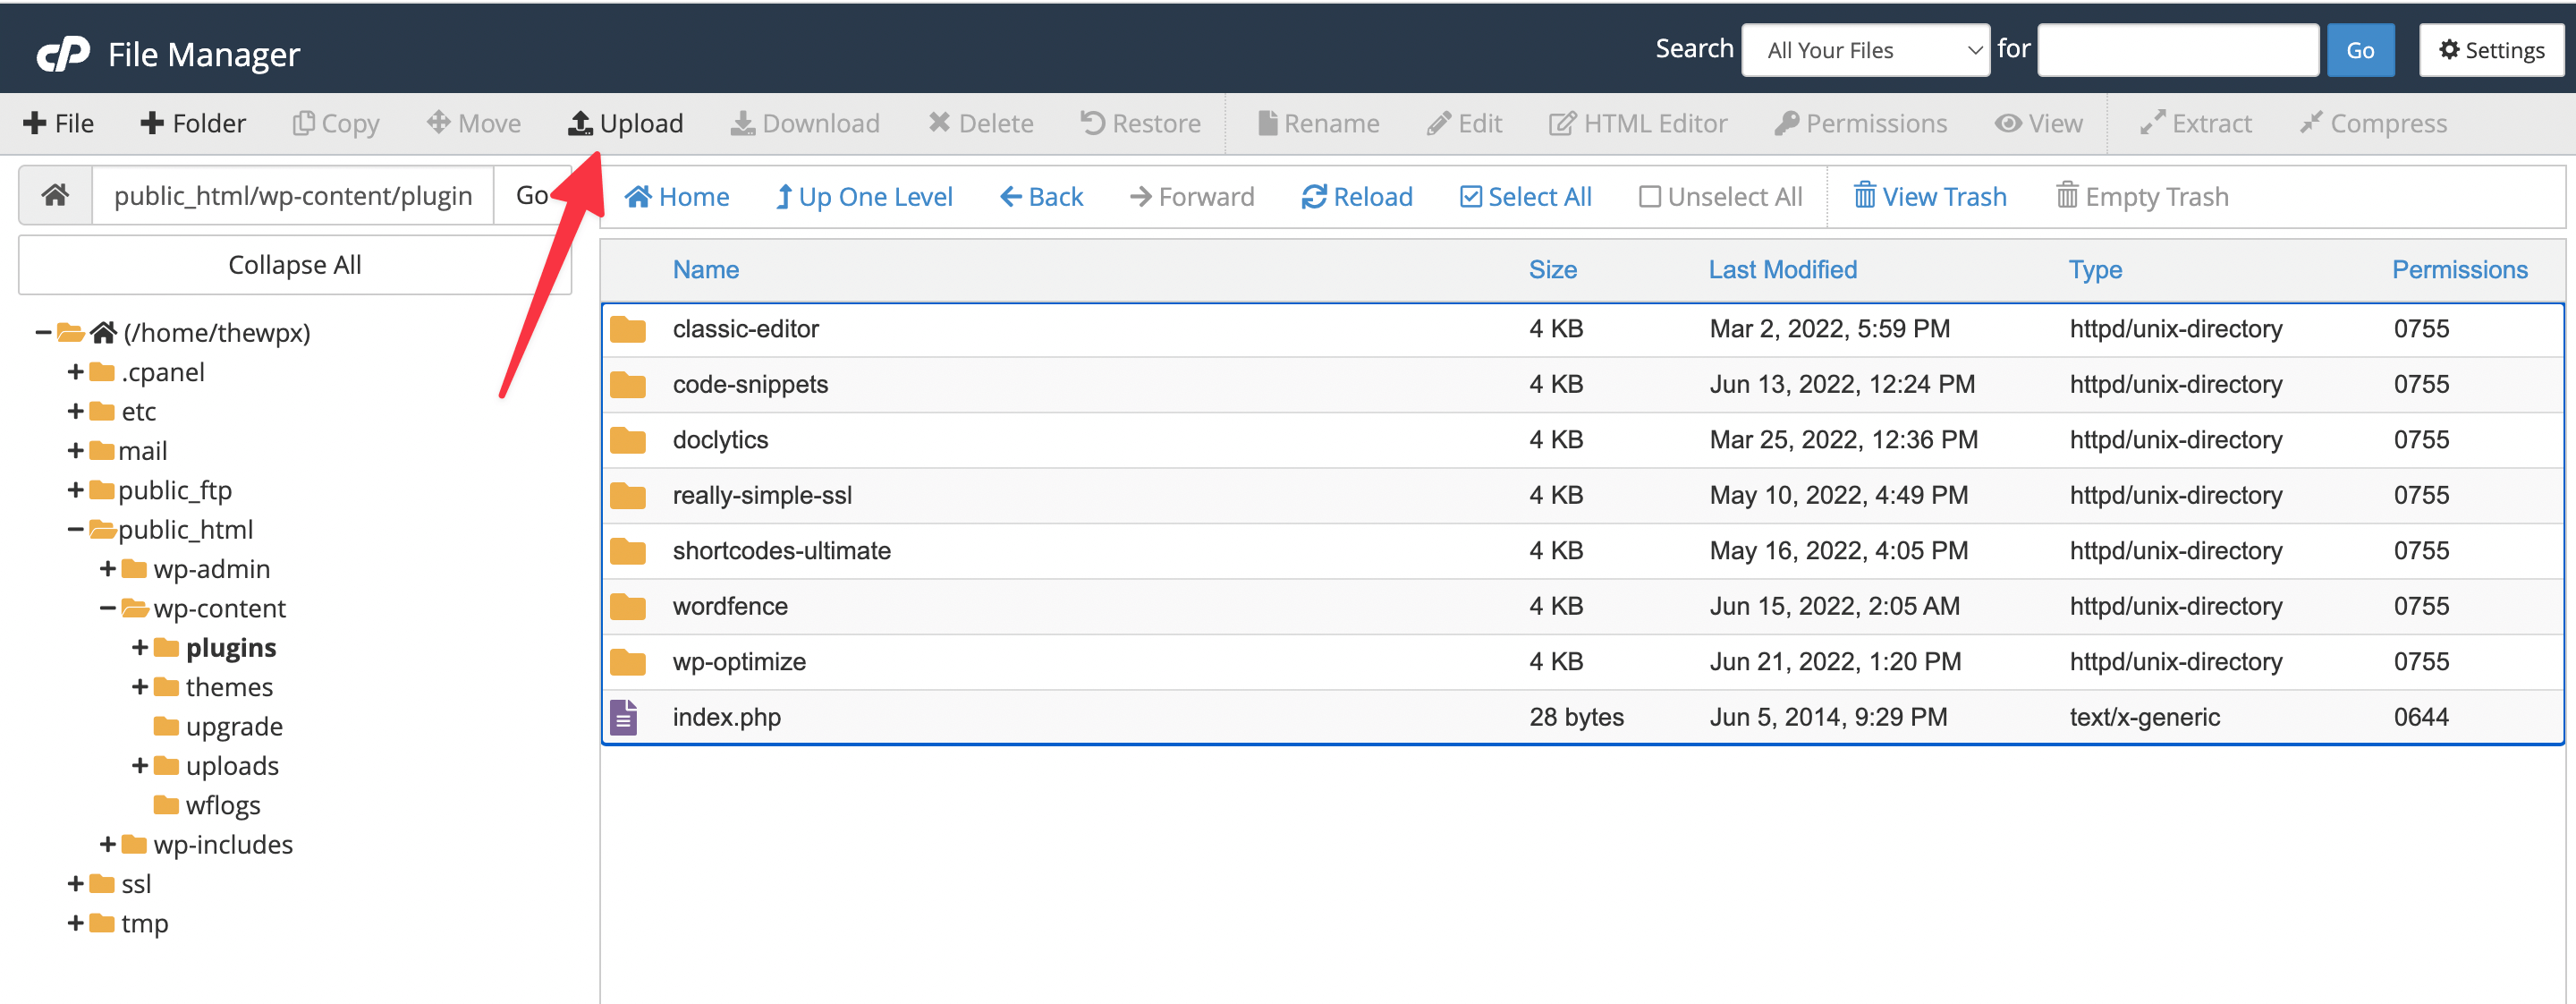
On the next page, select the directory where you want to upload the plugin folder. In most cases, it will be the public_html directory. Once you’re inside of the /wp-content/plugins/ folder, click “Upload.”
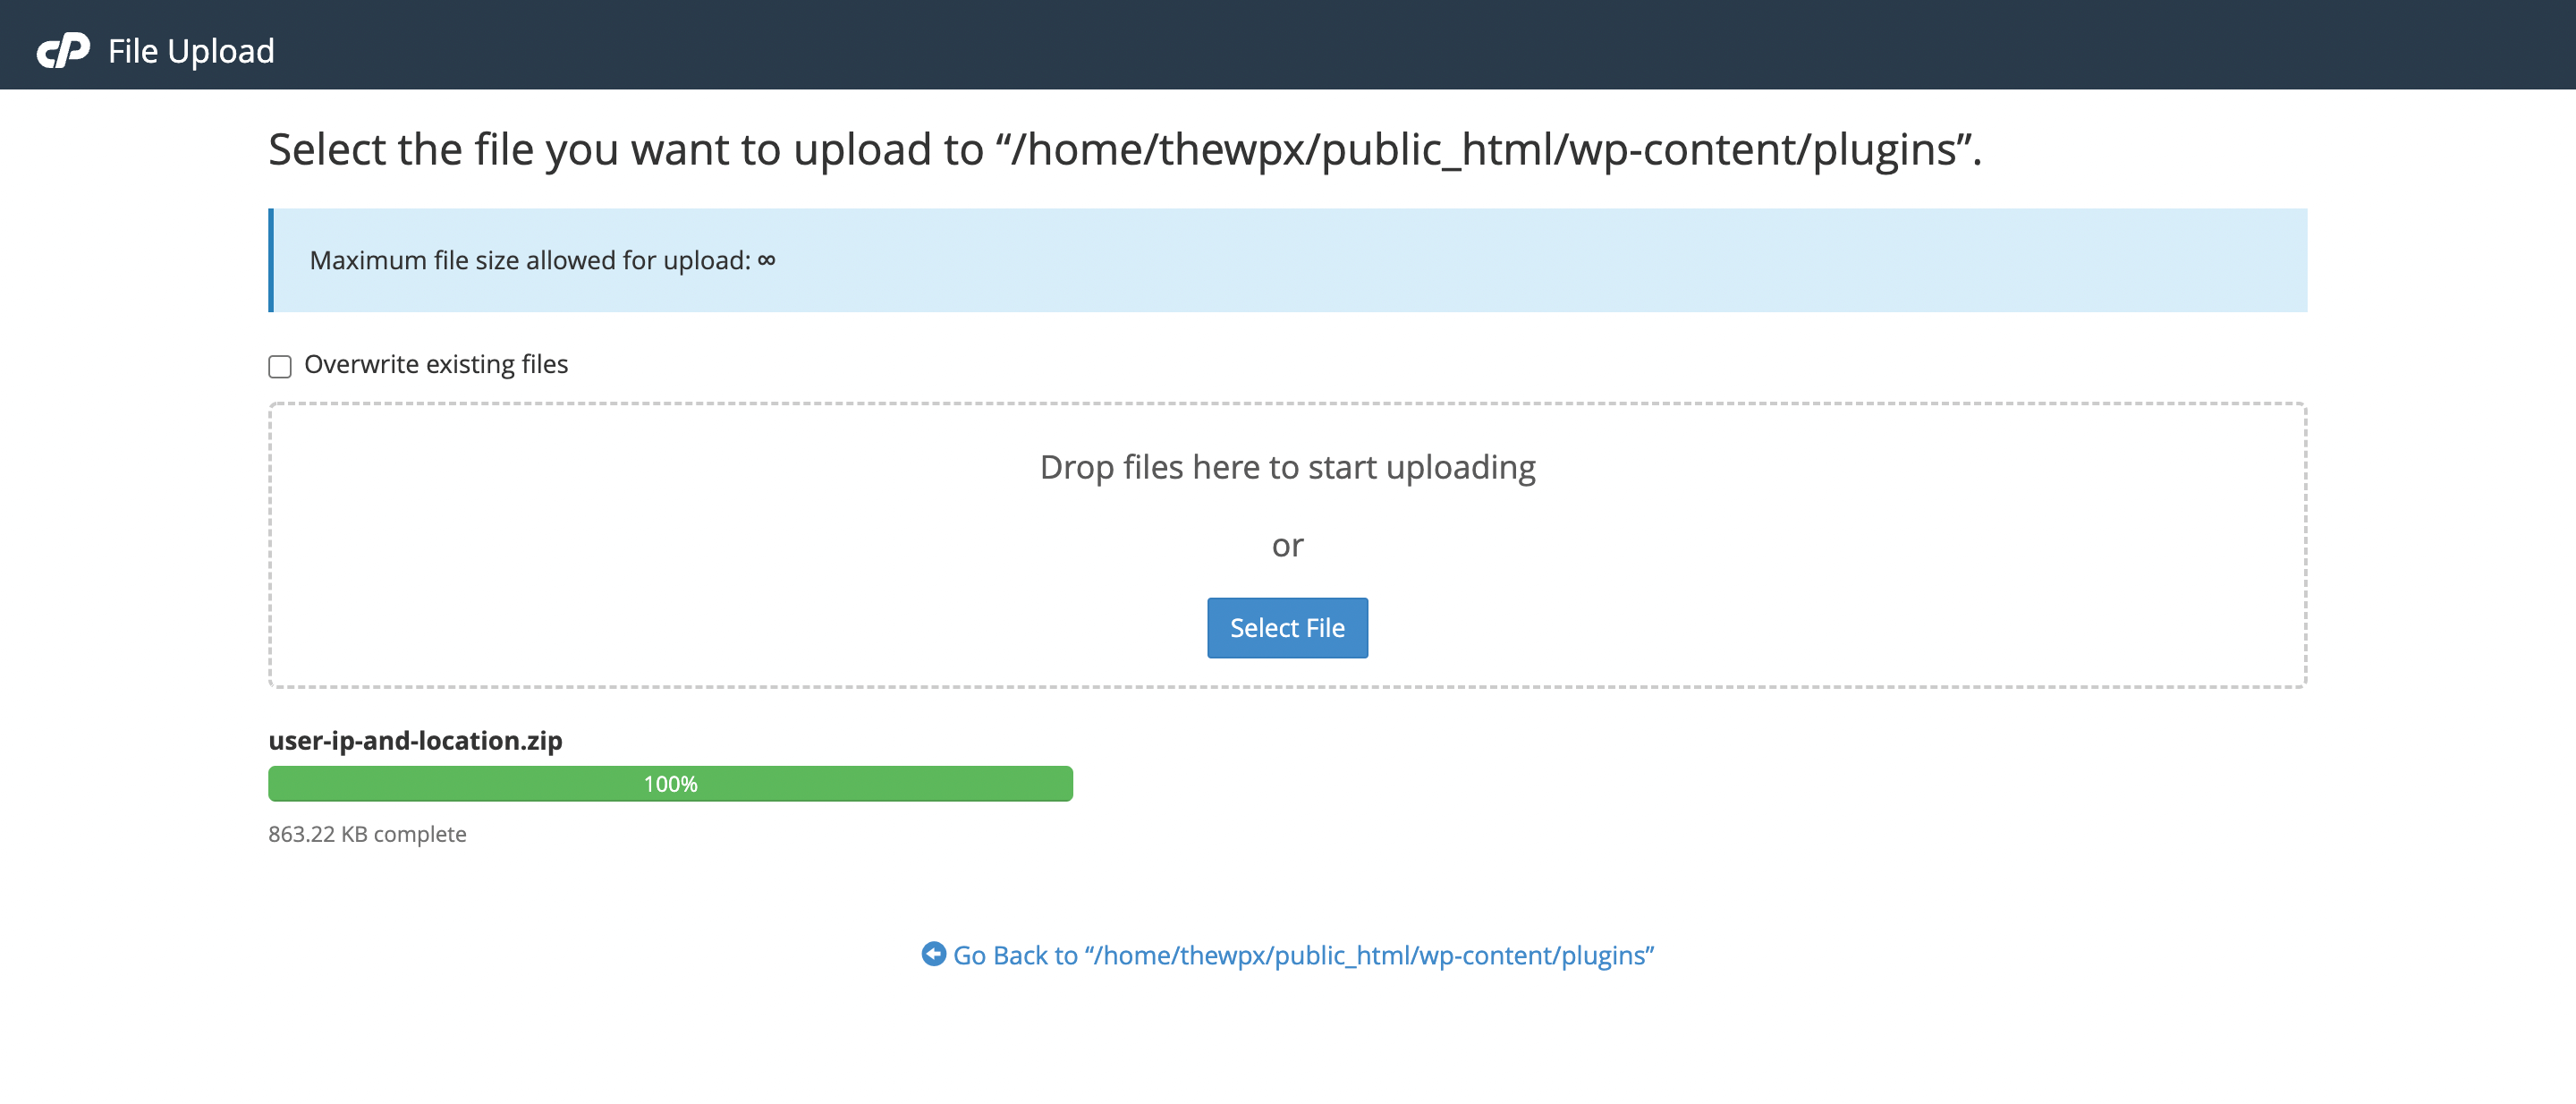
After you select the “Upload” option, you need to select the downloaded file that you want to upload. Once the upload is complete, you need to unzip the file.
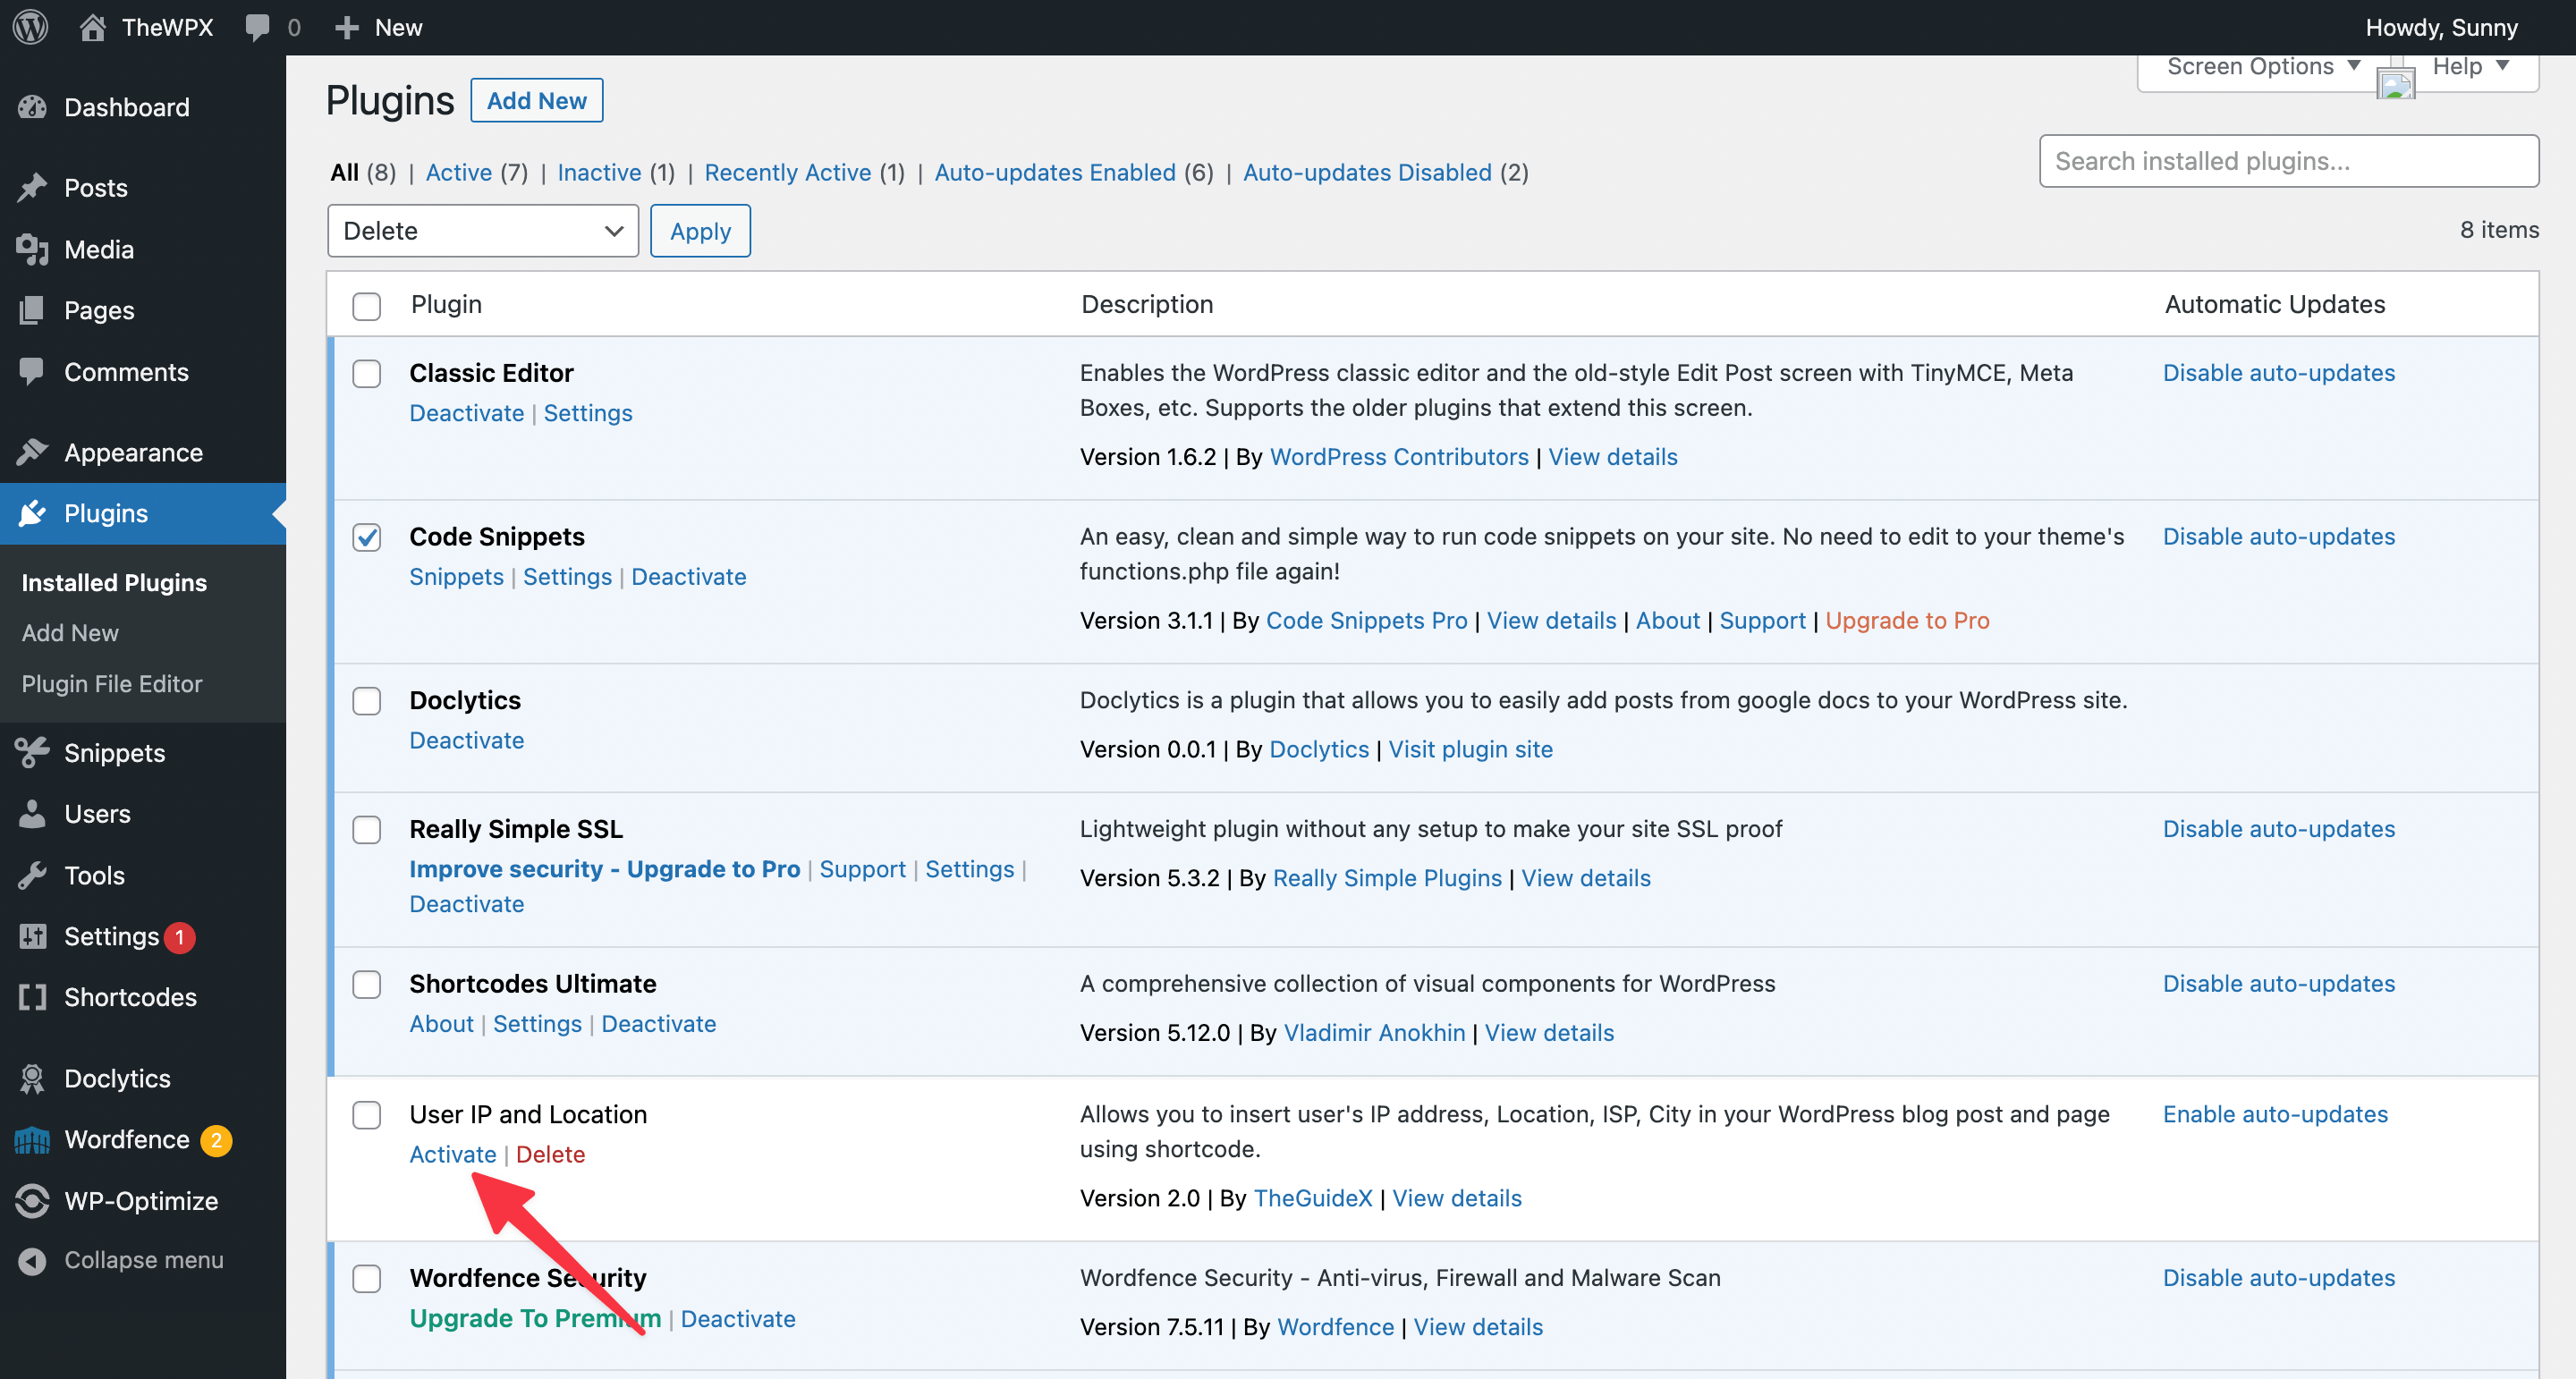
After unzipping, go back to your WordPress dashboard and hover over the “Plugins” option on the left-hand side menu. Here you’ll see the plugin you just installed.
Now click on the “Activate” button to start using the plugin on your WordPress site. And that’s it! The plugin is now installed and activated on your WordPress site.
Why Should We Install a WordPress Plugin on Our Website?
WordPress plugins are great because they can add new features and functionality to your WordPress site. For example, if you want to add a contact form to your site, you can do so by installing a contact form plugin.
Plugins are easy to install and can really help to improve the overall functionality of your site. And there are literally thousands of WordPress plugins available for free. Many of them are available in the WordPress directory, but if you can’t find a plugin in the directory, you can always install it manually.
This will come in handy if you ever want to add a new feature or functionality to your WordPress site.
Now that we’ve gone over how to install a WordPress plugin, let’s take a look at some of the best marketplaces for finding WordPress plugins.
Best Marketplace for Finding WordPress Plugins
Finding WordPress plugins is easy!
There are a few different places you can go to find WordPress plugins, and we’ve listed some of the best below.
1. The WordPress Plugin Directory
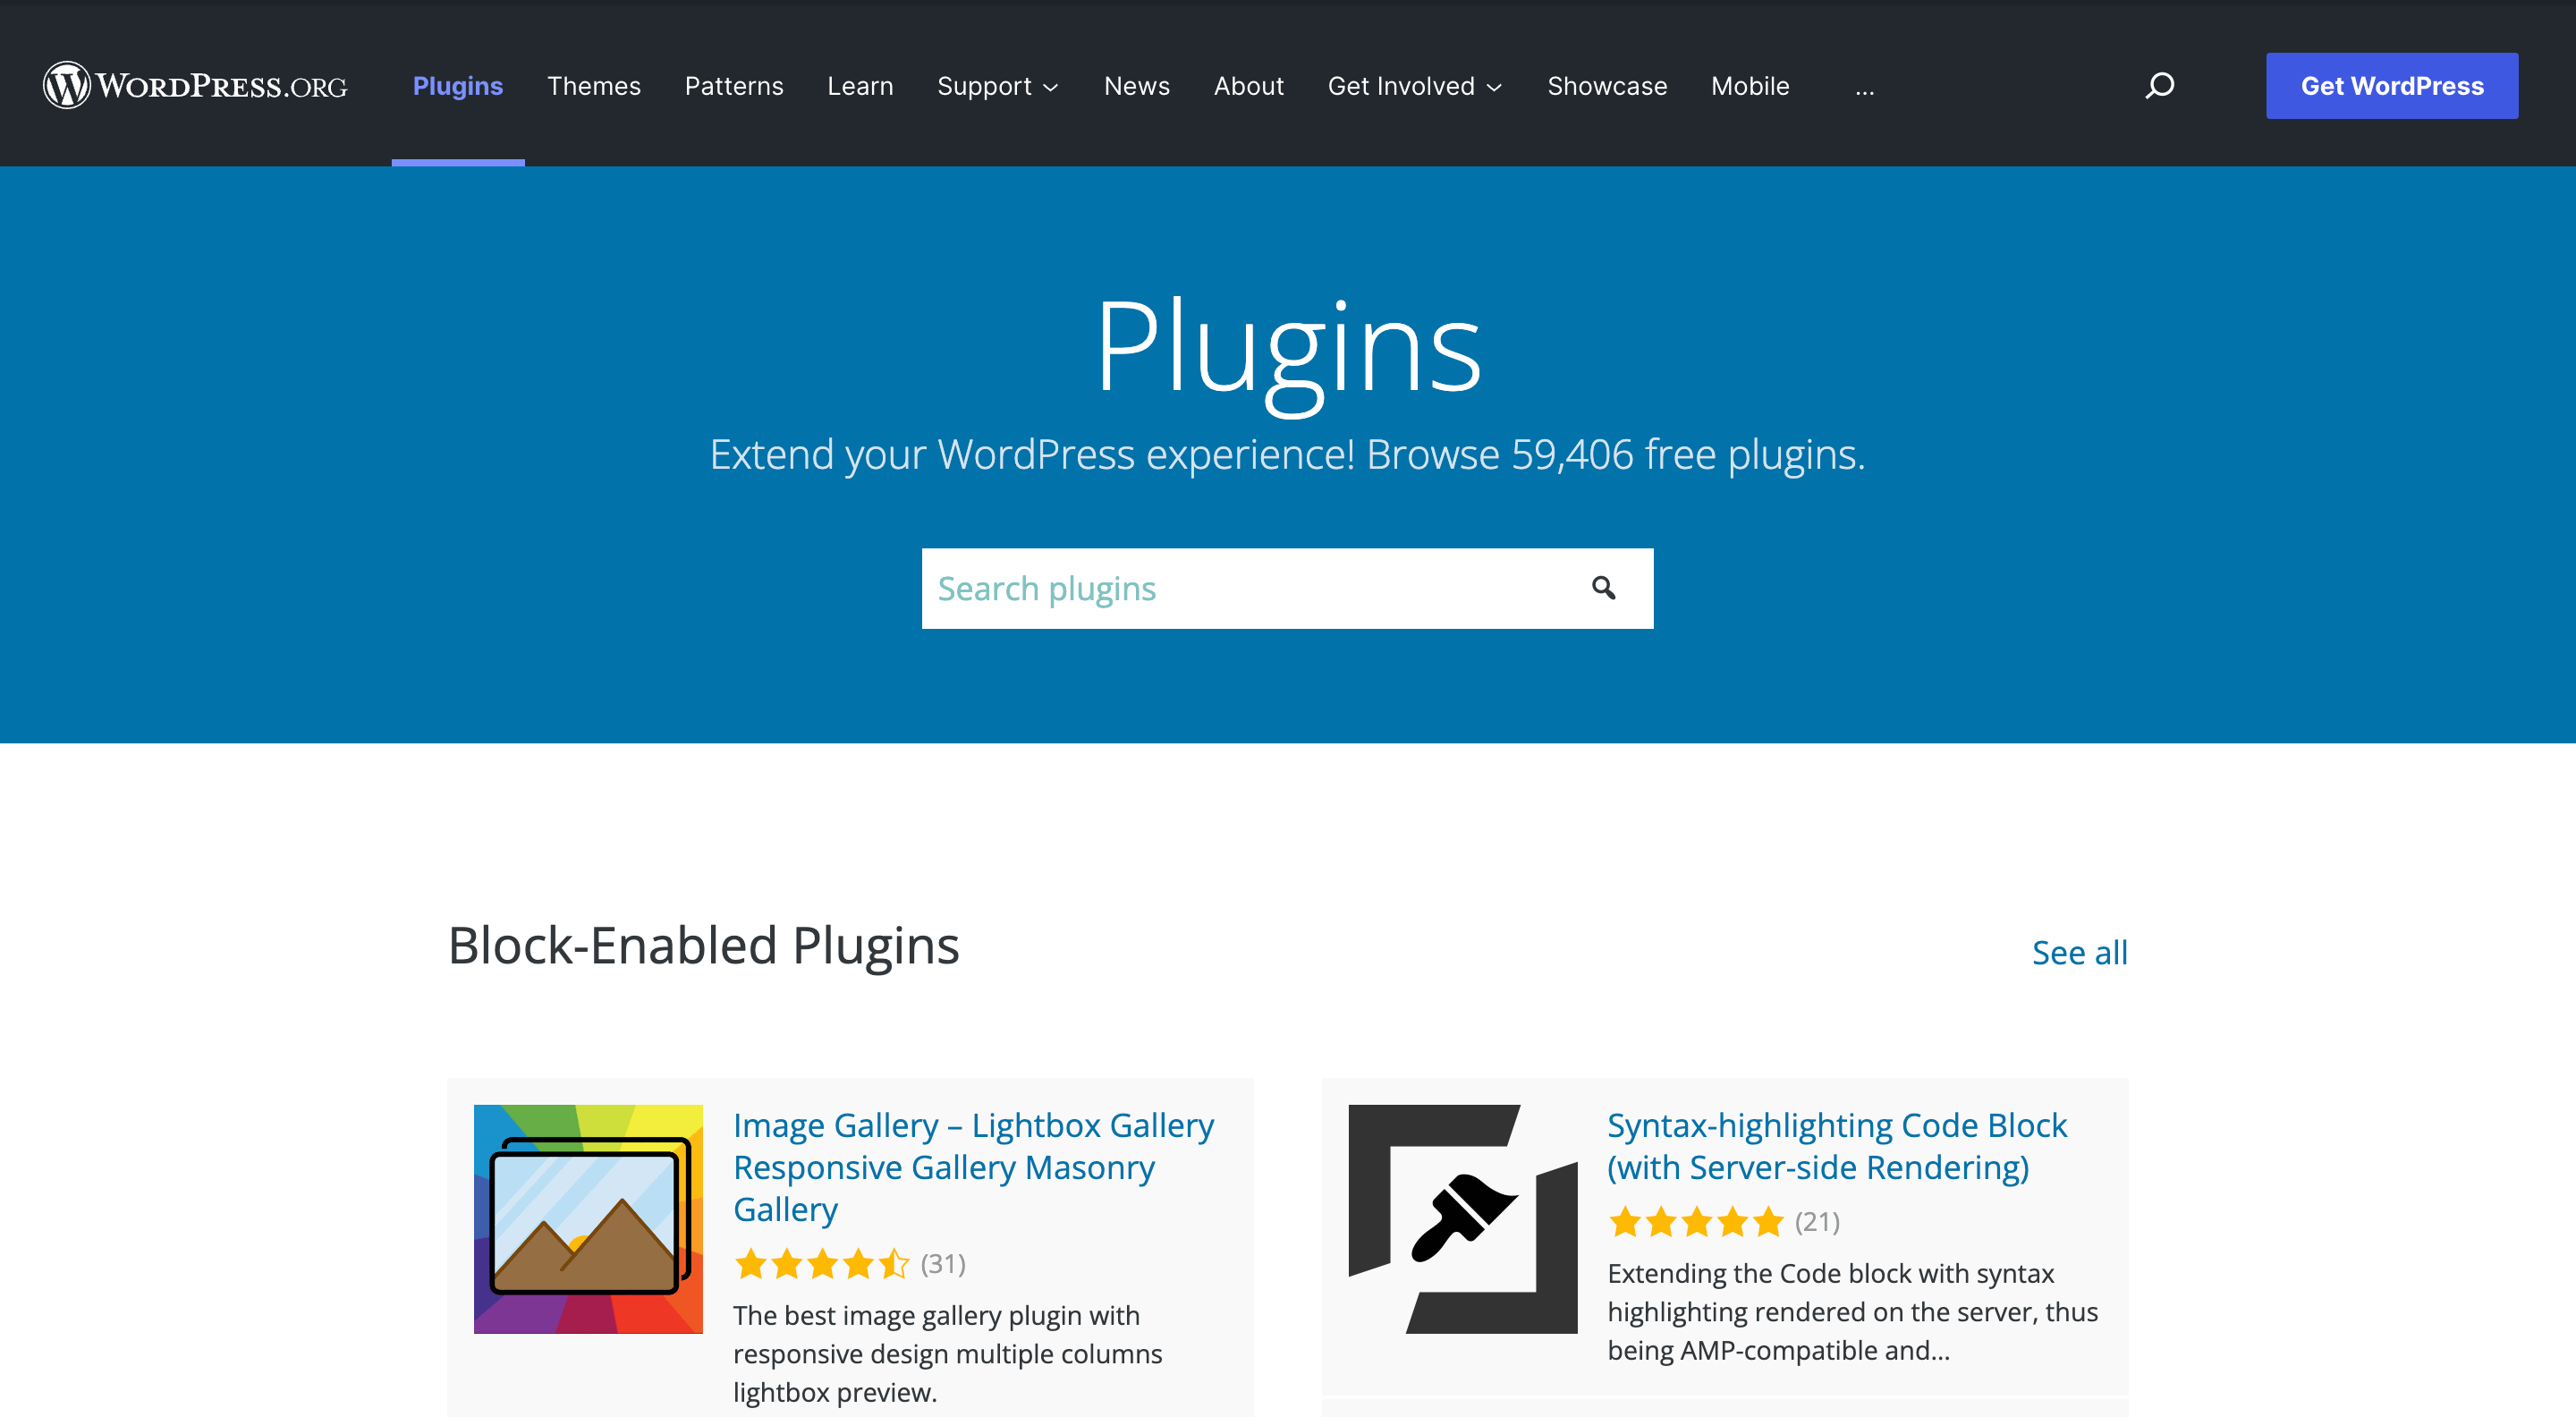
The WordPress plugin directory is one of the most popular places to find WordPress plugins. It’s a great place to start your search because it’s easy to browse, and you can see the most popular plugins.
There are thousands of free plugins available in the WordPress repository, so you’re sure to find one that meets your needs. Plus, if you’re looking for a specific type of plugin, the plugin directory has a handy search feature. And if you can’t find what you’re looking for, you can always install a plugin manually.
2. CodeCanyon
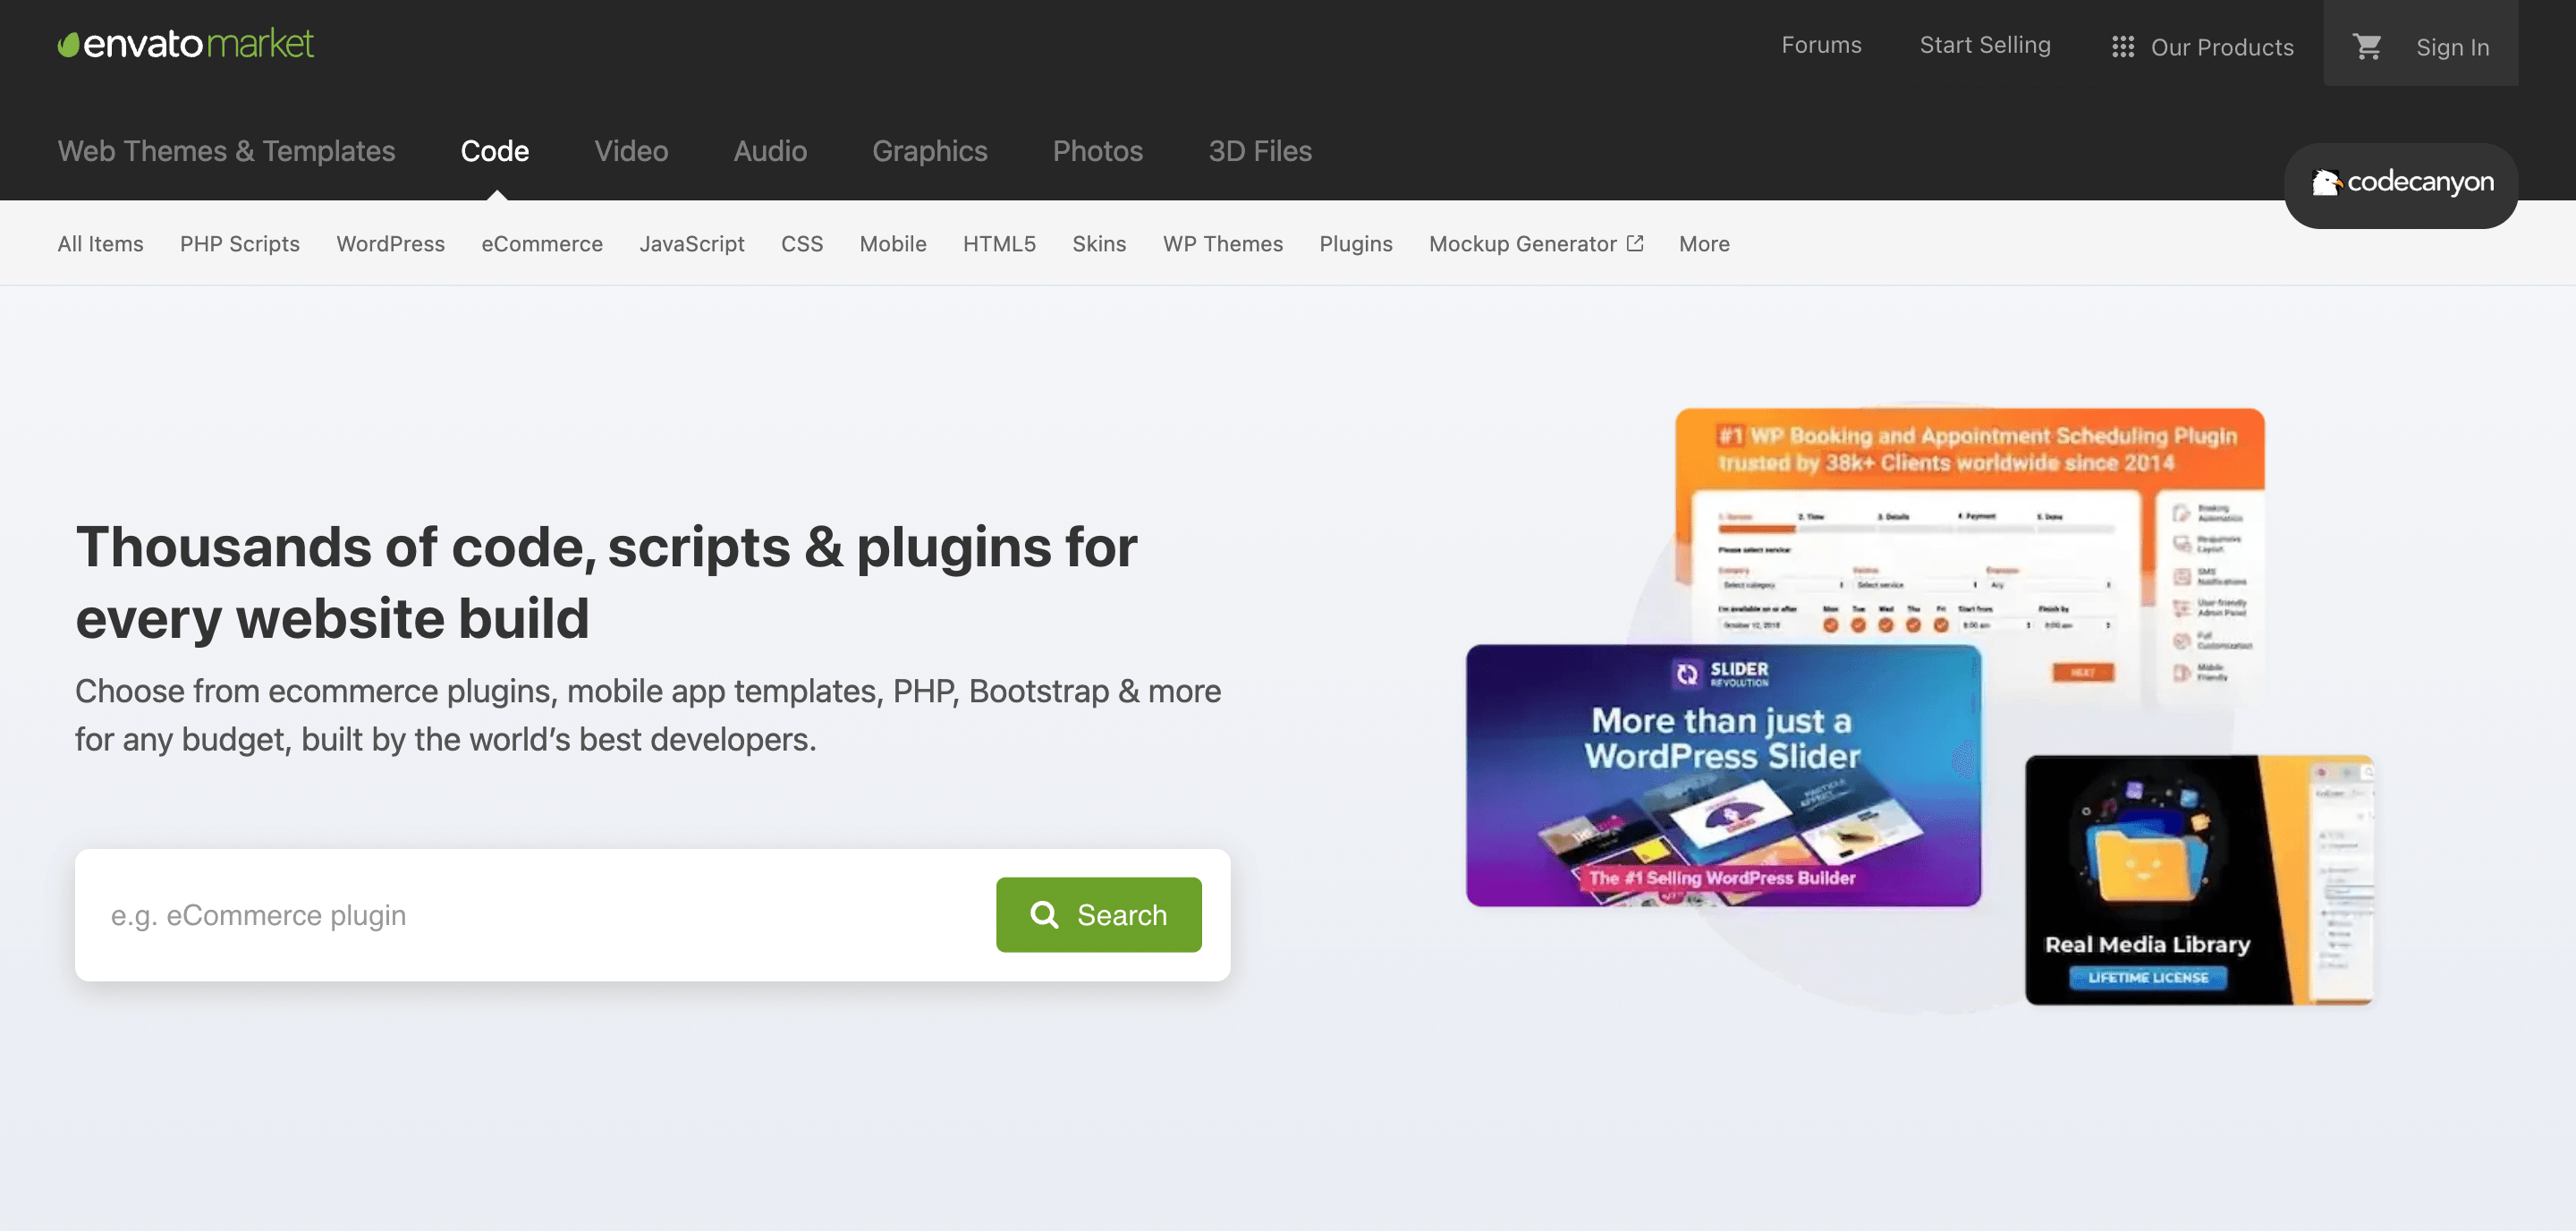
CodeCanyon is a great marketplace for finding WordPress plugins. It’s easy to browse, and you can find a wide variety of plugins, including both free (monthly freebies) and premium options. Prices for premium plugins start at just $6, making CodeCanyon a great option for budget-minded WordPress users.
CodeCanyon is a great place to find plugins for specific needs, such as contact form plugins, eCommerce plugins, and much more. And if you’re looking for a plugin that’s not in the WordPress repository, CodeCanyon is a great place to start your search.
So, if you’re looking for ways to add more features to your WordPress website, be sure to check out CodeCanyon!
3. Envato Elements

Envato Element is another great marketplace for finding WordPress-related stuff. Like CodeCanyon, Envato Elements offers both free and premium plugins. However, with Envato Elements, you can download as many plugins as you want for a single monthly price. This makes it a great option if you need multiple plugins for your website.
The price for Envato Elements starts at just $16 per month, making it a great option for WordPress users who want to install lots of new plugins. Plus, with Envato Elements, you get access to other digital assets like themes, stock photos, fonts, graphics, and more.
So if you’re looking for an all-in-one solution for your WordPress website, be sure to check out Envato Elements.
4. MyThemeShop

MyThemeShop is another great marketplace for finding WordPress themes and plugins. They offer both free and premium options, with prices starting at just $19 for premium plugins. They have a wide variety of plugins available, so you’re sure to find one that fits your needs.
Plus, they’ve developed some of the most popular WordPress themes and plugins, which are even used by us to power our own website. So, if you’re looking for a great place to find WordPress themes and plugins, be sure to check out MyThemeShop!
💡 Keynotes;
You’ll find several other theme marketplaces on the internet for finding the perfect theme for your website.
Recommended Plugins for WordPress Website
There are literally thousands of WordPress plugins available, so it can be tough to choose which ones to install on your website.
Fortunately, we’ve done the hard work for you and put together a list of recommended plugins for WordPress websites.
1. RankMath

RankMath is a must-have SEO plugin for WordPress websites. It’s packed with features that help you optimize your website for better search engine ranking. Plus, it’s free to use!
If you’re serious about getting your website to rank higher in search engines, then you need RankMath. Plus, it’s super easy to use, and you can get started in just a few minutes, and with their premium plugin, you get even more features to help you rank higher in search engines.
2. UpdraftPlus

UpdraftPlus is a great backup plugin for WordPress websites. It helps you easily create backups of your website so you can restore it if something goes wrong. It’s free to use, and it’s super easy to set up, and gives features like automatic backups to Google Drive, Dropbox, Amazon S3, and more.
If you’re not already using a backup plugin, then you need UpdraftPlus. It’s an essential tool for any WordPress site, and even I’m using it to back up my own website.
3. Elementor or Divi

Both elementor and divi are great WordPress plugins that help you create beautiful websites with no coding knowledge. They’re both drag-and-drop builders that make it super easy to create custom pages and posts for your WordPress website.

They both have their pros and cons, but personally, I prefer Elementor because it’s easier to use. However, after the recent price hike of Elementor, I’m not sure if it’s worth the price. As for Divi, it is a paid plugin that costs $89 per year. It has some great features and costs way less than Elementor’s premium version.
In the end, it all boils down to personal preference. If you want an easier-to-use page builder with a slightly steeper learning curve, then go for Elementor. If you don’t mind spending a bit more money upfront for a more powerful page builder, then Divi is the way to go.
4. WP Rocket
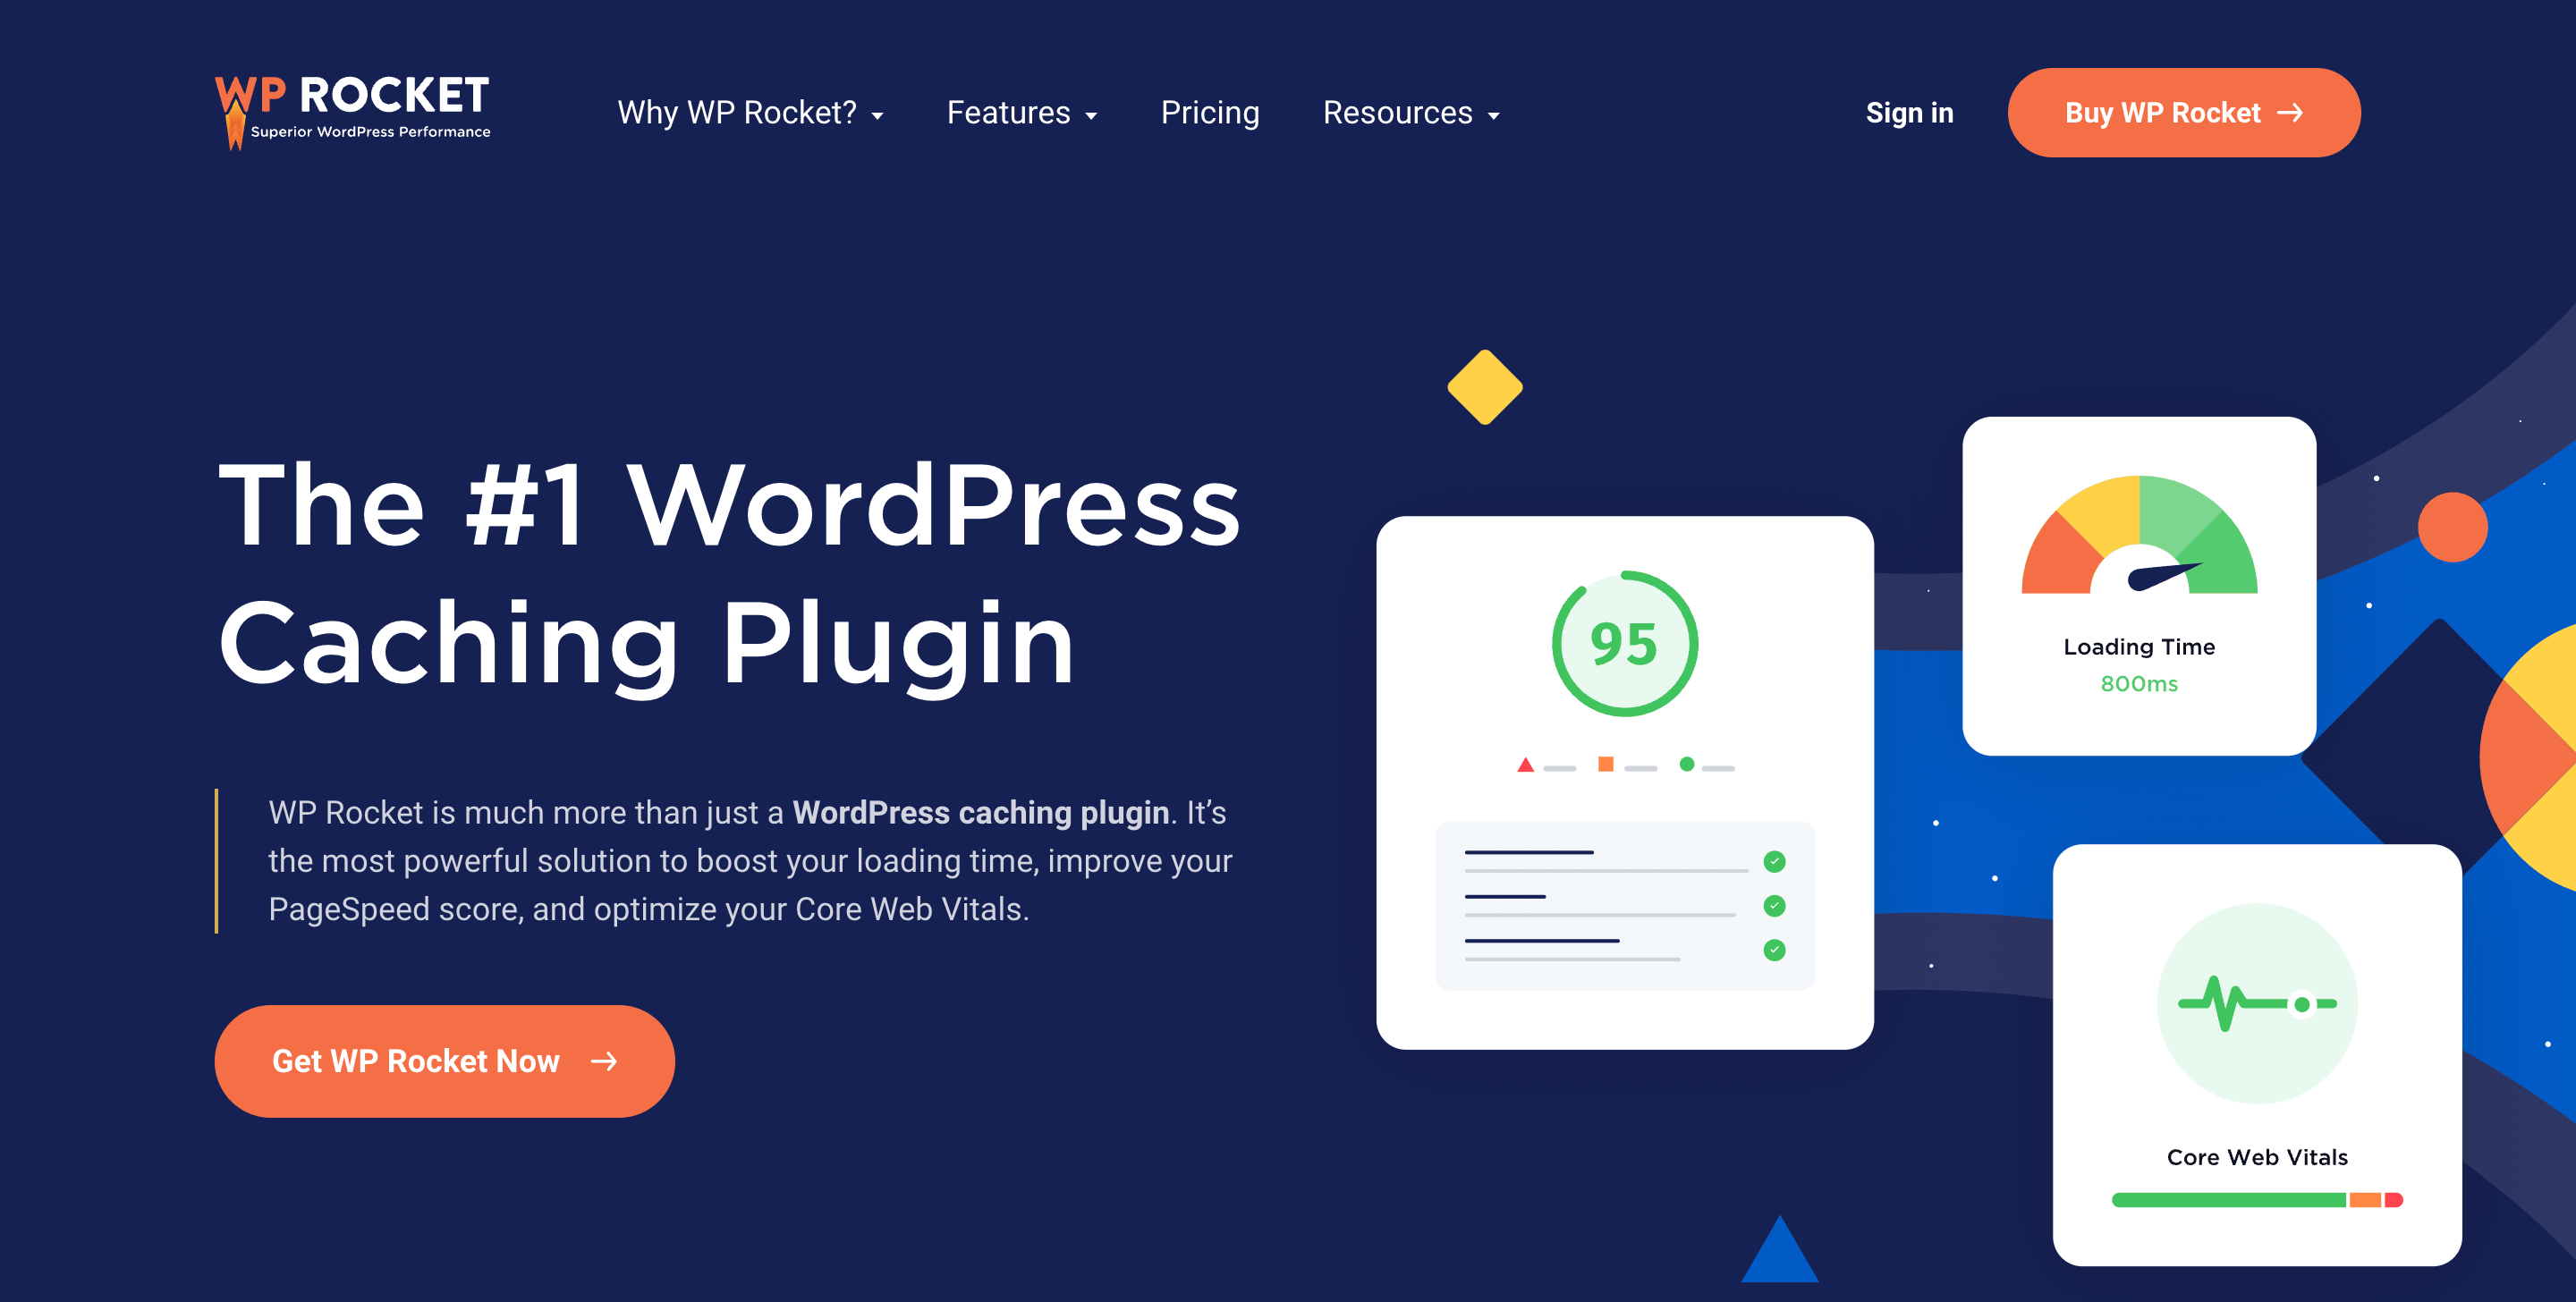
WP Rocket is a great caching plugin for WordPress websites. Caching helps improve your website’s performance by creating static HTML files of your pages and posts and serving those to your visitors instead of dynamic content.
WP Rocket is the best caching plugin on the market, and it’s used by some of the biggest websites in the world. It’s not free, but it’s definitely worth the price. Plus, I’m also using WP Rocket on my own website, and I’m loving it!
5. WooCommerce

WooCommerce is a must-have plugin for WordPress websites that want to sell products or services online. It’s the most popular eCommerce platform on the internet, and it powers over 30% of all online stores.
WooCommerce is super easy to use, and it’s packed with features that help you easily create an online store. Plus, there are tons of plugins and themes available for WooCommerce that help you customize your online store to perfection.
You can also set up WooCommerce to work with popular payment processors like PayPal and Stripe so you can start accepting payments on your website. So, if you’re looking to start an online store, then WooCommerce is the plugin for you.
6. Wordfence

Wordfence is a great security plugin for WordPress websites. It helps you secure your website from hackers and malware. This plugin is available for free from the WordPress directory. Simply search for “Wordfence” in the plugin directory and install it on your WordPress website.
It is a great plugin that I use on my own website. It has helped me secure my website from hackers & malware, and I have never had any issues with it. Plus, it is always being updated so you can be sure that they always protect your website against the latest security threats like Mikkiload virus.
7. MonsterInsights

MonsterInsights is the best Google Analytics plugin for WordPress. It helps you easily connect your WordPress site with Google Analytics and collect data about your website traffic. You can then use this data to improve your site and make it more successful.
It is a freemium-based plugin, and the paid plugin is definitely worth the price. I’m using it on my own website, and I love it. It’s super easy to use, and it has helped me collect a ton of useful data about my website traffic. Plus, it comes with a 14-day money-back guarantee so you can try it out risk-free. So, if you’re looking for a Google Analytics plugin for WordPress, then I highly recommend MonsterInsights.
8. Link Whisper

Link Whisper is a newly released plugin that helps you easily add internal links to your WordPress website. It’s a great plugin that I’m currently using on my own website, and I’m loving it.
When I first installed it, I was a bit hesitant because I wasn’t sure how well it would work. But, after using it for a few weeks, I can say that it’s a great plugin, and it definitely does what it promises.
It’s super easy to use, and it has helped me add internal links to my website quickly and easily. So, I highly recommend it if you’re looking for a plugin to help you add internal links to your WordPress website.
Frequently Asked Questions (FAQs)
Still, have doubts?
Here are some of the frequently asked questions (FAQs) that can help you understand more about WordPress plugins.
How Do Plugins Work on WordPress?
WordPress plugins are pieces of code that extend the functionality of your WordPress website. They add new features and functionalities to your website, and they can be either free or paid.
You can install plugins (some extra lines of codes) on your WordPress website from the plugin directory, and you can also find plugins for sale on third-party websites. Once you install a plugin on your WordPress website, you can activate it and start using it right away.
How Can I Make a WordPress Plugin from Scratch?
Making a WordPress plugin from scratch is not as difficult as it sounds. In fact, it’s quite easy if you have some basic coding knowledge.
All you need to do is create a new folder and add a PHP file having the same name of the plugin. Then, you need to add some code to this file and save it. After that, you can upload this file to your WordPress website, and you’re done!
Can I Install WordPress Plugins for Free on My Website?
Yes, you can install WordPress plugins for free on your website. In fact, there are thousands of free plugins available in the WordPress repository.
All you need to do is search for the plugin you want in the plugin directory and then install it on your WordPress website. Once you activate the plugin, you can start using it right away.
Wrapping Up!
Plugins are one of the most important aspects of WordPress and you can use them to add new features and functionalities to your WordPress website. They’re easy to install, and there are plugins available for just about everything you can think of.
In this post, we’ve shown you how to add a plugin to your WordPress site. We’ve also shared some of the best plugins which you can use on your WordPress website. So, whether you’re looking to add social media buttons, a contact form, or just want to display some basic visitor information, be sure to check out WordPress plugins!
And if you have any questions or queries, feel free to ask in the comments section below. We would be happy to help you out!

