
Everyone wants their website to be translated into multiple languages – but most of the time, either they don’t have any idea on how to do it, or maybe they lack the financial goal to meet the needs of writing content in different languages.
Targeting international languages can help your audience reach your services more easily and efficiently with less SEO. And as you know, every person likes to communicate in their own language, it’s an old marketing tactic, and it gives them the freedom to express themselves more efficiently.
However, the only limitation here is that writing blogs/services/homepages in multiple languages can be a huge task, and it may cost a whole lot to your pocket. That’s where AI comes into play.
In this article, I’ll share a step-by-step guide on creating a multilingual site in WordPress, so it will not be a burden to your pocket.
So, let’s get started…
What is Multilingual Site
A multilingual website is the one on which content is present in more than one language. One can create a multilingual site manually or automatically.
Points to consider while choosing between creating a site manually or automatically are:
- Accuracy – Translation programs may or may not always give correct results. A human translator understands language nuances better and can create more understandable content.
- Budget – Hiring a professional translator can be expensive, especially for translating into less common languages. Using translation programs can be cheaper since you have to pay based on only the number of words you want to translate.
So, in my view, if your budget is low, then you should go for translation programs. Moreover, I feel using AI is more economical, pocket-friendly, less time consuming, and also saves a lot of energy.
Why Need to Turn Your Website Multilingual?
Our world includes seven continents, having a large number of countries that go beyond 200 with different types of people, who all are connected to each other through the medium of the INTERNET. And as stated earlier, it’s an old tactic to make friends and sell our services to them in their own language rather than using popularly used language like English.
So, when we already know that to buy people’s confidence, we need to have a multilingual site, then what are we waiting for? Therefore, here in this section, I have listed several benefits of having a multilingual site for your website.
- Increase in Site Traffic: It is one of the most important factors to have a multilingual site. If our website is present in different languages, then it will attract a larger number of audience from around the world. Language plays an important role in UX design as it helps users understand text and interact with visual elements easily.
- Improved SEO and Search Visibility: This is another important factor. When the content of our website is present in different languages, then it is easy to rank our website. In simple terms, consider your website to present only in English, and if someone is searching with the keyword in Spanish, then what will happen?
You don’t need to run your horses; I am here to tell you. The search engine will show the results of websites in Spanish. It doesn’t matter if your content is better than others; it will not get ranked if you don’t have that keyword on your website. I hope this example helped you to clear up your confusion. - Increase in Conversion and Revenue: Multilingual sites are a great way to increase conversion and revenue. If you have a product with global targeting, you can create a multilingual website that serves people in different regions.
…and many more. So having a multilingual website can really help you in the long run. It provides you with different advantages, as I mentioned above, including competitive advantage, enhancing the user experience, increasing sales, and building a trusted brand.
How to Create a Multilingual Website in WordPress
Now, after knowing all the benefits of having a multilingual site, you might be wondering how you will write the content of your website in so many languages. But you don’t need to worry. I am here to rescue you!
There are various online WordPress translation plugins that you can use to create a WordPress site with multiple languages. Another one of the easiest and simplest ways is to add a WordPress plugin and install it for the translation of the content.
There are a large number of plugins, such as Polylang, Weglot, WPML, and Google Language Translator, which WordPress supports. But today, we will learn about the AI translation plugin Linguise, which is easy to use.
So let’s get started!
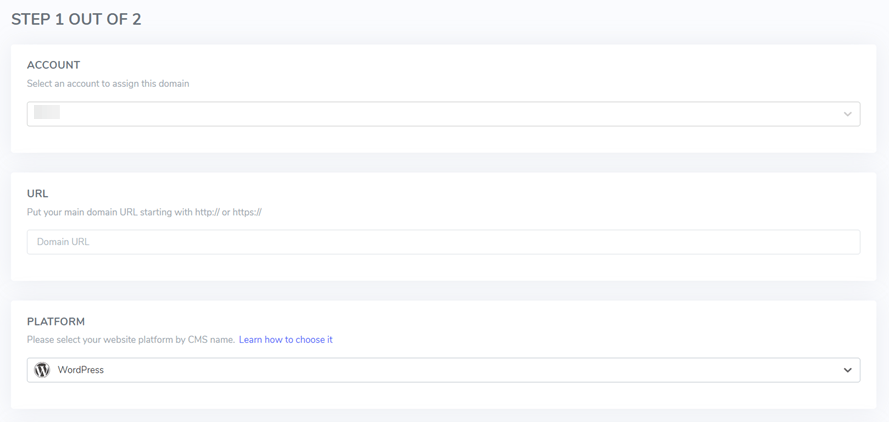
Step 1: Register Linguise Account
The first step is to create and register for a Linguise Account by entering your email and name. After that, add your site domain and other required details.
- For the account section, you need to add your Linguise account credentials.
- Then, in the URL section, add your website URL.
- Further, you will see the option of Platform; here you have to select WordPress.
- Now, add the primary language of your website.
- In the next step, add the languages you want to add for translation in the Translation Language segment.
- At last, you will see a option of Translate the URL, and below it an option of Yes or No. Click on Yes.
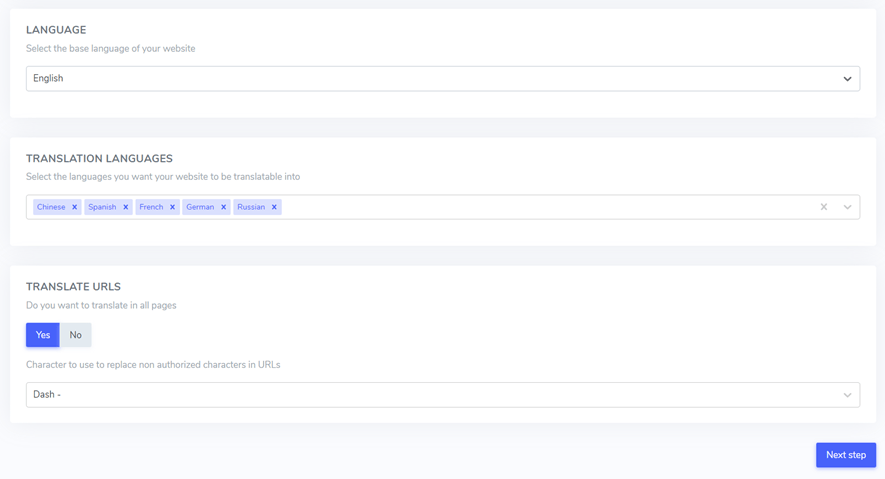
After filling in all the credentials, click on the Next step, and you are done with the first step.
On the next page, you will see there is an API key which you need to “copy to clipboard”, as you will require it in the next steps.

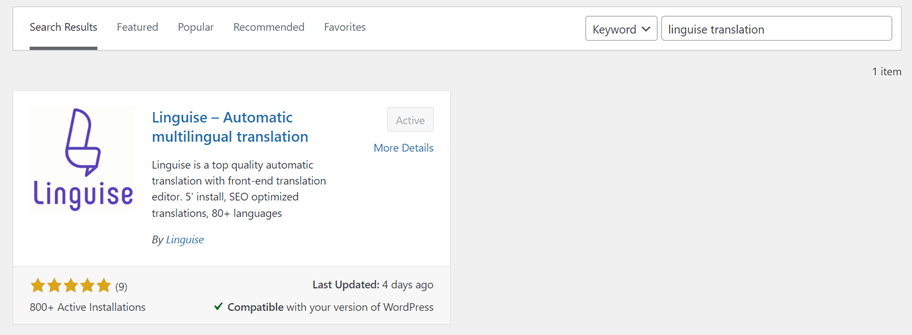
Step 2: Install Linguise AI Plugin on WordPress
After completing the first step, you need to install the Linguise AI plugin on WordPress. For this step, first go to the WordPress dashboard and follow these steps.
- Open the Plugin menu.
- Click on Add New.
- Search for Linguise and select it.
- Then, Install and Activate it.
Step 3: Enable the API key
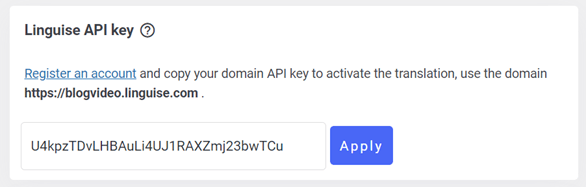
After installing the Linguise plugin, for the third step, open the Linguise Menu in the left navigation bar, and a display, as shown in the image will appear.
Here, you will see a box for the Linguise API key; paste the API key here in the box that you copied in the previous step. After pasting, click on Apply.
Now, your website is integrated with Linguise and can be translated into your selected languages immediately.
Step 4: Customize Language Switcher
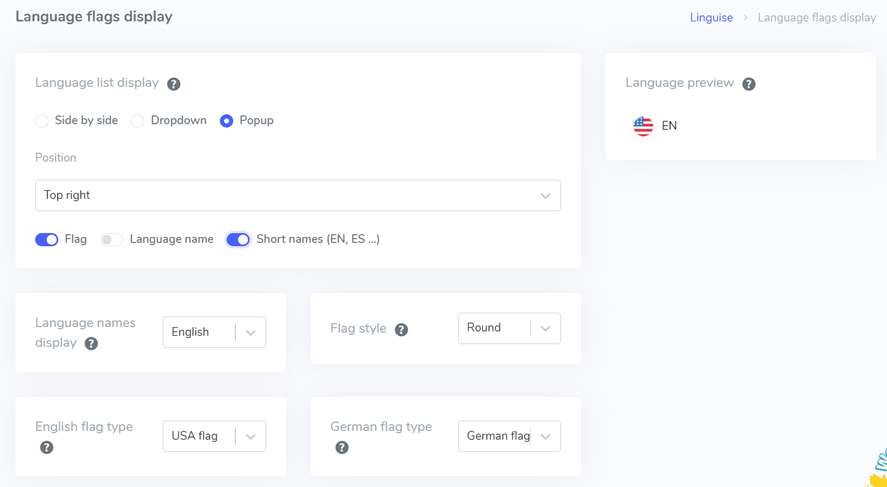
After completing the third step, we need to customize the language switcher button. We can do this either using WordPress or the Linguise dashboard. Here, I will tell you how you can do it with the Linguise dashboard.
On the dashboard, click on Settings and then go to the Language Flags Display option. After this, a display, like the following image, will appear. Here, you can see various options and set the list of language displays, positions, icons to be used, and flags and names, flags only, or names only, either short names or language names.
You also have one more option, in which you can select the language name using the native language. For example, French or Francais. After that, click on the preview button.
Now, the time has arrived to see the result of our settings. If you have followed all steps carefully, you’ll now see a dashboard similar to the one you can see in the image above.

Step 5: Try Translating the Website
After customizing the language switcher, let’s try to switch between two languages and see if it’s working or not. As you can see in the image below, our website uses English as a default language and now, we’ll try to translate it into Japanese.
For translation we need to click on the language switch button shown on the top-right side of the screen. Once clicked, it will show different languages, select Japanese from there.
After selecting Japanese, you will see everything on the page will be converted into Japanese language in a matter of a few seconds.
Step 6: Review the Translation Using a Live Editor
The Linguise AI plugin can automatically translate text, but it also lets you manually translate using the live editor feature. With this feature, you can check the translations done by the machine. To use this feature, go to the dashboard and click on the “Live Editor” menu. From here, you need to select the language for your website.
You can then select the specific part you want to edit in the translation. In the column for Japanese translation, type in the Japanese translation which you think is more appropriate. If it’s correct, then click on “Save”.
See how simple it is to create a multilingual website using a WordPress plugin.
Tips for Creating Multilingual WordPress
When creating a multilingual website, there are a few things you need to keep in mind. Here are a few.
- Consider cultural differences: The meaning of a sentence or slang can be totally different in another language. So, try avoiding such slang or phrases in your content to avoid any future conflict.
- By selecting specific languages: Don’t try to create a website in every possible language because that will only waste your company’s resources. First, you need to identify the audience. For example, if your website is natively in English but you see lots of Spanish traffic, then we recommend adding Spanish to your website along with other languages.
- By implementing herflang tags: To help search engines understand the languages and regions your website targets, you can try implementing hreflang tags in your HTML. These tags tell search engines which language and location each page is meant for. This way, search engines can better catch the linguistic variations in your content and will show the right page to the right audience.
These are the additional tips that can be kept in mind while adopting a multilingual website. I hope you found this bonus section helpful.
Conclusion
As you know, having a multilingual website is one of the best ways to expand your business globally. Plus, it will attract lots of targeted traffic, which further enhances your SEO efforts. You can create a multilingual website manually or using AI plugins.
For creating a multilingual site using an AI plugin, you can follow the above mentioned steps, I hope this article has helped you find the right solution for your needs, and if it does, please let us know in the comment section below.
And that’s all from my side, I hope you liked it. Thank you for being a wonderful reader.
